Showing posts with label Polaroid Frames. Show all posts

Friday, April 29, 2022

Odis P. - Created by Emma Zappone - BONUS VIDEO

 Please meet Odis, he is the sweetest of them all.
Gentle and kind, Odis only wants what is best for all of earths creatures.


Check out the beautiful chippy I chose this week.....

Grid Panel
Polaroid Frames
Steampunk Element set1


So this page was inspired by another one of Lisa Aisato's art works off Pinterest. I loved that Odis looks so tranquil and yet boyishly dishevelled. His name came about by some Tim Holtz stickers I had in my stash. And so the page took form. I have a video for you today also, so you can see the story unfold.
Plus I love the chippy used in this piece, old and new pieces together.


Let's start talking about the finishes on the chipboard. They all were painted with an acrylic paint to start with, except the Polaroid Frame as this also had a little crackle paste on it before painting. I wanted to use muted tones to match the tones in the image. I blended some Distress Oxide inks over the Acrylic to add a chalky, old look to them.


The frame was painted in a darker blue to match the blue hues in the image. Distress Oxides were also blended over the top, especially where the paste was laid. 


Once the paint and the Oxides were added, I added a little dry brushing of Gold acrylic to all the chipboard pieces. This added a little bit of shine, but not impacting the more demure look I wanted on the pieces. I love how this Steampunk Element piece picks up all the light and dark shades.


While I stamped the background papers, I added a little stamping to the chipboard also. This gives just that extra bit of interest and helps tie them to the whole composition.

I would love it if you stopped by and checked out my video here....


Thank you for joining Odis and myself.

Stay crafty everyone.
Em xx


Thursday, June 24, 2021

Memories
by Sabrina Turpin

Hello 2Crafty friends!

I hope everyone is doing great!
Today I'm sharing a layout featuring my two besties in a picture taken back in simpler, pre-pandemic times. I can't wait to meet them again in a few days, as restrictions are being slowly lifted.

"Memories"


For the "Weeping Vine", I used ivory embossing enamel.


On the "Polaroid Frames", I stamped a pattern with some embossing powder and then rubbed some black ink very roughly on top.


For the title, "memories", part of the "Line Words - Goodtimes Borders", I used two coats of jade-teal embossing powder.

I used the following 2Crafty chipboards in this layout:

Weeping Vine [m00648]
Polaroid Frames [m00391]
Line Words - Goodtimes Borders [db0096]


That's all for me today! I hope you enjoyed this layout and that it gave you some inspiration for your creations! I'll be back in a few weeks with more ideas to share with you!


Thursday, November 5, 2020

Memories Of You
A Quick & Easy VIDEO TUTORIAL
By Jenny J.

  Hello 2Crafty fans!

Hope you all are safe and healthy.

Here is a new video tutorial for you along with my new layout.


TO VIEW VIDEO CLICK HERE

For the first time, I've treated my title piece, "Memories of you" with deco foil.
I've simply prepped my chippie with Tombow glue and let it dry a bit.
When it was still sticky, I've pressed my foil on with my fingers and my bone folder.

Really love that bright shinny look :)


On my picture, you will see a "Polaroid frame".
That one is treated with gesso and distress stain.
On the edges, I've applied distress ink to give some depth.
You can see that below, at the left of the "Leafy silhouette".


All those foliage pieces are heat embossed with a glittery gold powder.


A lovely piece that I used here is "Stitched lace border".
That chipboard is also embossed with a deep emerald green powder.


Hope you will like my layout!

Thanks for stopping by!
xxx


Monday, June 8, 2020

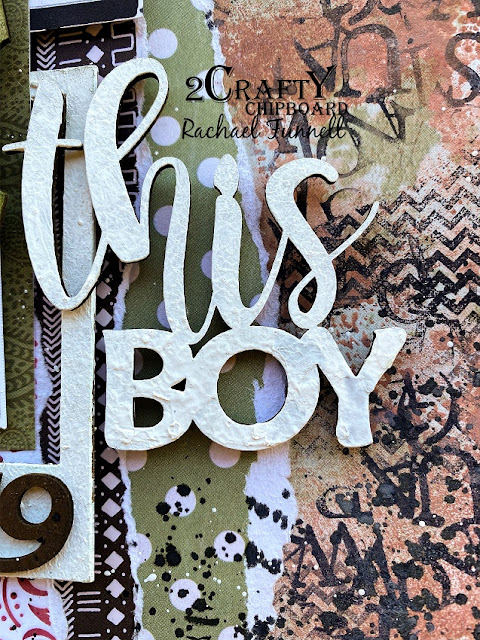
'This Boy' layout
by Rachael Funnell


Hello there everyone!
Rach here with you today sharing another layout
'This Boy'


 Some FABULOUS 2 Crafty Chipboard that I used...


Squiggly strips
2019
This boy (title)
Polaroid frame
the negative piece from the chain circle frame set


For the 'This BOY' title
I  gave it 2 coats of gesso..
Also did the same to the Polaroid frame
I have sitting out the right side of the photo.. 


One of my all time favorites 2 Crafty chipboard pieces
is the year dates, I tend to gravitate to
them everytime I am creating a page...

Here I have used a 2019 & inked with brown 
and adhering it to the polaroid frame


Another thing I tend to do is incorporate the leftover/negative
bits and here I have used a leftover piece from the 
chain circle frame set Inking it green and adhering it, 
which I think makes a great frame...


Lastly the awesome Squiggly strips
were heat embossed these with
Nuro Crimson gloss...


That's it from me today!
Until next time
Happy Crafting peeps!


Sunday, October 6, 2019

"Friends" by Tammy Klingner

Hi there creative souls.
Tam here today to share my latest design.......

"Friends"

For this layout, I wanted to steer away from my usual bright colours,
and have a go at using a more pastel colour palette.


I used the following 2Crafty Chipboard:

*NEW* "6" Floral Cluster Border"
"Lattice Leaves"
"Friends Loopy Font Title"
"Mini Branches"
"Polaroid Frames"


I firstly coated ALL pieces with white gesso.

I absolutely LOVE that NEW 6"Floral Cluster Border.
I couldn't wait to use it.
I coloured each flower individually with watercolour paint.
Once dry I added a few simple pen marks.


I just love the mottled look this technique creates.
Soft and lovely.

I did the same to the "Mini Branches"
I love the effect of the pen marks.
It gives them an arty/whimsical feel.


The "Polaroid Frame" was painted with a grey/silver watercolour 
and then swiped with white gesso.


I simply added white paint to the "Friends Loopy Title" and the "Lattice Leaves".
I wanted that fresh simplicity!


There you are, I hope you like this one.
It was fun to try something a little different.


I'll see you again soon.
You can find me on my BLOG.


Wednesday, March 20, 2019

Love Canvas - By Karan Gerber

"Love Canvas"
by Karan Gerber

Hi Friends and welcome  2 Crafty blog today.
 Its Karan here to host the blog for you and I have a mixed media project to share.


I started with a 6x8 canvas, I primed with Gesso, added some texture paste and then baked embossing powders from Seth Apter manufactured by Emerald Creek Craft Supplies right here in Canada.
 I love them, I have mixed some of the first line and some of the newest colors on this project.


This little project will be perfect for the new couple too add to a photo stand and they can remember the moments captured in this beautiful photo. 
......
The clock Face I embossed with clear embossing ink and used Emerald Creek Taos Sunset baked embossing powder, its so gorgeous in real life, it makes that chipboard look like real metal. I also did the same to one of the Doilies 


The photo frame:  I applied a coast of clear embossing ink and went over with desert sand baked embossing powder and while heating dropped a bit of ancient amber

I added in a couple sprigs of the Leafy Twig Branches in under the flowers just to add a bit of greenery.


 I used the "Love" title from the fine word set 1, and i just inked this with vintage photo distress ink and dabbed a bit of vintage gold wax. 


I also used Tahnyas 6 Inch border and just heat embossed it with white embossing powder, I attached it to the Polaroid Frame, its so finely detailed I just love it and I didn't want to hide the detail. 

Thank you for dropping by the 2Crafty Blog today I hope you enjoyed by project

2 Crafty Materials Used:


Thursday, December 13, 2018

'2Crafty Christmas Tags' By Elisa Ablett


Merry Christmas 2Crafty fans,

Elisa here from the design team with the first of my December inspiration for you, three very different and unique Christmas mixed media tags.

Here are the 2Crafty Chipboard Products used in the tags;


 Products List:

Presents
Sparrows and Branch
Polaroid frames
Tags
Brushstroke Tree
ATC Mini Hearts
Mini Houses
Linear Snowflakes
Circle Stack
Mini Christmas Word Set 1

🎅🎅🎅🎅🎅🎅🎅🎅🎅🎅🎅🎅🎅🎅🎅🎅

Let's take a closer look at each tag!


'Christmas Wonderland'

Create a Christmas snow globe on a tag, by cutting circle chipboard, heat embossing with silver embossing powder and adding small Christmas themed chipboard to your globe 
and Snowtex by DecoArt for a textured snow like look!

I heat embossed the delicate Linear Snowflakes with white glitter 
embossing powder to co-ordinate with the snow and winter scene. 


'Rejoice' 

Use small chipboard Polaroid frames to frame and draw attention to 
cut out elements like felt Poinsettia's and foam berries. 

I converted the 'sparrow on a branch' to a Christmas theme by sticking with the 
co-coordinating colours plus cutting Christmas paper to use as a wing on the bird. 

Heat emboss your small title with brilliant white embossing powder 
and add some lace and wood fibres for texture.


'Santa' 

Cover your tag with Christmas themed paper and sand the edges. 
Then ink around the edges to create a black grungy look.

Heat emboss your Chipboard Tree with metallic green embossing powder, 
then wrap the tree in black wire, making sure it lays fairly flat. 
Colour small ATC chipboard hearts or stars with gold glitter pen or 
paint pen and attach to the wire as though they are baubles. 

Add finishing touches like a hand painted present and title and red thread!


Well that's it from me today, 
thank you so much for stopping by the blog.

I hope all your Christmas and holiday preparations are going well!

Hugs.

Elisa xx