Showing posts with label harlequin clumps. Show all posts

Thursday, February 19, 2026

Attitude - Laura Gilhuly

 Hi everyone!
I am back today to share another masculine mixed media layout


2Crafty Products used:


Banners Flags
Chevron Bits
Word Circle Set 2
Steampunk Element Set 1
Steampunk Arrow Set 2
Scribble Circles
Harlequin Clumps


After prepping the chipboard with white gesso I applied rangers distress mica stain in
 Winter Frost to most of the chipboard.


I allowed it to dry naturally then layered Dylusions Black and Ranger Distress Stain in
Lost Shadow and also allowed to dry naturally. 
 When completely dry I applied some Ranger vintage photo distress ink over it and black ink to the edges.


I used the same Vintage Photo ink on the title!


Thanks for stopping by


Thursday, September 11, 2025

Enjoy The Journey - Laura Gilhuly

 Hi everyone!


Back today to share a layout I created of our oldest sons purchase of a 1977 Corvette.


2Crafty Products used:


Mini Chunky bits
Grungy Splatter Bits
Harlequin clumps
Brick Panel
Frame Chained Circle
Enjoy The Journey
Mini Numbers Panel
Steampunk Chain Clock Cluster


I always begin by prepping my chipboard with gesso - either clear or white


I then begin spraying different shades of grey and bit of black mists to create the effect I wanted.


I inked the pieces with black ink on the outside so when I layered all the pieces there was
still definition of each piece.

I had added some red tickets from my stash to coordinate with the cars red interior and wanted
the title to stand out a bit so I inked it with lumberjack plaid ink and embossing powder.


Thanks for stopping by


Tuesday, July 22, 2025

Memories - Laura Gilhuly

 Hi everyone!
I am back to share my next layout! 
A masculine layout I created of my husband, stepson and friend working on Sebastian's motor.


2Crafty Products used;


Harlequin Clumps
Line Words Good Times
Grungy Splatter Bits
Mini Checkerboard Bits
Steampunk Gears Small
Steampunk Gears Medium
Steampunk Gear Border
Hanging Steampunk Lightbulb Set


I covered all of the chipboard pieces with texture paste then I began painting, misting and inking each piece


I used pumpkin impasto paint first then added some blue brusho powder and Lindy's cattail brown mist.  I wanted each piece to be different.


To highlight the texture on each chipboard piece I dry brushed white paint and then added some art stones that I dyed to match.


I wanted the title to stand out from grungy background and to accomplish that I painted a few coats of the pumpkin impasto paint then heat embossed it with orange embossing powder.


Thanks for stopping  by


Tuesday, May 13, 2025

Good Times - Laura Gilhuly

 Hi everyone!

Creating simple and multi photo layouts are a great way to record fun memories with friends!  


2Crafty Products Used;


Seaweed Set 1
Line Words - Good Times
Harlequin Clumps
Anchor and Buoy Set
Seashells Set 2
Banners Flags


We had such a good time that day so the title piece was perfect!  I inked and heat embossed the title!


After inking the seashells I added a bit of copper paint


The anchor and wheel were perfect accents for a layout about spending the day on the water


I wanted to keep the layout fun and watery so when I painted the banners and used dimensional paint!


thanks for stopping by


Tuesday, March 31, 2020

Live Your Dream with Emma

Hi Everyone, Emma with you all.
I hope everyone is doing ok and are safe in this unusual time.
Today I hope I can inspire and help take your mind off the outside world for just a small time.
I really enjoy Steampunk themes and so today's layout is a 'pretty' version of that, using awesome chipboard to compliment the theme.


Chipboard used:

Harlequin Clumps
Decorative Dangling Bits Set1
Steampunk Cog Strips
Fancy Clock Hand Set2


The perfect choice for this theme!


Most of the chipboard is painted white and then coated with 3 different emboss powders.
A chunky Pink one and a smooth shiny pink one, mixed with a smooth silver. And I love how the soft pink looks against the green, they really compliment each other.


The Harlequin clump I coated with a distress oxide and then I clear embossed.


I just love the Fancy Clock Hands so much, will need to add these to my stash so I never run out. They are perfect with any layout but I love how they look on this one especially.

I hope this has been a small distraction and inspires you to have a play in your scrap room at some stage.

 Stay safe everyone and I will see you all very soon.

Emma xx


Tuesday, August 7, 2018

"Escape" - Em's August share

Hi 2Crafty friends, 
Emma here today to share my first creation for the month of August.
I used 4 different pieces of chipboard for this creation.


And here is how I used them......


I had fun getting a little messy with this one. Letting the ink drip down my page
and seeing the different shades of colour come through the distress oxide.

My chipboard elements were simply 'inked' with distress oxides and then
sprayed with a resist spray to get a different finish on them.


The 'escape' title piece I left just inked with no other finish on it.


 Same with the Tiny frame, I left it inked only. I love these frames, I chose to
 cut this one in half to use in 2 places rather then use them as a frame in full.


 If you look closely you can see the dots the resist spray creates on the chippy.
 I love the slight grunge feel it gives, plus a slight sheen too.

I hope the colours and chippy inspires you to create and I will see you later in
 the month with another share showcasing the epic 2crafty chippy.

Em xx


Monday, May 7, 2018

Your life is a Story - with Emma


Hello, hello all 2Crafty Peeps!!
I’m so excited to be designing and playing along with this awesome team! 
Also to share and hopefully inspire you, but also be inspired by all of you. 
For my first share I have created a masculine page using lots of 2Crafty chippie. 


I’ve used these pieces of 2Crafty chipboard on my page:


I wanted my page to be a bit of fun as my boys were pulling the best faces.
I started with applying Gesso straight onto my background, and then I chose 
my colours, which became, Gold, yellows and a splash of green.


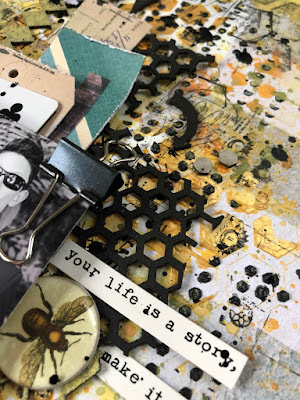
Because I had chosen the awesome hexagon chipboard which I inked in black, 
I chose a hexagon stencil, 2 sizes, one I used Gold texture paste and the other in Black ink.
Then with my Distress Oxides I smooshed, yep smooshed the colour all over the 
stencils and gesso. Then I went over that with my Stamps.
The Harlequin Chippie was inked in black then embossed over it in a
 distressed gold to give a different texture from the rest of the page.


For my layers I went deep into my stash and used up scrap pieces.
This included tags, off cuts and cards. I love doing this as it makes each page feel unique.
I very rarely use a full range but choose elements from a few different ones and make
 them work together.
The arrows were also coated in black ink to really pop from the page
 as these were a major embellishment element.


Finally as my Finale I flicked artists ink around my page to bring it all together.

This page makes me smile, and I feel it really speaks my style.
Plus the photo is awesome as my boys were all dressed up and then pulled cracker faces.

I'm so happy to be here and I look forward to sharing
 another layout with you all very soon.
Till then,
Em xx

Saturday, November 11, 2017

Tammy's November Shares

Hello 2Crafties!!
I'm excited to be here today and share my latest creations with you all.
First up I have a layout called:

 'This Boy'


A bright fun layout, celebrating my gorgeous boy and his sweet thoughtful nature.


I used the following 2Crafty Chipboard:
"Triangle Set"
"Harlequin Clumps"
"This Boy Title"


As I'd used a lot of vibrant colour using Dylusions Ink Sprays, I painted some
 of the triangles from the 'Triangle Set' in black paint.
 
I like how the black grounds the bright colours, and helps pull it altogether.

I turned them onto their side to create an arrow look, as this went perfectly 
with one of the background stamps I had used. I love how versatile these triangles are.  
You will find them on lots of my layouts.


I added some 'Harlequin Clumps' around my photo. 
I used Distress Inks in a variety of colours to  colour these.

Layer upon layer.
The colours changes slightly depending on the light - a very cool finish.


I added some flicks of green paint, just to give them a bit of extra oomph and life.


For my title 'This Boy', I created a two tone effect using watercolour paint.
Firstly, I added white gesso and then kept adding watercolour until I was happy with the colour.


I really love the 2Crafty titles, and I especially love these ones with the two different styles of font.


I just love blue and green together - so much for that old saying...
 "blue and green should never be seen".
How wrong they were!!
Teamed with the black and white, they are just perfect for documenting my teen boy.


I just love him to bits.

My second creation is titled

"In the Blink of an Eye"


A layout about my gorgeous daughter, who suddenly doesn't look like my
little girl anymore, who has grown into this amazing woman.

I used the following 2Crafty Chipboard:
"Polaroid Frames"
"Medium Film Strip"
"Tiny Film Strip"
"Handdrawn Flowers"
"In the blink of an Eye title"


As I've used a black background and lots of colour, I coated the 'Medium Film Strips'
  and the 'Tiny Film Strips' in a few coats of white gesso. I love the contrast.


I also did this to the leaves from the 'Handdrawn Flowers'
I just LOVE these, not sure why I haven't discovered them earlier.
I love how they are a silhouette style, and that they can be tucked
in around your layout, without covering up elements on your page.


To get the variegated colours on the flowers from the
'Handdrawn Flowers' pack, I added a few different coats of Distress Ink. 
This gave them a beautiful depth. 
I purposely put the ink on randomly as I wanted them to be
 multi-coloured and have that variegated look.


I added in some 'Polaroid Frames' behind my photo.  I painted these with
white gesso and then inked them with a pink Distress Ink.
The white gesso first makes the colour more vibrant
(and you know how much I LOVE vibrant colour)!!


I added the 'In the Blink of an Eye' title so that it became not just
 my title but part of my journaling too.
I really wanted to bring out the purple that I had created in the background.
I don't have a lot of purple so I created it by adding pink distress ink
and then blue distress ink. Instant purple!! Ta da!


So that's it from me this month, I hope I've inspired you today to get creating.


If you'd like to see more of my work, you can head to my blog HERE.