Showing posts with label 2023's. Show all posts

Thursday, May 1, 2025

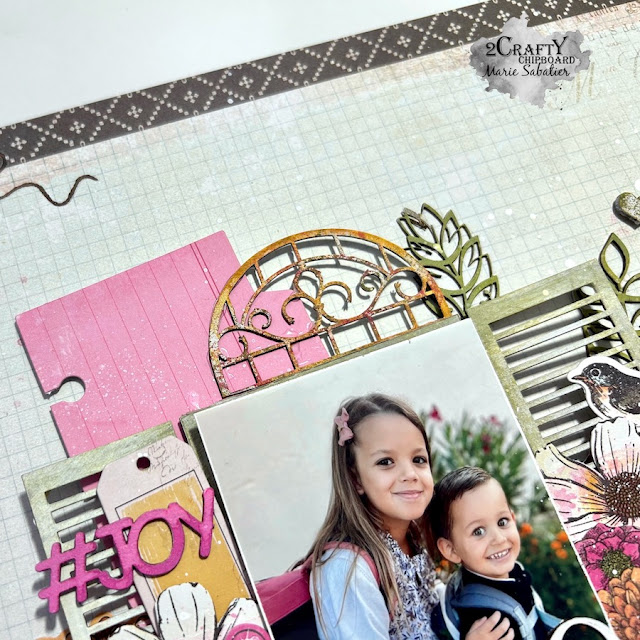
"#JOY"
Layout and tutorial by Marie Sabatier

Hello everyone,

I hope you are all well!
This month of May inspired me to create a floral and colorful spring layout. 
The winter has been long. Welcome to spring.

#JOY


I made a video tutorials that you can watch HERE


The chipboard used:

2023s


To begin, I apply a layer of white gesso.
I used Distress Oxide inks to enhance each chipboard.
I used a "peeled paint" for the "window-shutter-set 1" chipboard. I mixed it with water to obtain a very light shade.
Next, I use the "ironworks-gate" chipboard. I cut it and only use the top half. I keep the other half to use another time. I start with "mustard seed" ​​ink, then add "picked raspberry" and "peeled paint" for a mixed media effect.


I really like this "fine-flower-photo-adornment-set-1" chipboard template.
I'm placing it under my photo.
Then I add 2022 and 2023. This photo was taken on the first day of the 2022-2023 school year.
They are colored with "picked raspberry" ink like #JOY.
And, this beautiful "loopy-heart-swirl", I think it goes well with the flower.


To add more volume to my cluster, I add "leafy silhouettes".


Watching the video is a good way to get more detail.

It's always a pleasure to meet you here!


Thursday, July 4, 2024

Loving These Moments by Tania Ridgwell

Hi there!
Tania joining you today to share the first of my DT projects for July.  I have created a layout.

"Loving These Moments"


2 Crafty Chipboard Used:

*6" Parisian Border
*Circle Dot Frames
*Funky Heart Swirls
*Loving these Moments
*2023's


 I have used the stunning Celebr8 Starry Night Collection to create the base for my layout.  I fussy cut the gorgeous wreath for the focal point of the background page.


I coloured the Funky Hearts Swirls & Parisian Border chippies with Dylusions Black Marble Shimmer Spray.  The Circle Dot Frame, 2023 and Loving These Moments Title chippies were all coloured with Heidi Swapp Blush Color Shine Spray. 


Once I added my photo,  I added lots of paper blooms to the top and bottom of my photo.  I cut the Parisian Border in half and tucked a piece in each side of the flower clusters along the bottom of my photo.  I also cut the Circle Dot Frame in half and tucked a half in the top flower cluster and one in the bottom flower cluster.  I tucked the Funky Heart Swirls in amongst the bottom flower clusters and finished of my page by adding the "Loving These Moments" title and 2023 chippies to my page.


Thats' all from me today, I hope I have inspired you all with my Layout.  Until next time thanks so much for stopping by.
Tania xx

Thursday, April 18, 2024

Love This Memory by Tania Ridgwell

Hi there!

Just popping in today to share the last of my DT projects for April.  I have created a layout.

"Love This Memory"


2 Crafty Chipboard Used:

*Thin Rectangle Stacked Frames
*Aged Film Strip Set
*2023's
*Mini Title Stick Set 5 


I used the gorgeous Mintay Mamarazzi Collection to create the base for my layout. 
 Once I had created my background I set about putting my page together.

I gave the Aged Film Strip Chippies a spray with Kaisercraft Black Mist and once dry I rubbed some Antique Gold Brush Leaf Gold Paint over them.  I painted the largest Rectangle Stacked frame with Antique Gold Brush Leaf Paint and once dry attached it to my photo and added it to the centre of the page.  I added lots of fussy cut elements and flowers along the top and bottom of my photo.  I cut the Aged Film Strip Chippies into pieces and tucked these in amongst the Embellishment clusters.


I finished off my page by adding a Title from the Mini Stick Title Set 5 and the year 2023.
  I left both of these raw.


Thats' all from me today, I hope I have inspired you all with my Layout.

  Until next time thanks so much for stopping by.

Tania xx


Tuesday, March 12, 2024

"My Sunshine August 2023" with Amy Voorthuis

Goodmorning lovely 2Crafty friends, 

I am so happy you are visiting this blog today for this post I made a layout again. 
For this layout I have used tons of amazing chippies and a picture of Abbey on the beach in Greece August 2023. For this layout I have used the pretty new beach paper collection called {the beach is calling} by the other company I design for. I really enjoy working with all the pretty chipboard pieces by 2Crafty Chipboard. 
 I had so much fun creating this layout that I am going to make another one hahaha enjoy my post...

My Sunshine August 2023:  

2Crafty Chipboard used: 
Intricate Seahorses
Your Smile is Like Sunshine Title
Seaweed Set 1
Seashells Set 2
Reeds
2023's
Photo Adornment Flynn's Flourish
Photo Adornment Larinda's Flourish
Thin Square Stacked Frames
Industrial Spring Set
Achor & Buoy Set
Fine Word Set - Months


You know what's amazing, you can order directly from the
2Crafty website here so you can also play with their amazing chipboard pieces.


All the chipboard pieces are treated with white gesso on the seashells I used some matte acrylic paint and on the edges I added some brown wax to mimic the rocks in the picture. I couldn't help myself while I was creating this layout I kept on adding more and more chippies. I cut out the word "Sunshine" out of the beautiful phrase "Your Smile is Like Sunshine Title" but firstly I wanted to use the whole phrase but it became to cluttered on my work so I left the rest out. 


On the photo adornments & reeds I added some white crackle paste and later I added some spray paint and matte acrylic paints to make them look a little weathered. The word sunshine was coloured in three different colors white, light blue and dark blue to match my layout. 


The seahorse I coloured in three different colors I used some waxes & several acrylic paints. On the backgound of my layout I added some coloured crackle paint which I coloured with magicals powders. I also altered the flowers myself to fit my layout and in the end I added some white spray paint, art stones & some antique jewels. 


 Thank you so much for your visit today and if you would like

 to see more of my work please visit here: Amy's Pretty Papers


Thursday, February 8, 2024

'Beautiful Destinations'
layout by Rachael Funnell


Hello there! Rach with you today
sharing this beachy themed layout
 I created using some GREAT 2 Crafty Chipboard pieces


2 Crafty Chipboard used:
2023
Funky Film strips
6x4 Phrase sticks set 1
Seaweed Set

I kept the treatment to the chipboard quite simple yet again with just inking...
Let's start with the Funky Film strips, inking one in a lovely pale blue & the other in pasel pink 
& I think they look GREAT sitting underneath my photo...

Next up I have the Seaweed where I have inked these randomly using some borwn ink & 
then tucked in amoungst the cluster of fussy cutting & flowers..


For my tiltle which I think is just perfect for this page
 beautiful destinations from  6x4 Phrase sticks set 1 -I've inked this with a lovely bright teal ..
  I just love these phrase sticks, 2 Crafty have created such array of fantastic title sticks & 
  they are my go to when looking for a title..


Lastly a layout of mine these days isn't complete without the some sort of date added....
This time I have added the year 2023, inking this with black...
I'm really pleased with how this layout has turned out.... 

Thanks for stopping by,
I hope I have inspired you in some way
Until next time!


Thursday, January 18, 2024

Cherish You Always by Tania Ridgwell

Hello there!

Tania joining you today to share the last of my DT projects for January.  I have created a layout.

"Cherish You Always". 

2 Crafty Chipboard Used:

*Boho Floral Arrow
*2023's
*6x4 Phrase Stick Set 4
*Mini Title Stick Set 1
*Magnolia Stems


I used the beautiful Mintay Grandma's Attic Paper Collection to create the base for for my layout.  Once I had created my background I set about putting my page together.


I gave the Magnolia Stems, Boho Floral Arrow and 2023 Title a light coat of gesso and then sponged them all with Blushed Peach Opal Polish.  I added my photo and once the chippie pieces were dry I added the Boho Floral Arrow along the bottom of my photo.  
I added a couple of clusters of flowers and fussy cut elements along the bottom of the photo also and then tucked in the Magnolia Stems to these.


I finished off my page by adding a couple of the Stick Titles one from the Mini Range and the other from the Phase range.  I left both of these raw.


Thats' all from me today, I hope I have inspired you all with my Layout.  Until next time thanks so much for stopping by.
Tania xx

Friday, October 6, 2023

" Let's Explore"
layout by Rachael Funnell


Hello everyone!
Rach back with you today sharing another layout
This masculine fun layout...


2 Crafty Chipboard used:
Anchor & Buoy set
2023
 Industrial Spring set
Giant gears & cogs
Let's Explore

With all the chipboard pieces I've used, I have just simply inked them...
Let's start with the Giant Cog this has been inked with Tim Holtz - Distress Oxide Faded Jeans
a nice pop of blue color, Don't you think?

Next, is this Ship Wheel from Anchor & Buoy set, which I have sitting over the Giant cog
I have inked with again a Tim Holtz ink - Frayed Burlap.. 


I also inked the 2023 and this Industrial Spring with Tim Holtz - Frayed Burlap 
then cut this Spring before placing either side of the photo..


Lastly for the title, Let's Explore I wanted it to stand out that little more
so I inked it black... I am really happy with this page &
I hope I have inspired you in some way as well...

Thanks for stopping by
Until next time