Showing posts with label Thin Rectangle Stacked Frames. Show all posts

Monday, June 8, 2026

Favourite Memory by Tania Ridgwell

Hi there!
Tania popping in today to share the first of my DT projects for June. 
 I have created a layout. 

"Favourite Memory"


2 Crafty Chipboard Used:

*Paws and Heart Set
*Little Pawprint Strip
*Thin Rectangle Stacked Frames
*Fine Word Set 1


I have used the gorgeous Unmistakable Creations 'Denim & Lace' Collection to create the base for my Layout.


I first painted all the chippie pieces with a white Posca Paint Pen.  Once dry I sprayed the Forever (from the Fine Word Set), Rectangle Stacked Frame and Heart chippies (Paws and Heart Set) with Heidi Swapp Navy Color Shine Mist.


To construct my page I added the Rectangle Stacked Frame chippie around my photo and then added it to my base page.  I added lots of paper blooms around my photo.  I cut the Little Pawprint Strip chippie into pieces and tucked the pieces in amongst all the blooms.  I also tucked the Paw Print chippies from the Paws and Heart Set into the paper blooms.  I added the Hearts chippies from the Paws and Heart Set randomly around my page.  To finish off my page I added the Forever chippie across the bottom right of my photo.


That's all from me today, I hope I have inspired you all with my Layout. 
 Until next time thanks so much for stopping by.
Tania xx


Thursday, January 8, 2026

Favourite Projects for 2025 by Tania Ridgwell

Hi there!

Tania joining you today. 

Firstly I would like to wish you all a very Happy New Year......... my first post for the New Year is my MY FAVOURITE FOUR 2 Crafty Chipboard projects for 2025……. I have had so much fun creating with 2 Crafty chipboard over the past year that choosing just four favourites wasn't easy.   I do hope you like the four projects I have chosen as much as I do.

"My Favourite Four"


"Cherish"


2 Crafty Chipboard Used:

*Thin Rectangle Stacked Frames
*2024's
*Fine Word Set 1
*Corner Steampunk 7


You can find all the details HERE

"Life is Good"


2 Crafty Chipboard Used:

*Hexagon Outline Frames Set
*Decorative Poles
*ATC Design Elements
*Mini Title Stick Set 1


You can find all the details HERE

"#ADORE"


2 Crafty Chipboard Used:

*Decorative Circle Accents Set 1
*Mini # Word Set 1
*Thin Square Stacked Frames
*Foliage Set 13


 You can find all the details HERE

"Hello Beautiful"


2 Crafty Chipboard Used:

*Ginny's Flourish Set
*Hello Beautiful
*Foliage Set 14
*Frame Messy Squares 6"


You can find all the details HERE

Well that's all from me today. 
 Until next time, happy crafting.
Tania xx

Wednesday, June 18, 2025

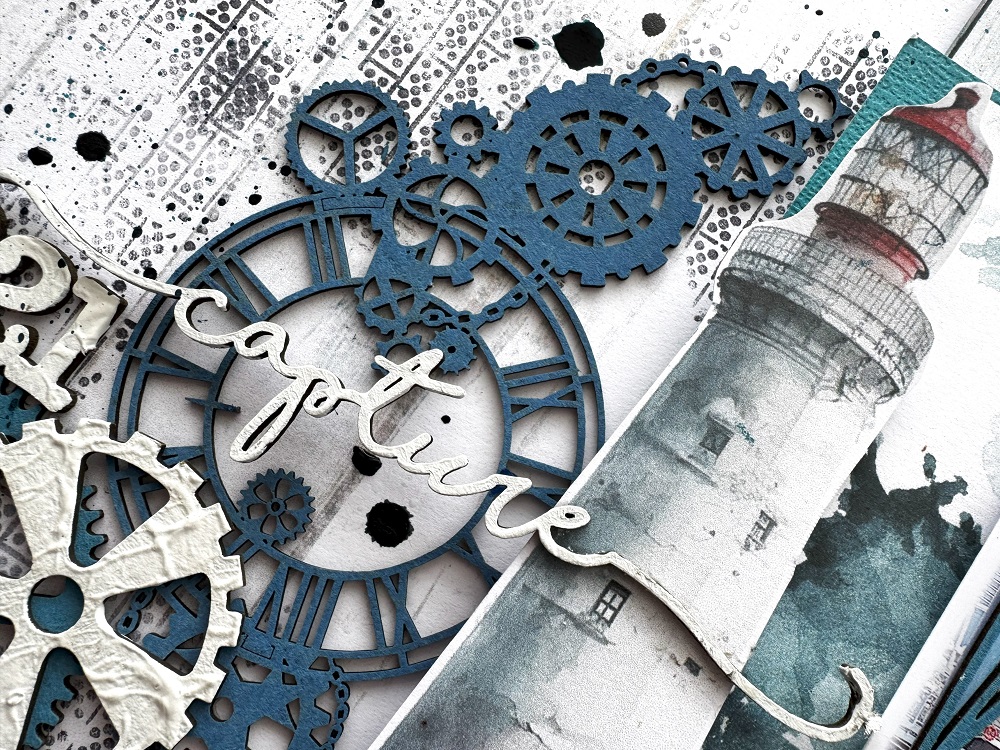
'Capture 2021'
layout by Rachael Funnell

'Capture'

Hello Everyone!
Rach back with you today sharing another 2 Crafty Chipboard bit of inspro
This fun boy's layout featuring some great 2 Crafty Chipboard pieces..


2 Crafty Chipboard used:
Fine word set 3
Thin Rectangle Stacked frames
Giant gears
Corner steampunk 7
Steampunk medium gears

As usual i have kept the treatment to the chipboard quite simple..
Let's start with the Thin Rectangle Stacked frame, 
these are just prefect for framing photos, I have inked this with this lovely blue...


Also! inked with the same blue is a Giant gear, a couple of the Steampunk medium gears
and this fab Corner steampunk 7.

Then I added a thick coat of gesso to a couple more of the Steampunk medium gears
And to tie it altogether nicely for my title 'Capture 2021'
Both of these pieces I have given a thick coat of gesso...


Super happy with how this layout has turned out..
I hope I have inspired YOU in some way.
Thanks for stopping by & have a great day!!!

Wednesday, March 19, 2025

"World Traveller"
Layout by Marie Sabatier

Hello everyone,

Welcome to the 2Crafty website.
I present you my second inspiration of this March.
An invitation to travel with a layout embellished with a collection of splendid chipboards, 
accompanied by photos of my grandchildren during a train trip.

"World Traveller"


The chipboard used:


I went a bit overboard with the number of chipboards, but I liked them all!
I outlined the center of my page with a solid-colored piece of paper.
I positioned my two photos that I framed with the chipboards "thin-square-stacked-frames" that I embellished using embossing powders of Lindy’s Gang color "Golden Angel Wings".At an angle of the photos, I create a cluster of embellishment, I add a tab "page-tab-set". They are great to bring a little bit of detail. In order to create a contrast, I add some "grungy-spatter-bits" that I tinted darker.


I used a piece of the 'luggage' chipboard.
    I used embossing powder to embellish it and personalized it with embellishments from the paper collection. I love how it turned out. It's what makes scrapbooking so magical. In the background of the title, I add a chipboard "circle-arrow-journal-spots".  To make it more obvious, I place a 'laser-cut' element in the center. I choose to leave the title covered with a single layer of white gesso, simply.


    On each photo, I added a phrase with the "mini-title-stick-set-6" chipboard, which I also embellished with embossing powder. For an extra touch of fun, I added white embossing powder. The first piece I glued to the center of the plain paper was the "world-globe" chipboard. I used a wide range of colors to achieve a result that suited me!!!


        A close-up showing the chipboards I used. 


As always, I loved the transformation of each chipboard.
Thank you so much for stopping by.


Tuesday, February 11, 2025

Wonderful Day Cherish by Tania Ridgwell

Hi there!
Tania joining you today to share the first of my DT projects for February.  I have created a layout. 

"Wonderful Day Cherish"


2 Crafty Chipboard Used:

*Thin Rectangle Stacked Frames
*2024's
*Fine Word Set 1
*Corner Steampunk 7


I have used the gorgeous Uniquely Creative 'Beautiful Oasis' Collection to create the base for my layout.


I first gave all the chippies a coat of Summer Sky Opal Polish.  Once dry I dabbed on extra Summer Sky Opal Polish to the Steampunk Corner and 2024 chippie title.  The other two chippies, the Rectangle Stacked Frame and Cherish Title were given some extra colour using Kaiser Denim Mist.  


I added some paper layers under my photo and then added the Large Rectangle Stacked Frame chippie to frame it on my page.  I added lots of paper blooms to the top left and bottom right of my photo.  I cut the Steampunk Corner chippie in half and tucked one of each of the halves into the flower cluster along the bottom of the photo.  I added some die butterflies and finished my page by adding a 2024 and Fine Word Cherish chippie Title to it.


Thats' all from me today, I hope I have inspired you all with my Layout.  Until next time thanks so much for stopping by.
Tania xx

Friday, February 7, 2025

Togetherness my favourite time layout
By Rachael Funnell


Hello everyone!!
Rach with you sharing my first Feb layout
This FUN, BRIGHT & a little bit grungy page..


2 Crafty Chipboard:
Thin Rectangle stack
Fine Month Set
2017
Togetherness my favourite time


Let's start with the Thin Rectangle stack, I just love these frames...
 I have inked the largest frame with black and as you can see
it frames my selfie family pic taken in 2017, perfectly....


Next up is the Title Togetherness my favourite time
and inpsired the colours in the background paper 
I have inked this title with a teal, Pink & pale blue.. 

oh and the papers are Uniquely Creative - Steampunk Graffiti..


Lastly  from the Fine Month Set - Janurary 
I have simply Inked it black & 
added a thick coat of gesso too the year 2017

That's it from me for now
I hope I have inspired you in someway
Until next time

Friday, December 27, 2024

Lullaby Baby Cards by Tania Ridgwell

Hello there! 

Tania joining you today to share a bonus DT project for December. 
I have created a set of sweet baby cards to share with you all.


2 Crafty Chipboard Used:

*Thin Rectangle Stacked Frames
*Handrawn Stars
*Mini Lattice Bits


I created each of my card bases using the gorgeous Mintay Lullaby Collection and Mintay Fancy Card Bases.
I used Kaisercraft Red mist to colour the Rectangle Stacked Frame chippies and once dry I toned down the colour using some Frost White Shimmer Paint.  I coloured the Handrawn Stars & Mini Lattice Bits chippies using Yellow Limes Opal Polish.

 Then to construct each of the cards I added Rectangle Stacked Frame chippies to each.  I 
then embellished them with fussy cut flower elements and blooms. I tucked the Handrawn Stars and Mini Lattice Bits chippies in amongst the clusters on each card and to finish each I added a Sentiment.

See each card below.


Thats' all from me today, I hope I have inspired you all a little with my sweet Lullaby Baby Cards.  Until next time thanks so much for stopping by.
Tania xx