Showing posts with label Christmas Cuties. Show all posts

Sunday, December 20, 2020

Christmas Cuties
my last layout for 2Crafty
by Jenny J.

                                                          Happy Christmas time everyone!

This is it!  

My last layout with this fabulous team!


I am leaving you with this Xmas themed layout,
on which I applied snowflake paste over a stencil on my background.

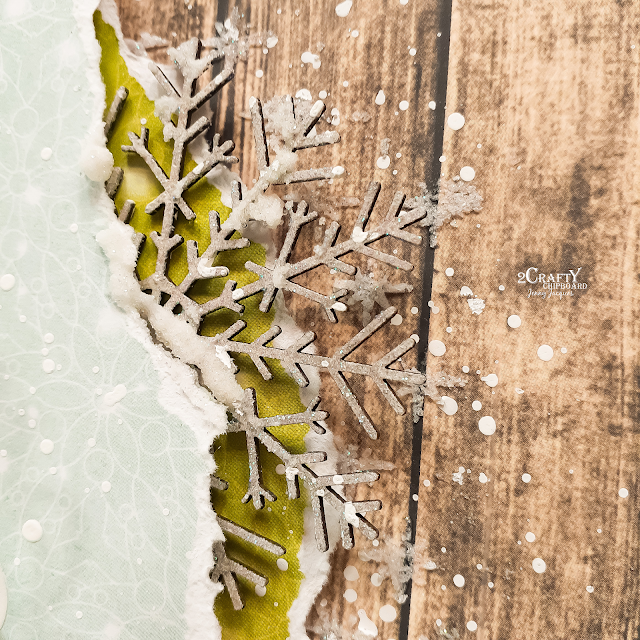
These are the chipboards that are on this layout


*Fine Snowflakes
*Starbright snowflakes
*Holly twig
*Deer head set
*Christmas Cuties


I wanted this layout to be festive and sparkling.
That's why I chose to add shimmer paint on "Starbright snowflakes" and "Fine snowflakes".


Above, you can also see "Holly twig" chippies, 
heat-embossed in green and with a touch of red stickles.

For the title, "Christmas Cuties",
I've used an ancient gold powder to heat embossed it.
Really like that the color matches my flower's centers.


The last chipboard piece is one of "Deer Head set".
That one is simply treated with 2 color of paint
to give him some texture.


Do you like Christmas time?
It will be different this year but keep the magic alive 😉
Wishing you all the love and support from your dear ones.


Thursday, December 21, 2017

December Inspiration with Debbie

Hi everyone,
 Debbie here with today to share my last Design team projects for 2Crafty Chipboard.
I want to thank Vanessa and Di for allowing me the opportunity to design this
 past year for 2Crafty Chipboard.

 With Christmas just around the corner, I have two Christmas layouts to share...

"Christmas Cuties"

My two kiddos from several years ago, just being silly!

2Crafty Chipboard used:
6" Circle Dot Frame
Christmas Cuties Title
Decorative Disk Set 1
Festive Music Notes
Holly Vine Wreath
Winter Twig Branches


On both sides of my photo I used the Winter Twig Branches embossed with a
dark green/gold embossing powder and a piece of the Holly Vine Wreath.


Beneath the photo I placed the Holly Vine Wreath, Decorative Disc Set 1 
and the title embossed gold. 


Beneath my layering I used the Festive Music Noted embossed gold.  Placed around 
the photo I used the 6" Circle Dot Frame, also embossed gold.


"Peace Love Joy"

Here I have another festive holiday layout.

2Crafty Chipboard used:

Blitzen
Christmas Mini Word Set 2
Corner Swirly Set 
Flower Doilies
Foliage Set 3
Formal Flourish 3


I embossed the Formal Flourish 3 and Flower Doilies a deep red.


I embossed the words from the Christmas Mini Word Set 2  gold, 
 Corner Swirly Set in deep red and the Foliage Set 3 a deep green.


Here I've used another piece from the Foliage Set 3

I hope that I've inspired you over this past year.  
It's been a joy designing for 2Crafty Chipboard.

Happy Holidays!
Debbie


Friday, December 9, 2016

December Inspiration By Jessika Lundman

"Christmas Cuties"

Hi guys!

Christmas is almost here! It is by far my favorite time of the year!

So for starters I want to show you this Christmas layout I made of my two cuties :) 
I used the color scheme of red, white and gold. Mostly I used color bloom spray for the
 red and gold and acrylic for the white.

Aren't the Christmas bulbs just beautiful? It is a big chipboard piece that I cut to pieces so I could place them exactly where I wanted them. The gold bow is also a part of that chipboard piece and I also have two swirls that where left overs from the same big chipboard piece that I will use on another layout.


The bulbs,  I embossed with white, red and sparkle embossing powder to really make them shine.
In the background you can see both white and gold. I splattered gold and white and also used
 heavy white gesso to make sort of a snow effect behind the embellishments.


2Crafty products used:
Flourish ornament border
Flower doilies
Christmas cuties


"The Magic of You"

For my second layout I wanted to make something a little more boyish :) 
A magic layout for a magic boy.

At first this layout was all black and white stars but when it was almost finished and I
 looked at it I thought it lacked that "umpf" so I simply cut it in half and mounted it 
on a white cardstock. I loved how it came out! The contrast is awesome. Some 
black stars on the "other side" to tie the layout together.


All the chipboard is painted with white acrylic and that is also what I used on the
 background for splatters and dabbing. 


2Crafty products used:
Stars
The magic of you
ATC mini heart and stars
Frame flourish


Thanks for calling by! Have a very merry Christmas!

Love Jessika


Friday, December 25, 2015

December Layouts By Rachael Funnell

 
'Christmas Cuties'

Hi There!
I have two layouts to share with you today, that I have created for my December post...
2 Crafty Chipboard have a FANTASTIC range of Christmas theme chipboard pieces!
So! I couldn't resist & have created two Christmas themed pages.
For my first layout of my hubby & daughter with a photo taken Christmas day last year....
 I have used these FAB Chipboard pieces!
 
 
 I have added a coat of gesso to some Checkerboard clumps, cut up into
smaller pieces & placed onto the base of my page....


I have added some black ink the 6' Clock face frames....

 
Gave these gorgeous 'Wicked Christmas Wreath' a coat of gesso & finished 
them off with some bling....
 

With this 'Christmas Cuties' title I gave it a couple of coats of gesso, then finished it off
by adding some pale blue mist spray along the bottom.....

 
**************
 
 
For my 2nd layout......
'Sitting on Santa's Knee' 
 
The 2 Crafty Chipboard pieces I have used on this layout of my two kids with
a Santa photo, taken back in 2010...
 
 
I have given this Sitting on Santa's Knee title a coat of gesso, then to give it a bit
 more texture I gave it a coat of light modeling paste & lightly inked it with some red ink.....
  It has also been splattered with some black mist!
 

With this 'Heart Lattice panel' I have inked it with red ink, then sponged very lightly
with some gesso... 

 
I have Inked this Camera with black ink & it also has been splattered 
with some White mist spray...
 
 
With theses 'Dotted Baubles' I have added a coat of gesso, then a coat of
light modeling paste once dried, & rubbed over them with some  yellow ink!
 
 
That's it from me today....
Hope you all have a WONDERFUL time with you family over the Christmas/New Year break!
I will be back in January 2016!  
 
 
Please remember to become a blog follower & leave a blog comment to
be eligible to go in our monthly draw for a great chippie prize pack.
 

Photobucket