Showing posts with label 6" Circle Dot Frames. Show all posts

Thursday, December 12, 2024

Father & Son Moment - Laura Gilhuly

 Hi everyone!
I love scrapping photos of my husband with our sons.


2Crafty Products used:


Suzie's Swirls
Filmstrips - Small
Father & Son Moment
Circle Dot Frame
6" Circle Revolution
Mini Checkerboard Bits
Photo Adornment - Element Set 3 


I painted the circle revolution frame, the element set 3 and the filmstrip to be slightly different then the rest of the altered chipboard.


The other pieces I started with heavy texture paste


I then began layering different shades of blues and browns to achieve the look I wanted.


After the mists dried I inked the edges and a bit of the raised texture.


Thanks for stopping by


Thursday, July 4, 2024

Loving These Moments by Tania Ridgwell

Hi there!
Tania joining you today to share the first of my DT projects for July.  I have created a layout.

"Loving These Moments"


2 Crafty Chipboard Used:

*6" Parisian Border
*Circle Dot Frames
*Funky Heart Swirls
*Loving these Moments
*2023's


 I have used the stunning Celebr8 Starry Night Collection to create the base for my layout.  I fussy cut the gorgeous wreath for the focal point of the background page.


I coloured the Funky Hearts Swirls & Parisian Border chippies with Dylusions Black Marble Shimmer Spray.  The Circle Dot Frame, 2023 and Loving These Moments Title chippies were all coloured with Heidi Swapp Blush Color Shine Spray. 


Once I added my photo,  I added lots of paper blooms to the top and bottom of my photo.  I cut the Parisian Border in half and tucked a piece in each side of the flower clusters along the bottom of my photo.  I also cut the Circle Dot Frame in half and tucked a half in the top flower cluster and one in the bottom flower cluster.  I tucked the Funky Heart Swirls in amongst the bottom flower clusters and finished of my page by adding the "Loving These Moments" title and 2023 chippies to my page.


Thats' all from me today, I hope I have inspired you all with my Layout.  Until next time thanks so much for stopping by.
Tania xx

Tuesday, June 18, 2024

Your Smile by Tania Ridgwell

 Hi there!

Tania joining you today to share the last of my DT projects for June.  I have created another layout. 

"Your Smile"


2 Crafty Products Used:

*Circle Dot Frames
*Mini Title Stick Set 3
*Foliage Corners


I used the gorgeous 49 & Market Art Options Viken Paper Collection to create the base for my layout.  Once I had created my background I set about putting my page together.


I coloured the Foliage Corners and the large Circle Dot Frame with Heidi Swapp Color Shine Mist in Navy. I added the largest Circle Dot Frame chippie to my photo and then centred this to my background page.  I added lots of Viken laser elements and paper blooms to the top left and bottom right of my photo and then tucked in the Foliage Corners amongst all these elements.  I left the medium Circle Dot Frame raw and cut it up and tucked one half into the bottom cluster and one half in the top cluster.  I also left the small Circle Dot Frame chippie raw and added this to the right of my photo with a title inside.


 I finished of my layout by adding the Your Smile Chippie Title from the Mini Title Stick Set 3 along the top left of my photo which I gave a very light brush with navy mist.


Thats' all from me today, I hope I have inspired you all with my Layout. 

 Until next time thanks so much for stopping by.

Tuesday, August 8, 2023

Filled With Wonder by Emma Zappone plus VIDEO

 Hello Creatives, Em with you today.
The piece I am sharing features lots of chipboard circles with a lovely pastel colour tone.
Plus there is a VIDEO for you to watch 🥳


Here are the chipboard pieces used....

6" Revolution Frame
Circle Stack
Circle Dot Frames
Mini Decorative Frame Set 9


I used only the negatives from the Revolution frames and a couple of different sizes from the circle dot frame and stack.


The Circle's all have the same finish just a different colour. They started with an acrylic paint base, once dry, I added a white paint by flicking over them all. Once that was dry, I then added a clear emboss to bring out all the colour.


I love how effective these circles look with the background and under the image stack.


The cool decorative frame is painted with white crackle paste, allowed to dry and then a little pink ink wiped back to sit in the 'cracks', finished with a pink wax to really highlight the crackle pattern. This was then cut in half to fir around the photo how I wanted.


I really enjoyed using the same style of elements, they compliment each other so well.

I would love you to grab a cuppa and enjoy the video made here....


I hope you enjoyed 🥰


Hope this inspires you today.

Thanks for joining me.
Stay Crafty, Em xx


Tuesday, July 4, 2023

Great Memories Layout by Tania Ridgwell

Hi there!

Tania joining you today with the first of my shares for July a layout I created.

Great Memories


2 Crafty Chipboard Used:

*Foliage Set 11
*Circle Dot Frames
*Mini Title Stick Set 1
*2023's


I used the beautiful Paper Rose Studio Morning Memories Paper Collection for the base of my layout.


I added a few paper layers to the centre of my base page and then my photo.  I used the Dot Circle Frame Chippies which I kept raw - tucking the larger one under my photo and the smaller one I cut in half and tucked one of each of the pieces into the top and bottom paper layers.
I created a couple of embellishments clusters to the top left and bottom right of my photo using assorted flowers and fussy cut elements.


I painted a couple of the Titles from the Mini Stick Set, Foliage 11 and a 2023 Title all with Interior Silver Leaf Paint.  Once dry I tucked the Foliage chippies in amongst the embellishment clusters.  I added the Great Memories Title to the top of my photo and the Simple Moments to the bottom.  I added the 2023 title along the top right of my page.
To finish I randomly splashed on some Night Gloss Spray.


Thats' all from me today, I hope I have inspired you all with my Layout. 
Until next time thanks so much for stopping by.

Tania xx

Tuesday, December 14, 2021

"A Home is not a home without a Dog"
Layout By Marie Sabatier

Hello loyal friends of 2Crafty.

Here is my second inspiration for this month of December. 

I was inspired by this photo to make my layout. It's the little puppy that my son has just adopted, it's a female called "Sayka" a ball of happiness.

He left home in the spring and couldn't do without our dogs, as the title suggests...


"A Home is not a home without a Dog"


The chipboard used:


- Title "A Home is not a home without a Dog"
- Circle Dot Frames
- Houses
- Foliage Set 6


I wanted to give him this layout for his Christmas decoration. 

So i'm still having fun...


I embellished each chipboard in the same way. First, a layer of white gesso 
then layers of golden acrylic paint. 

On the particle boards "houses" I added patterns with transfer rub-on.

To get different golden hues, I painted with metallic waxes, and opal waxes.


For the title and the chipboards "Circle Dot Frames" and "Foliage Set 6" 
I proceeded in the same way but adding nuances.


I wanted to get closer to the color of the dress of "Sayka" in the end I'm quite satisfied ...


Hope you liked this layout and you yourself will be inspired.


Marie


Monday, October 21, 2019

It's a boy thing
By Marie Claude Rodier
PLUS A PROCESS VIDEO TUTORIAL

Hello there!

I'm here today to show you a new creation. And this time, I went for a masculine layout. 
2Crafty store contains lots of chippies that are perfect our men and boys projects.

You will find a process video at the end of this post.
I hope you will enjoy it.

"It's a boy thing"


"It's a boy thing" was basecoated with white gesso.
Two layers of dark grey embossing powder were then applied.
And finally, silver wax accents were added.


Small and medium"Steampunk Gears" were also basecoated in white
and then embossed with a light silver powder.


"Circle Dot Frames" were basecoated in white. Two layers of blue embossing powder
followed by a few touches of black powder here and there were applied.
Finally, touches of white gesso were dry brushed over them.

TO VIEW VIDEO CLICK HERE...


2Crafty Products Used…
It's a boy thing
Steampunk Gears Small
Steampunk Gears Medium
6" Circle Dot Frames


Until next time, be happy and be creative!
Marie Claude
xx


Friday, April 26, 2019

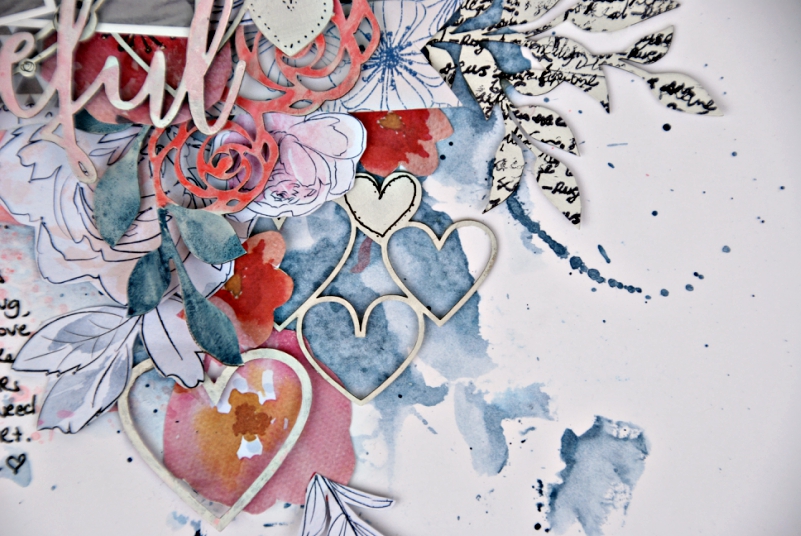
Grateful by Tammy Klingner
includes a process VIDEO!!

G'day there 2Crafties!!

Tam here today to share not only a creation but a process video too!!!

This layout is titled:

'Grateful'


A layout that celebrates and documents our beautiful neighbours.

So grateful for them and to them, and love having them in our lives.


Let's take a look at the video  as that best shows you how this came together....


I used the following 2Crafty Chipboard:
"Heart Clusters"
"Grateful title"
"Rose Set"
"6 inch Circle dot frames"
"Mini Branches"


As you can see in the video, I began by coating all of the chipboard in white Gesso.

To the "Heart Clumps" I added white paint.

I then added some doodling with a white pen.


I followed the same process for the "6 inch Circle dot frame".


The 'Grateful title' was painted with some soft watercolours.
I really love this look on chipboard.
It gives it a softer look, rather than bold.
Also, as it's soft it can be added over the photos slightly, without detracting from them.


To the "Rose Set", I also added watercolours.
Such a great finish.  Love the variance in the depth of colour.
I just LOVE the "Rose Set" chippy and could use it over and over (in fact I do!).


Finally, to the "Mini Branches", I stamped with a script stamp over the top.


This is a really simple, yet effective way to personalise your chippy.

Love it!


So that's it from me today.
I've been really enjoying playing with more softer colours lately.
So often, I am drawn to bright colours, so it's really nice to mix things up a little!!


I'll see you again next month with more chipboard creations!
In the meantime you can find me on my BLOG.
Love Tam
xxx