Showing posts with label Corner Steampunk Set 5. Show all posts

Wednesday, August 21, 2024

"Enjoy the Journey"
Layout by Marie Sabatier

Hello everyone,

Here is my second presentation for this month of August, a vintage layout in which 
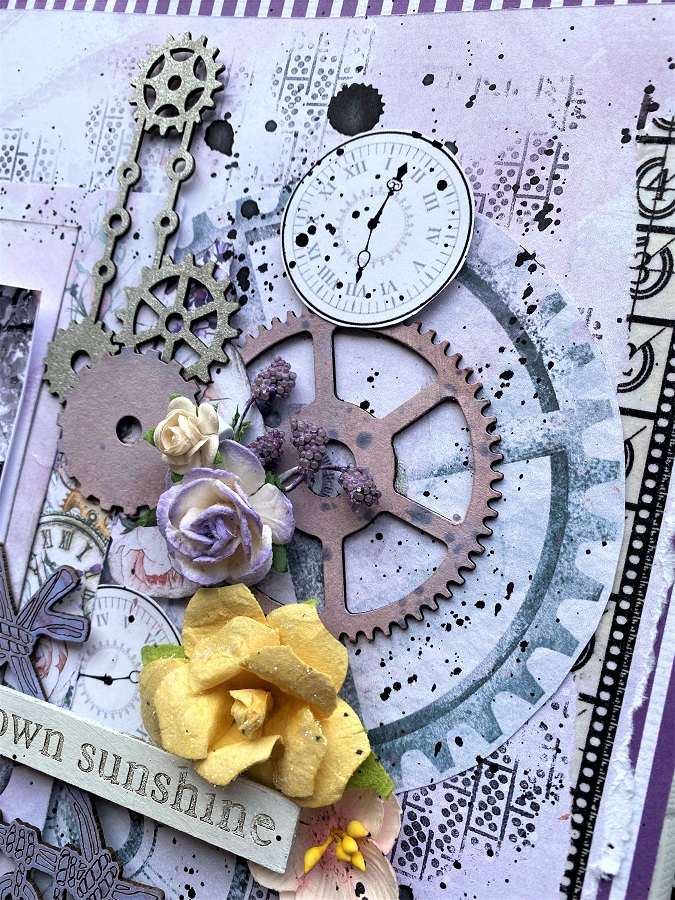
I use a lot of chipboard "steampunk".
The photo is of my grandson during our stay at Disneyland, in a room specially 
designed to take pictures of heroes.

"Enjoy the Journey"


The chipboard used:

- Enjoy the Journey
- Corner Steampunk Set 5
- Steampunk Arrow Set 1
- Steampunk Gears Medium


The "steampunk" chipboards are one of my favorite chipboards. 

All the chipboard was decorated in the same way. With a first coat of acrylic paint "Reven Black" then rubbed with antique waxes glossy "Fire Ruby" "Red Amber" and "Turquoise Satin" opal wax. 
These are "Finnabair" products.


For the title "Enjoy the Journey", I delicately apply the "Turquoise Satin" wax with my finger
I love the result!


After placing the photo and paper embellishments, I tucked the chipboard
Steampunk Gears Medium around the photo stack.


The chipboard has the advantage of standing out from other embellishments 
while adding texture.


I hope you liked my layout.

Good scrap to you!


Wednesday, May 22, 2024

'2015 memories'
Layout by Rachael Funnell


Hello everyone!
Rach back with you today sharing my newest layout
This bright and fun layout
featuring my boy and some awesome 2 Crafty Chipbaord pieces...


2 Crafty Chipboard used:
2015
Steampunk gears medium
Steampunk gears small
Fine word set 3
Corner Steampunk 5
Industrial Spring set


Let's Start with my title....
where I have used the 2015 & Memories from the Fine word set 3
Inking the 2015 with black & I have added two coats of gesso to the word Memories


Next up is the Corner Steampunk 5,  I really couldn't decide on which color 
I wanted so I inked it, So i went with a few colors...Purple light blue red, pink & a little darker blue..
 I just love how it has turned O.U.T... 😍

Then I added some of the Industrial Springs, again couldn't decide on what colours, lol
 & went with inking them in yellow purple & blues....


And for the finishing touch I added a couple of Steampunk gears, Inking these black..
I just love how this has turned out 
and I hope I have inspired you in someway as well...

Thanks for popping by 
Until next time

Tuesday, July 18, 2023

Everyday Hero Step x Step Cards by Tania Ridgwell

Hi there!

Tania joining you today to share my latest creation with you all.  I have a short step x step photo tutorial for how I created these cards. I'm stepping right out of my comfort zone with these cards - not a flower in sight!


2 Crafty Chipboard Used:

*6" Messy Square Frames
*Giant Gears
*Corner Steampunk 5


I have used the awesome Celebra8 Everyday Hero for these cards.  I created the bases for my cards by using lots of paper layers of patterned paper and cardstock.


I painted the Messy Square Frames using Colour Blast Leather Texture Paste.


The Corner Steampunk 5 chippies have been coloured by painting on some Distress Ink Frayed Burlap Ink.


Once all my chippie pieces were dry I attached them to the base cards.


I then tucked a couple of each of the Giant Gears in and around the other chippie pieces.


I finished off each card by adding layers of fussy cut elements.

Card One.


Card Two.


Card Three.


Card Four.

Thats' all from me today, I hope I have inspired you all a little with my cards. 
 Until next time thanks so much for stopping by.

Tania xx


Monday, June 20, 2022

"tis, the season"
Layout By Marie Sabatier

Hello everyone,

Here I am again to present my second inspiration of this month of June. 

In France, we are approaching the summer holidays, 
It made me want to do a layout on the theme of the sea.

This is a picture of my son and grandson taken last year in a marina.


"tis, the season"


The 2Crafty Chipboard used:


- Mini Title Stick Christmas Set 1
- Assort Chain Borders
-  Anchors & Buoys Set
- Corner Steampunk Set 5
- Seaweed Set 


First I cover the chipboard with a layer of white gesso.

To create perfect harmony, I used the shades of my paper to embellish the chipboard.

For the "Asst chain Borders" chipboard I used "Tin Roof Rusted" powder from Lindy’s Gang. 
I placed them to create a dividing line for my layout.

To bring even more detail I added this chipboard "Corner Steampunk" which 
I embellished with a gray metallic paint.


For the "Anchors & Buoys" chipboard I just applied a thin layer of "Bronze Age" 
coloured wax to reveal the details of the chipboard.

The "Seaweed" chipboard I like have been coated with "Mermaid Sparkle" acrylic paint.


I love creating clusters by superimposing chipboard and ornaments.


Thank you for your visit, I wish you a good scrap with 2Crafty.


Tuesday, May 24, 2022

'Create your own Sunshine'
layout by Rachael Funnell


Hello fellow crafters!

Rach with you today sharing this mixed media, grungy, girly layout
featuring yours truly, along with some beautiful Studio 73 papers, flowers 
and of course some great 2 Crafty Chipboard pieces...


2 Crafty Chipboard used:
Boho hanger
6x4 Phrase Sticks Set 5
Corner Steampunk Set 5
Giant gears & Cogs
Medium Steampunk gears


Let's start with this gorgeous Boho hanger....   Just LOOOK at that detail 
and I've kept it quite simple by inking this with a lovely purple (lavender)

Then I have the Perfect Title 'Create Your Own Sunshine' 
from the 6x4 Phrase, Sticks Set 5  Sitting at the top of the Boho hanger,
which I've given this phrase stick two light coats of Gesso...


Next up is the Corner Steampunk from Set 5 where I inked one of the corners with a sliver, 
then I have cut the Corner in half and placing the two halves
 in between the fussy cutting & flower clusters...


Also! added a Giant and a couple of the Medium Steampunk gears 
 inking these in a pretty Pastel pink finishing it off just nicely...

AND that's it from me, Thanks for stopping by
 Hopefully, I have inspired you in some way today
Until next time!