Showing posts with label Starbright snowflakes. Show all posts

Tuesday, February 21, 2023

"Snow Happy"
Layout by Marie Sabatier


Hello everyone,


I am always happy to meet you to present my new inspiration. 

In France, we are on winter school holidays. 
My granddaughter has just spent a week on holiday in the snow 
and this new photo inspired me to create a layout with my favorite chipboards.


"Snow Happy"


The 2Crafty chipboard used:

- Word "Snow Happy"
- Sabine Frame
- Winter Twig Branches
- Foliage Set 10
- Starbright Snowflakes
- Circle Tags Set 2


I was inspired by the colors of the ski jacket to make my layout.

I prepare each panel by applying a layer of white gesso.

I then embellished the title, frame and chipboard "Strabright Snowflakes" with Lindy’s Gang’s
 "Pop Rock Purple" coloured embossing powder.


I set up my frame, my photo, and then I formed two clusters. 

I added on the "Winter Twig Branches" chipboards a "Lucky Emerald" wax 
which I then inserted into my cluster. 
By highlighting them.
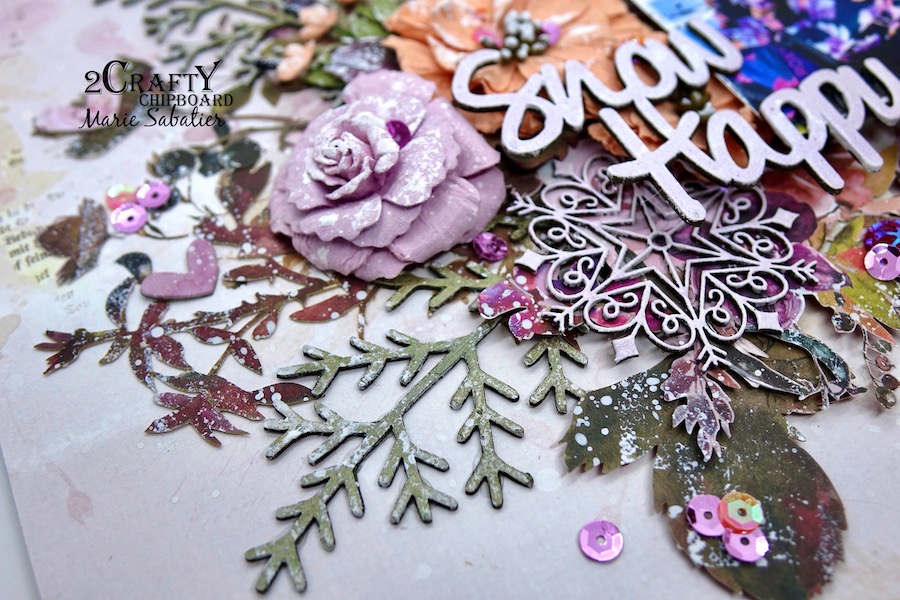


I did the same for the chipboard "Foliage Set 10".

The snowflake being well openwork it is possible to distinguish the colors behind and mixes 
well in the middle of the flowers

And, for more details I added this tag in circle that found its place!


I hope I brought you some freshness and the need to scrape. 


Thank you for your visit and see you soon!


Saturday, January 2, 2021

'Christmas Delight'
with Lisa Amiet


Hello all! 

Happy New Year! Here's to hoping for a better year for 2021!
I have one last Christmas inspiration layout for you...

This was for the CSI Challenge Blog that 2Crafty is sponsoring.


2Crafty Chipboard used:


For this layout, I have used some of the gorgeous Christmas themed chipboard pieces.
For my photo to sit on I have used the 'Christmas Frame 1',
that I have turned on it's side. 


I have given all of my chipboard pieces a white finish. 


I have also used a few of the 'Starbright Snowflakes',
some peeking through my layers. 


I have also used one of the 'Mini Word Set 2',
tucked in near my embellishments, also finished in white. 


More close ups :)


I am really happy with how this layout turned out, it worked out perfectly.
I hope you like it too!

Until next time!

Lisa 


Sunday, December 20, 2020

Christmas Cuties
my last layout for 2Crafty
by Jenny J.

                                                          Happy Christmas time everyone!

This is it!  

My last layout with this fabulous team!


I am leaving you with this Xmas themed layout,
on which I applied snowflake paste over a stencil on my background.

These are the chipboards that are on this layout


*Fine Snowflakes
*Starbright snowflakes
*Holly twig
*Deer head set
*Christmas Cuties


I wanted this layout to be festive and sparkling.
That's why I chose to add shimmer paint on "Starbright snowflakes" and "Fine snowflakes".


Above, you can also see "Holly twig" chippies, 
heat-embossed in green and with a touch of red stickles.

For the title, "Christmas Cuties",
I've used an ancient gold powder to heat embossed it.
Really like that the color matches my flower's centers.


The last chipboard piece is one of "Deer Head set".
That one is simply treated with 2 color of paint
to give him some texture.


Do you like Christmas time?
It will be different this year but keep the magic alive 😉
Wishing you all the love and support from your dear ones.


Wednesday, December 16, 2020

"MERRY CHRISTMAS"
Layout by Marie Sabatier
For CSI CHALLENGE

Good morning all,

Today I present to you my inspiration for the challenge N ° 340 of CSI CHALLENGE

I tried my best to meet the rules it's a lot of fun.

For the photo I chose a Christmas cake decoration made by my family, totally handmade.


"MERRY Christmas"


I have included in my layout
Evidence : Stipes, Wood, Text Pattern, Food, Christmas themed, Transparent elements, 
Glitter, Frames, Rub-ons, Stamps, Baker's Twine, Snowflakes, Putty stickers, Cursive font.

Testimony : Topic : Document Christmas, Inspiration Words : Merry.

And the color code.

2Crafty Chipboards used :
- MERRY Christmas
- Frame Tiny Funky
- Starbright Snowflakes


As always I applied a layer of white gesso on each chippboard
Then a coat of white acrylic paint and a coat of Glitter Varnish.
I love these little "Frame Tiny Funky" frames.


The word "MERRY Christmas" is perfect for the challenge and it is so beautiful!


And to finish the elegant "Starbright Snoflakes"


I loved playing to achieve this challenge.
It is also a way to use up supplies and to challenge yourself.

Good creativity!


Sunday, August 26, 2018

Tam's back again.....includes a VIDEO!!

Hi everyone
Tam here today to share some more 2Crafty goodness with you all.
This one's titled...

"Magical"


A page telling the story of a recent fancy dress party.
I love the bright bold colours against the black.
Yep, surprise surprise, this page has bold colour!!
I guess it's my signature style, but the photo and theme really called for it.

I used the following 2Crafty Chipboard on this page:
"Grid Bits"
"Fine Word Set 2"
"Lina's Swirl"
"Element Set 1"
"Starbright Snowflakes"

I began by painting all of the chipboard, except for the title in a few coats of white gesso.


I applied white acrylic paint to the "Grid Bits" and the "Lina's Swirl".

I knew these would pop against the black background and bold colours.


I tucked "Lina's Swirl" underneath my photo, and the "Grid Bits" underneath all the layers.


To the "Starbright Snowflake", I added a variety of Dylusions Ink Sprays.
Instead of spritzing them on, I applied them direct with a paintbrush.
  This gives a more concentrated colour.
I layered the colours as I really wanted to create an ombre look that complemented
 the background. I used the colours "Fresh Lime" and "Polished Jade".


I also used this technique on the "Elements Set 1"
I really love the Moroccan feel of both the shape and the effect I
achieved on the chipboard. It really helps to 'tell the story'.


I tucked both of these pieces amongst the layers.


Finally I added black gesso to the "Magical" Word from the "Fine Set 2".
I laid these down the side of my photo.


I have created a video of the layout so you can see it all come together.
You can see EXACTLY how I created the background, and how I created the
ombre finish on the pieces of chipboard.
Hope you enjoy it!!

TO VIEW VIDEO CLICK HERE

I'll be back again really soon with some more inspiration
 using my favourite chipboard, 2 Crafty.