Showing posts with label Holly Twig. Show all posts

Tuesday, December 13, 2022

"Joy"
Layout by Marie Sabatier

Hello everyone,

After a short period of absence, independently of my will, I am happy to return to present my first inspiration for this month of December. 

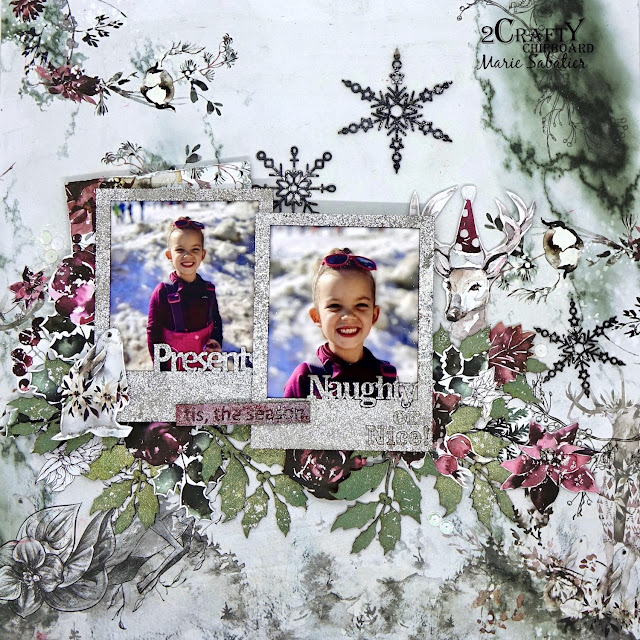
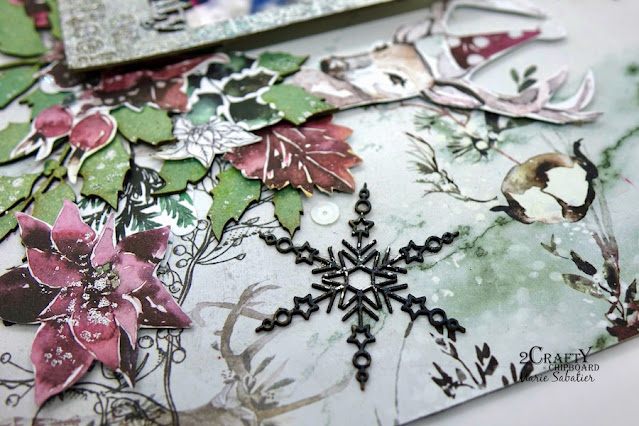
A Christmas layout with lots of bright colors and wonderful chipboards.


"Joy"


The 2 Crafty Chipboards used :


- Xmas Card Words
- Frame Tiny Star Circles
- Dasher With Sliegh
- Holly Twig


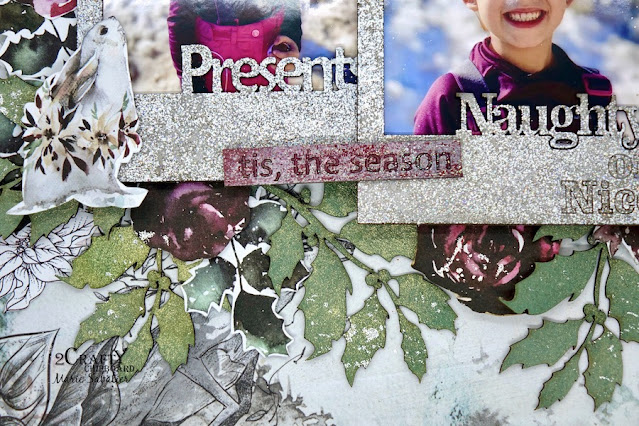
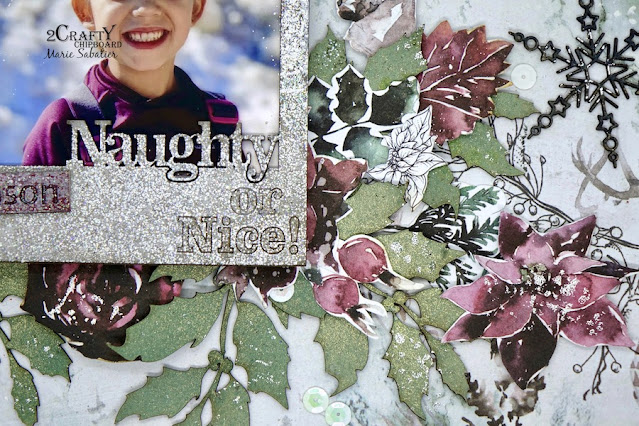
After applying a layer of white gesso, I embellished the chipboards "Frame Tiny Star Circles" 
and "Dasher Wiht Sliegh" with white and golden embossing powder.

For the two words "Joy" and "Peace" I applied powder to emboss that I heated by adding golden glitter. Another method. 


I love this chipboard «Dasher With Sliegh» for its finesse and elegance.


After arranging my photo and making my two bouquets of flowers I opted for a powder to emboss 
"Aged Marine" to embellish the "Holly Twig".

 To avoid perfection, I have more or less heated to obtain shades of color.


I love the atmosphere this Christmas.

I hope that this layout will inspire you. 
I wish you a good scrap.


Saturday, January 1, 2022

"This, the season"
Layout by Marie Sabatier


Hello everyone. 

I wish you a very beautiful and happy new year 2022.

I am so happy to see you again for a fifth year, it is such a pleasure for me to be able 
to continue to create with this magnificent brand.


A first realization on the theme of winter with a photo of my granddaughter taken last year.


"Tis, the season"


The 2CraftyChipboards used:


- Mini Word Sticks Christmas Set 1
- Christmas Polaroid Frames
- Holly Twig
- Assortment Snowflakes 


To embellish the "Christmas Polaroid Frames" chipboards I applied directly to the chipboard a
 "White Transparent glitter" embossing powder.

I get like that a snowy effect.


For the title I applied a paint and then some glitter.


For the "Holly Twig" chipboards I applied different shades of green from Lindy's Gang, 
it brings nuances. 


With the chipboards I slipped paper embellishments to create clusters around my photos.


For a little more detail I added these "Snowflakes" chipboards that I painted black and to finish 
I sprinkled a little white embossing powder on all the chipboards.


I'm done, come back tomorrow for some new ideas, 
and see you soon.


Sunday, December 20, 2020

Christmas Cuties
my last layout for 2Crafty
by Jenny J.

                                                          Happy Christmas time everyone!

This is it!  

My last layout with this fabulous team!


I am leaving you with this Xmas themed layout,
on which I applied snowflake paste over a stencil on my background.

These are the chipboards that are on this layout


*Fine Snowflakes
*Starbright snowflakes
*Holly twig
*Deer head set
*Christmas Cuties


I wanted this layout to be festive and sparkling.
That's why I chose to add shimmer paint on "Starbright snowflakes" and "Fine snowflakes".


Above, you can also see "Holly twig" chippies, 
heat-embossed in green and with a touch of red stickles.

For the title, "Christmas Cuties",
I've used an ancient gold powder to heat embossed it.
Really like that the color matches my flower's centers.


The last chipboard piece is one of "Deer Head set".
That one is simply treated with 2 color of paint
to give him some texture.


Do you like Christmas time?
It will be different this year but keep the magic alive 😉
Wishing you all the love and support from your dear ones.


Sunday, December 9, 2018

Christmas Inspiration by Hetty Hall

Hello everyone and welcome to my blog post.

Today I would like to share with you a Christmas layou.

'Joy'


This month 2Crafty Chipboard is a sponsor for CSI: Colour, Stories, Inspiration challenge and I am one of the lucky DT ladies who got to play along as Guest Detective


The scene for this month's Case File:

To copy the colour scheme I had some issues as I couldn't find any Christmas related papers in those colours so I went for the love struck collection by Authentique which I think worked well for this layout.


From the evidence I chose to use 2Crafty elements: stars, snowflakes/winter elements, animals (deer), Christmas elements (Holly Leaves) and for the testimony I chose the title word 'Joy'.


I added some silver embossing powder to the holly leaves and snow flakes and white embossing powder to the title, stars ad hearts and date to tone in with the other colours.


Other elements from the evidence are dots, grid pattern, more hearts, string, numbers, tag and from the testimony I added journaling to the tag which is tucked behind the photo mat as well as the photo is documenting the joy of the holidays.


Flowers are from 49 and Market and the stargazers make perfect poinsettia flowers.

Product List:
- Star Circular Frames
- Deer Set
- Fine Snow Flakes
- Holly Twig
- Christmas Card Words
- ATC Tiny Hearts and Stars pack
- 2018 Date Chipboard


And there you have it, I hope you enjoyed today's blog post.

Until next time......

Hugs

Hetty


Friday, December 29, 2017

December Inspiration - A Layout & A Home Decor
PLUS TWO VIDEO TUTORIALS
By Mary Catt

''Christmas Joy''

Hello 2Crafty fans! 
  Mary here with you today with my last post for 2Crafty Chipboard. It's so hard for me to
step down from a team that I have been a member for more than one year. It has been one
 of the best teams ever and I am so honored I was a part of it. I had a really great time
 creating with these gorgeous chipboards and I really hope to return in the future.
But for now, let's take a look at the projects I made for my December inspiration.  
I created a layout and a Christmas home decor on wooden slides and both are having
 video tutorials.
My first layout was made with lots of flowers, some Christmas embellishments
combined with some beautiful chipboard pieces.
You can watch the VIDEO TUTORIAL with the procedure here. 

TO VIEW VIDEO CLICK HERE

 I based my page on the 13arts ARTelier December sketch challenge.


2Crafty Chipboards used... 
 Stars
Swirly Star Border
Xmas Mini Word Pack

 Here are some close ups...


 First, I made a mixed media background with modeling paste and a stencil and did some random stamping. Then, I added color with the ''Pastel Cobalt'' and the ''Pastel Lavender'' 13arts mists.


 I painted the ''Stars'' and the ''Swirly Star Border'' chipboards with the ''Gold'' splash ink.


The title words from the ''Xmas Mini Word Pack'' was also painted with the ''Silver'' splash ink.


Finally, I added some ''Natural Mika Flakes'' and made  some splatters with ''White'' splash ink.


''Christmas Wishes''
 
My second project is a Christmas home decor piece created with lots of
chipboards along with some beautiful Christmas flowers and lots of glitter.


You can see the procedure on my VIDEO...

TO VIEW VIDEO CLICK HERE 


 I based my page on the Mixed Media Place December challenge.


2Crafty Chipboards used... 
 Holly Twig
Deer Head Set
Mini Reindeers
Stellar Snowflakes
Fernlike Snowflakes

 Here are some close ups...

 I started by applying a coat of white gesso on the wooden slices. Then, I created
 texture with modeling paste mixed with mini art stones.


 While waiting the paste to dry, I heat embossed all the chipboards with the ''Queen Sheba's Silver'' Lindy's Gang embossing powder, then I sprinkled some white glitter on them.


 I used some Lindy's Gang sprays such as ''Salt Water Taffy'', ''Alpine Ice Rose'' and
 ''Autumn Maple Crimson'' to add color on the wooden slices.


As a final touch, I used Snowflake Paste here and there and some made splatters
 with white gesso diluted with water.


 Well, that was all from me today...

 I really hope you enjoyed these projects and all the previous ones I've shared with you.

Thank you so much for stopping by!