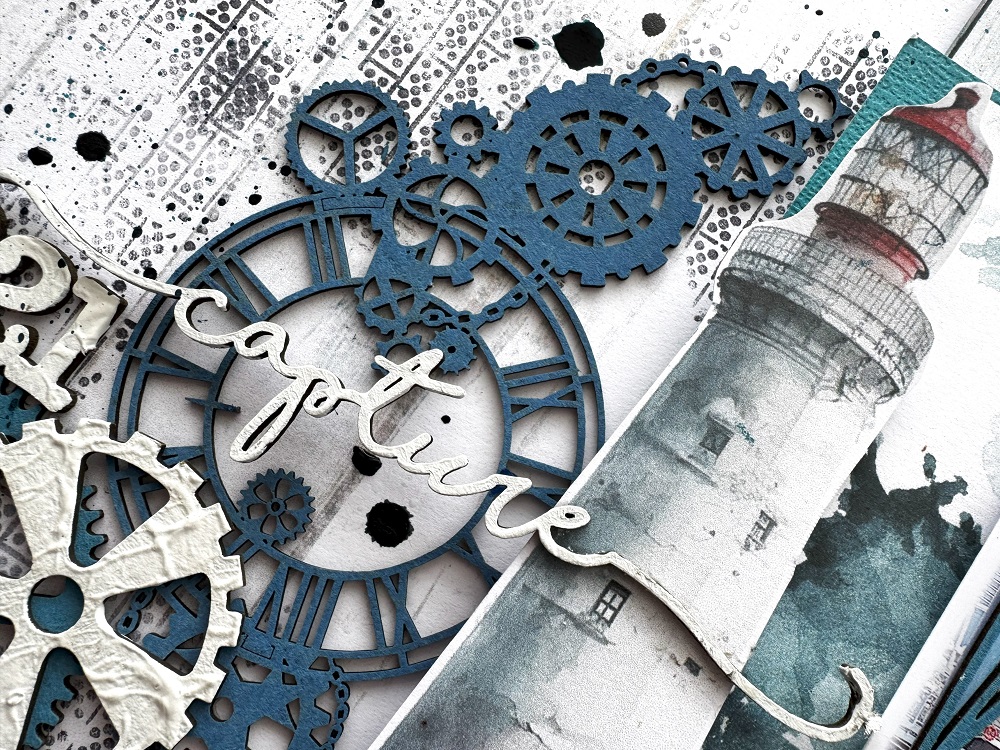
Showing posts with label Fine Word set 3. Show all posts

Wednesday, June 18, 2025

'Capture 2021'
layout by Rachael Funnell

'Capture'

Hello Everyone!
Rach back with you today sharing another 2 Crafty Chipboard bit of inspro
This fun boy's layout featuring some great 2 Crafty Chipboard pieces..


2 Crafty Chipboard used:
Fine word set 3
Thin Rectangle Stacked frames
Giant gears
Corner steampunk 7
Steampunk medium gears

As usual i have kept the treatment to the chipboard quite simple..
Let's start with the Thin Rectangle Stacked frame, 
these are just prefect for framing photos, I have inked this with this lovely blue...


Also! inked with the same blue is a Giant gear, a couple of the Steampunk medium gears
and this fab Corner steampunk 7.

Then I added a thick coat of gesso to a couple more of the Steampunk medium gears
And to tie it altogether nicely for my title 'Capture 2021'
Both of these pieces I have given a thick coat of gesso...


Super happy with how this layout has turned out..
I hope I have inspired YOU in some way.
Thanks for stopping by & have a great day!!!

Friday, August 2, 2024

'Journey'
with Lisa Amiet

 Hello all!
It's Lisa here today to share some
 scrappy travel inspiration with you.

"Journey"


2Crafty products used:


Fine Word Set 3, Photo Adornment Set 6, 
Chicken Barbed Wire Small, 6" Doily Clock Face


I have created this layout featuring a photo of my daughter in Japan. 
I used the '6" Doily Clock Face',
which I have left raw, tucked under the edge of some of my layers.
I really love the raw chipboard with the neutral tones of my papers.


I also used one of the 'Photo Adornment Set 6',
such a pretty little flourish,
that I have also left raw. 


I also used one of the 'Chicken Barbed Wire Small' panels, 
that I have cut into pieces,
 and used in among my layers and embellishments


I also used one of the 'Fine Word Set 3',
that I have finished in white and layered under my photo. 

I hope that you like what I have created. 
Until next time,

Lisa


Thursday, June 6, 2024

'beautiful dream'
layout by Rachael Funnell


Hello everyone!!
Rach back with you today sharing my newest creation, this Feminine/Mixed media layout
and of course I have used some gorgeous 2 Crafty Chipboard pieces...


2 Crafty Chipboard Used:
beautiful loopy font
Magnolia Stems
leafty Twig branches
2018
dream - Fine word set 3


Let's start with the gorgeous Magnolia Stems, where I have teamed them up with the perfect papers
 these beautiful 13@rts - Blue Magnolia papers, I have simply given these stems a light coat of gesso
then cutting these chipboard Magnolia Stems into smaller pieces & adhering them thoughout the paper & fussy cut out Magnolia's...


 Next up I decided to add some more foilage thoughtout the fussy cut out paper & chipboard magnolias
so I went with some leafty Twig branches, inking these branches with a lovely light blue, them cutting them into smaller pieces before adhering...Then I have added the year 2018 given this two coats of gesso...


And lastly, we have my title 'beautiful dream' that I have sitting to the right side of my photo...
For the beautiful loopy font I have inked this with a navy blue, then went with 
the word dream from the Fine word set 3 inking this with the same light blue as the leafty Twig branches...

That's it from me today, 
I hope I have inpsired you in some way
Until next time, HAPPY creating....


Friday, June 2, 2023

'Capture'
with Lisa Amiet


Hello all!
It's Lisa here today to share some 2Crafty goodness with you.
I have created a layout using a pic of my gorgeous girl.


2Crafty Chipboard Products used:


For this layout, I have used a couple of the 'Palm Leaves',
that I have finished in a green watercolour effect.


I have also used two of the 'Shrub Set 1',
that I have finished in yellow and green watercolours.


For my title, I have used one of the words from the 'Fine Word Set 3',
again finished in the same green watercolour effect.


I hope that you like what I have created, 
I am happy with how this turned out. 

Until next time!

Lisa


Monday, February 20, 2023

BeeYOUtiful Memories Layout by Tania Ridgwell

Hello there!

Tania joining you today to share the second of my DT projects for February.
I have created a layout for my second share.

"BeeYOUtiful Memories". 


2 Crafty Chipboard Used:

*BeeYoutiful Set
*Fine Word Set 3
*ATC Tiny Arrows
*Frame Doodled


I used the beautiful Paper Rose Studio Bee Happy Paper Collection to create the base for for my layout.  Once I had created my background I set about putting my page together.


I painted the Chipboard Arrows and Doodled Frame Green Lemons Opal Polish.  I then added some Lemon Zest Dylusions Spray over the top.  Once dry I randomly dabbed on some Black Marble Dylusions Spray.  The BeeYOUtiful Chipboard Set was all first sprayed with Black Marble Dylusions Spray and then randomly sponged with the Green Lemons Opal Polish.  The Memories Chipboard was coloured with Black Marble Dylusions Spray also.


I added my photo to my page adding the Doodled Frame to the top left of the photo.  I then embellished around my photo with assorted flowers and tucked in pieces of the BeeYOUtiful and Arrows chipboard to the flowers and between paper layers.


I finished my page by adding the BeeYOUtiful and Memories chipboard to the bottom right of the photo.


Thats' all from me today, I hope I have inspired you all with my Layout.  Until next time thanks so much for stopping by.
Tania xx

Saturday, October 1, 2022

"dream"
Layout by Marie Sabatier


Hello everyone!

I am always happy to meet you to present my new inspiration. 
A bright and flowery layout with this photo of one of our little females "Fouine" 
who likes to be photographed.  She’s twelve years old.


"dream"


The chipboards used:


- Fine Word Set 3
- 11" Celia Frame
- Lacy Border Set
- Heart Clumps


To frame my photo I chose this beautiful chipboard "Celia Frame"
I like it is wide and elegant and gives a lot of importance to my photo.


I first applied a layer of "Peacock" metallic wax and over it a layer of "Lucky Emerald" 
antique wax from the "Prima" brand.


To give volume to my frame I added layers of cardboard and for more detail I added this chipboard 
"Lacy Border Set" it emphasizes the frame and gives style.

It takes a little patience but it is very nice to bring beauty to each chipboard.

I chose this title it is long, fine and highlights my photo. 
I embellished the title with "Orange Creamside" color embossing powder. 


To finish I added this chipboard "Heart Clumps" that I insert behind my photo and
through my bouquet, a bit of fantasy that gives a beautiful result. 


I hope you enjoyed this layout and will have new ideas to create 
with this beautiful range of chipboards.


See you soon!


Friday, June 17, 2022

'Memories'
with Lisa Amiet

 
Hello 2Crafty fans!
It's Lisa here today to share some
 floral steampunk inspiration with you.


2Crafty products used:


For this layout, I have used a die-cut gear cluster cut from black cardstock.
I have then used some of the gears from the 'Giant Gears & Cogs',
which I have painted black, and adhered onto the back of the cluster. 


I have then layered gears from the 'Steampunk Gears Medium' and 'Gears',
all painted with black gesso and adhered to the front of some of the gears in the cluster. 


I then used a metallic wax to rub on the cluster, highlighting the gears and some parts of the die-cut.
By adhering the gears to the die-cut, I am able to build up dimension and texture to the cluster. 


I have also used one of the 'Fine Word Set 3' as my title,
which I have painted white and adhered,
layering over my bottom gear cluster. 


To finish I have used one of the 'Geotags', which I have also given the same metallic wax finish.
The wax finish highlights the chipboard pieces really nicely, and
I really like the mix of steampunk gears and pretty florals. 

Until next time!

Lisa x