Showing posts with label 6'' Circle Revolution Frames. Show all posts

Friday, August 8, 2025

Double Trouble - Laura Gilhuly

 Hi everyone!
Laura back today to share another masculine layout I created of our sons!


2Crafty Products used:


Double Trouble
Tickets
View Finder
Moroccan Bits
6" Circle Revolution Frame
Aged Film Strip
Chevron Bits
Page Tab Set


I primed all the chipboard with clear gesso including the center section of the revolution frames.


I then covered the chipboard with a mix of lumberjack plaid, rustic wilderness, and scorched timber distress inks that I sprayed with water then allowed to dry naturally.  I inked the outer edges of each piece with the scorched timber ink also


I wanted to use the highlights of red from the awesome papers because Ty's bike he built was red and I love the highlights it provided and it made the title stand out.


Thanks for stopping by


Wednesday, October 9, 2024

Fun In The Sun
Laura Gilhuly

 Hi!
Laura here today to share my next layout!


Fun in the Sun


We like to spend a lot of time at the beach and I like to take a lot of photos while we are there.

2Crafty products used:


I painted then heat embossed the title.  While the embossing powder was still wet I drop a
small amount of white and brown paint on the title


All the pieces were covered in gesso, then painted in either brown or white.  After the paint dried I sanded to create a more shabby washed out look.  For the fence I also dry brushed a bit of white paint over it after I had finished sanding to add a more aged look


I cut one of teh revolution frames and placed one on top and one under the photo.  I used a whole one under the photo.  I also added some altered grid bits into the clusters.

Thanks so much for stopping by


Tuesday, August 8, 2023

Filled With Wonder by Emma Zappone plus VIDEO

 Hello Creatives, Em with you today.
The piece I am sharing features lots of chipboard circles with a lovely pastel colour tone.
Plus there is a VIDEO for you to watch 🥳


Here are the chipboard pieces used....

6" Revolution Frame
Circle Stack
Circle Dot Frames
Mini Decorative Frame Set 9


I used only the negatives from the Revolution frames and a couple of different sizes from the circle dot frame and stack.


The Circle's all have the same finish just a different colour. They started with an acrylic paint base, once dry, I added a white paint by flicking over them all. Once that was dry, I then added a clear emboss to bring out all the colour.


I love how effective these circles look with the background and under the image stack.


The cool decorative frame is painted with white crackle paste, allowed to dry and then a little pink ink wiped back to sit in the 'cracks', finished with a pink wax to really highlight the crackle pattern. This was then cut in half to fir around the photo how I wanted.


I really enjoyed using the same style of elements, they compliment each other so well.

I would love you to grab a cuppa and enjoy the video made here....


I hope you enjoyed 🥰


Hope this inspires you today.

Thanks for joining me.
Stay Crafty, Em xx


Wednesday, June 21, 2023

"Togetherness my favourite Time"
layout by Marie Sabatier

Hello everyone,

For my second inspiration in June, I present a layout with a photo of my little niece accompanied by "Frimousse" who is the little female dog of these grandparents.

Children love animals although they are sometimes a bit too invasive.
I like the way they pose.


"Togetherness my favourite Time" 


The 2Crafty chipboard used: 


- "Togetherness my favourite Time" Title
- 6" Circle Revolution Frame
- Heart-Clumps


It is very rare for me to choose a black background but with this photo it seemed perfectly consistent.


For originality, I choose two identical photos, which also allows me to use two frames in different ways. One under my picture and the other above. 
I love serial chipboards that allow you to imagine different layouts.


To embellish the chipboards I only used Distress Oxide ink. 
I used two shades of pink and applied them more or less intensely.
I like this sentence that fits perfectly with my layout.


With the chipboards "Heart-Clumps" I bring a nice touch to my presentation.


As always I tried to sublimate these beautiful chipboards and hope you will also be tempted.

2Crafty is now available to all via their new website, so if you don't have a local store, you can
now buy direct.


Thank you for your visit, always appreciated!


Friday, March 4, 2022

My First Post for 2 Crafty Chipboard
by Tania Ridgwell

Hi there!  

Tania joining you today and I am super excited to be sharing my first post as 
part of the 2 Crafty Chipboard Design Team.  I can't wait to share my 
creations with you all through out the year using their gorgeous chipboard.   
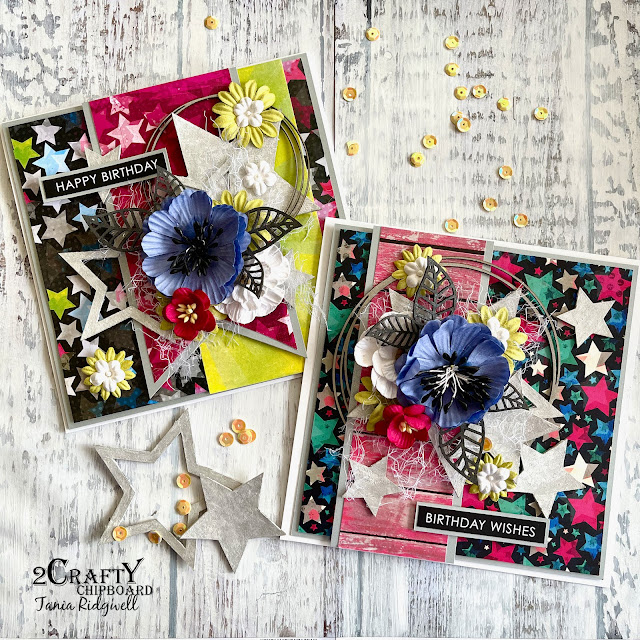
For today's share I have created two cards.


Gorgeous 2 Crafty Chipboard Products Used....
*Stars 
*Lattice Leaves
*6" Circle Revolution Frames 


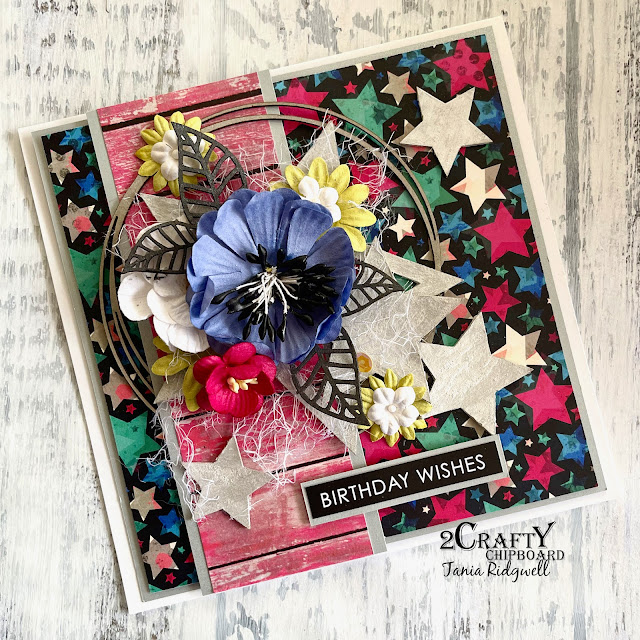
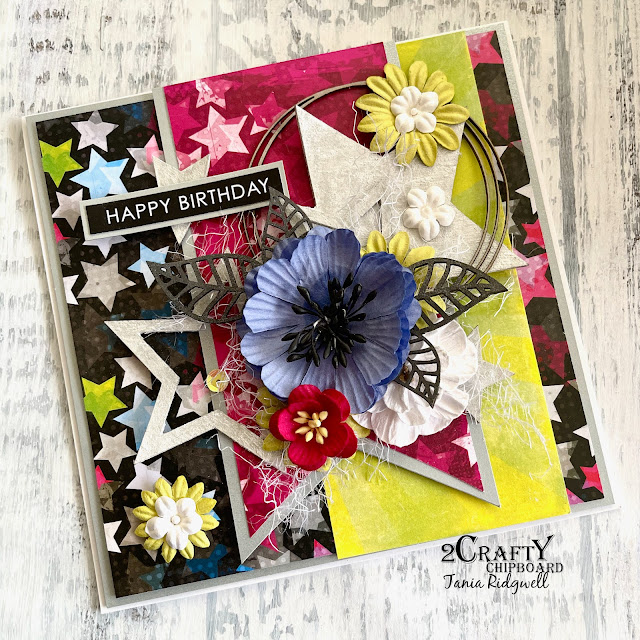
                              To create my cards I first painted the chipboard stars with two coats
                              of Inca Gold Silver and kept the Circle Revolution Frames raw and 
                                      sprayed the Lattice Leaves with Kaisercraft Black Spray.

I layered each card with Patterned Paper & Silver Shimmer Cardstock from Paper Rose Studio.  
I played around with the Stars and Circle Chipboard on the cards until I was happy. 
 Finally I embellished the cards with assorted flowers and finished by tucking in the 
Lattice Leaves amongst the flowers.

Here is the first card....


Second card....


Well thanks for stopping by to see my first post as part of the 2 Crafty Chipboard Design Team, 
I hope I have inspired you a little with my two cards.  
I will be back later in the month to share another project with you all. 

 Until next time happy crafting.

Tania xx


Saturday, August 10, 2019

This is my Happy Face
by Sabrina Turpin

Hello 2Crafty fans!

I'm back from a nice summer vacation family trip on the beaches of the US east coast and I'm in a awesome mood! I've had time to relax, recharge, enjoy great food, play play play in the sand and the water and overall spend real good time with my kids and husband! My inspiration levels are back to their peaks and I'm eager to show you what I brewed not long after being back home! 

"This is my Happy Face"


For the "Leafy Shrubs Set 2", I used a mint-green shimering gold wax paste.


On the "Aztec Arrows Set 1", I applied a pink embossing ink very roughly so we can still see the original chipboard texture through. On the "6" Circle Revolution Frames", I applied a honey colored ink and dabbed a yellow embossing ink on top of it. 


For the title, "This is my Happy Face", I used two coats of metalised jade embossing powder.

 2Crafty Chipboards Used... 
6" Circle Revolution Frames [660030]
Leafy Shrubs Set 2 [m00494]
Aztec Arrows Set 1 [m00806]
This is my Happy face [w00430]


That's all for me today!
  I hope you enjoyed this creation as much as I had fun making it!
 I'll be back soon with even more ideas to share with you. Cheers!


Monday, June 10, 2019

"Handsome"
By Sabrina Turpin

Hello 2Crafty friends!

For my layout today I wanted to build around a photo of my pre-teen son showing me his true smile, something that is getting a bit as he's growing up! One moment he can be showing his newfound attitude and the next one he can be the sweetest human being on earth!

With this layout, I wanted to highlight these both sides of him, combining both soft and hard elements. It's one of my simplest layouts in recent times, but I think it really allowed the vibe to come through.

"Handsome".


On the smallest circle of the "6" Circle Revolution Frames", I applied red embossing ink an then applied black embossing ink on top. On the "Mini Tags", I applied gray ink roughly and then I traced the contour with black ink. For the title, "Handsome - script", I used gray pearl metallic paint.


On the "Stars", I applied black embossing powder roughly, then dabbed red embossing ink on top so the black and the original chipboard color would stay visible in certain parts. For the "Circular Panel", I used silver embossing powder.


In this layout, I used the following 2Crafty chipboards:
Mini Tags [m00363]
Circular Panel [m00462]
6" Circle Revolution Frames [66030]
Stars [m00265] 
Handsome - script [w00511]


That's all for me today!
 I will be back in a few weeks with more ideas to share with you.
Until then, have fun creating!


Wednesday, November 21, 2018

Tags By Bec Genet

Hi everyone today I'm stopping by to share two tags that I made for 2Crafty Chipboard.

I always make layouts but this time I decided to switch it up and make some tags instead,
I've been very time poor this month so tags are much faster to make. To also save time
 I used only liquid pearls on my chipboard pieces again because it's just so quick and easy to do.


2Crafty Chipboard Used:
Card Word Circles - Sentiments
6in Circle Revolution Frames
Dotty Bits
Lacey Border Set
Flourish Adornment Set 3

Thank you Tag


On the Thank You Tag I used the chippie pieces: 
Card Word Circles - Sentiments, 6in Circle Revolution Frames and Dotty Bits

I used 2 of the 6in Circle Revolution Frames, a large one that I coloured with Nuvo Crystal Drops in Wedgewood Blue and I only used half of this frame. The smaller 6in Circle Revolution Frame I coloured with Nuvo Crystal Drops in Midnight Blue. The Thank You title from the Card Word Circles - Sentiments was also coloured in the same colour. Tucked under the flowers is two pieces from the Dotty Bits which are coloured with Ranger Liquid Pearls in White Opal

Here are my close ups:


 Best Wishes Tag


On the Best Wishes Tag ...
I used the chippie pieces Card Word Circles - Sentiments, Lacey Border Set 
and Flourish Adornment Set 3. 

I cut the Lacey Border Set into 2 pieces and coloured them with Nuvo Crystal Drops in Wisteria Purple. The Flourish Adornment piece was coloured with Nuvo Crystal Drops in Neptune and I also cut this piece in half. Half was placed at the top of the tag and the other half at the bottom of the tag. The  Best Wishes Title from the Card Word Circles - Sentiments pack was coloured with Nuvo Crystal Drops in Raspberry Pink.

Here are the close ups:


Thanks for stopping by.