Showing posts with label "Stars". Show all posts

Friday, March 4, 2022

My First Post for 2 Crafty Chipboard
by Tania Ridgwell

Hi there!  

Tania joining you today and I am super excited to be sharing my first post as 
part of the 2 Crafty Chipboard Design Team.  I can't wait to share my 
creations with you all through out the year using their gorgeous chipboard.   
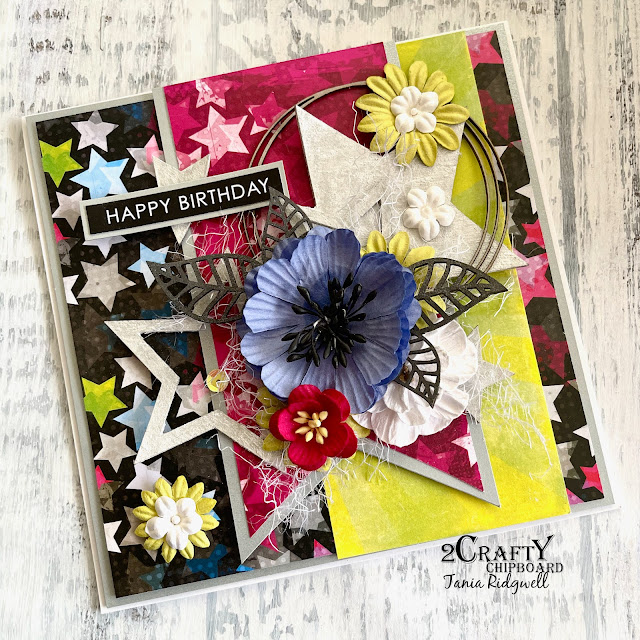
For today's share I have created two cards.


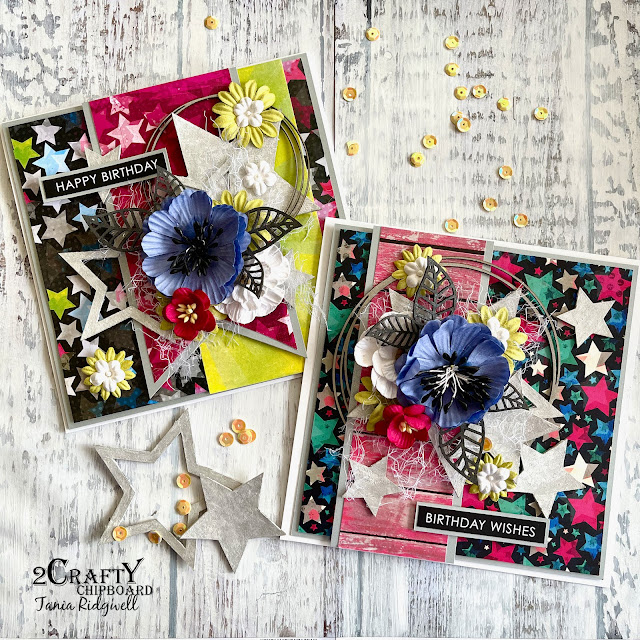
Gorgeous 2 Crafty Chipboard Products Used....
*Stars 
*Lattice Leaves
*6" Circle Revolution Frames 


                              To create my cards I first painted the chipboard stars with two coats
                              of Inca Gold Silver and kept the Circle Revolution Frames raw and 
                                      sprayed the Lattice Leaves with Kaisercraft Black Spray.

I layered each card with Patterned Paper & Silver Shimmer Cardstock from Paper Rose Studio.  
I played around with the Stars and Circle Chipboard on the cards until I was happy. 
 Finally I embellished the cards with assorted flowers and finished by tucking in the 
Lattice Leaves amongst the flowers.

Here is the first card....
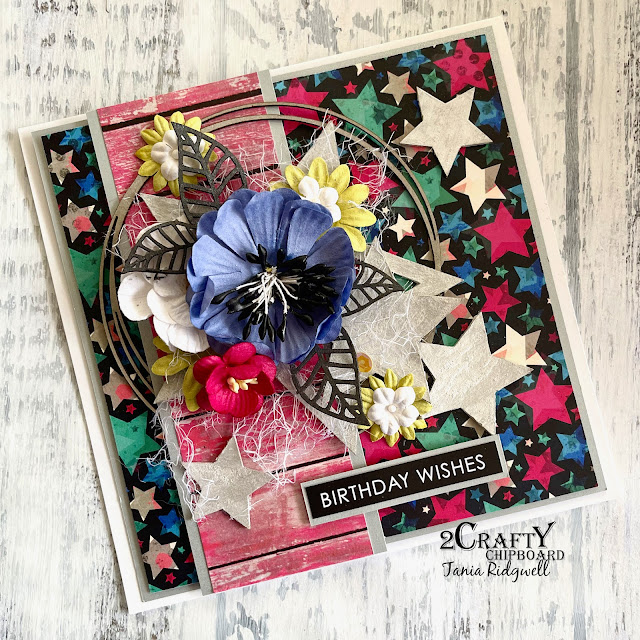

Second card....


Well thanks for stopping by to see my first post as part of the 2 Crafty Chipboard Design Team, 
I hope I have inspired you a little with my two cards.  
I will be back later in the month to share another project with you all. 

 Until next time happy crafting.

Tania xx


Tuesday, August 24, 2021

#AWESOME layout
by Rachael Funnell


Hello 2 Crafty fans!
Rach with you sharing another dose of 2 Crafty Chipboard
inspiration, with this masculine mixed media page...


2 Crafty Chipoboard used:
Medium flim strip
#AWESOME
Diamond Chunks
ATC- Tiny Hearts & Stars
Stars


I have stuck with a pretty simple but affective technique 
& that is inking all chipboard pieces...
Let's start of with the couple of the ATC-Tiny Stars & Diamond Chunks
where I have inked them with black....

Also! inked black is the Medium flim strip,
then I have cut into two pieces before adhering...
The three larger stars have been inked with Distress inks-
Peacock feathers, broken China & Pumice Stone..


Lastly! for my title #AWESOME which has been inked 
with Distress Ink  - Pumice Stone..

That's it from for now
Take Care & HAPPY crafting

Friday, January 22, 2021

'Showtime' layout
by Rachael Funnell


Hello & welcome to the 2 Crafty blog
Rach here with you and 
today I have this fun layout, featuring my nephew....


2 Crafty Chipboard used: 
ATC- Music Notes
6x6 Theme - Dance set
Hashtag - word set 2
Stars
2020


Starting with the 2020, where I inked it black..

Also! inked black are some of the 
Larger Music Notes from the 6x6 theme set
and a couple of the smaller Music notes from the  ATC- Music Notes


And for some more inking!! 
This time #funtimes and the rest of the music notes
Inking with Tim Holtz - Frayed burlap...


Lastly! is the Stars & my Title Showtime..
where I first gave them a coat of gesso,
 then finished them off with Tim Holtz - Fired brick (red)

Thanks for stopping by 
& hopefully you are inpsired in some way
Until next time..


Sunday, November 1, 2020

"Me & My Dad"
Layout and Video
By Marie Sabatier


Hello everyone, 

I am happy to meet you again and to present my first page of this 
month of November  along with a step by step video.

I chose to make a page on the theme of Christmas, I like this period so much 
but this year I think it will be very difficult to share this celebration with the family
 with the new reconfinement measures taken in France.

I took this photo of my son with my grandson it was his first Christmas in 2019.

"Me and My Dad"


TO VIEW VIDEO CLICK HERE


2Crafty Chipboards used :

- Me & My Dad
- 12 X 12 Clock Faces
- Deer Set
- Stars
- Winter Twig
- 2019
- Merry Christmas Card Set Fine 


Here are some close-ups, but don't hesitate to watch the video for more details.

I wanted to feature chipboards on this page. 
I hope I have succeeded!

I mainly embellished each chipboard with 
Lindy's "White Purely" and "Chalk It Up" embossing powder.


Here on the Deer chipboards I like the sheer, shiny effect 
and I thought it was bold to add those words "Merry Christmas"


For the background I chose the "Clock Faces" chipboard board which I cut 
and I used this title "Me & My Dad" it was also obvious for my page.


A little reminder of the year!


Stars to shine!


Here I used the "Winter Twig" chipboards I really like their effect.


I added a lot of material to the bottom of my page to give relief and warmth. 
Finally, a few tone-on-tone flowers.

I hope I made you want to watch the video and gave you some inspiration.

See you soon!


Wednesday, April 8, 2020

' Blood Sweat & Gears' layout
By Rachael Funnell

Hello Everyone!
Today I have my first share for this month...


This masculine/grungy layout featuring a photo 
I captured last yr of my son, hubby & nephew...
And have incorparated  some awesome chipboard 
pieces, including a few from the Steampunk range!!!

2 Crafty Chipboard I've used::


Steampunk cog strip
A Couple of medium stars from the stars pack
 Tiny stars from ATC - Tiny Hearts & Stars 
2019
a  couple medium Steampunk gears
Corner Steampunk 2
Blood Sweat & Gears


Starting with the perect title for this page
 'Blood, Sweat & Gears' & 2019
Both inked with black...


To incorporate the assortment of stars used for 
the page I inked the ATC - Tiny Stars and
other sized stars with either black or brown.....


The base page used, already had a great steampunk cluster image
SO I decided to ink a the Steampunk Strip with a teal,
adhering it over part of the image, then finishing it with a
couple of the Medium Steampunk gears that I had inked blue....


Lastly the Corner Steampunk 2 
I randomly inking this again with a brown & the 
adding another Medium Steampunk gear 
that I had inked blue..
Finalizing my layout with splattering of gold paint...


Hopefully I hve inspired you in some way  
 to create your next masculine page...
Take care & until next time!


Sunday, November 10, 2019

You rock my world
by Sabrina Turpin

Hello 2Crafty fans!

My big boy is growing up too fast! This week he's leaving for a full week-end by himself to go to a big swimming competition. It's the first time he'll be so far from home by himself! He's growing up to be such a wonderful boy. That's why I decided to create a layout of him sending his love to the world. I'm sharing this layout with you, I hope it'll give you some inspiration!

"You rock my World"


On the "Stars" chipboard, in the back, I applied a black embossing ink and a glittering pencil on top (that's why it's shimmering like this). For the the "Swirly Star Border", in the front, I used a black gesso and then I applied some green wax on top that gives that metallic gold look.


On the "Checkerboard Clumps", I used some mint green embossing powder. For the title, "You Rock My World", I used a shabby green embossing enamel.

For this layout I used the following chippies:

Stars [M00265]
Checkerboard clumps [M00584]
Swirly Star Border [DB0110]
You rock my world [W00402]


That's all for me today! I hope you enjoyed this layout and it helped inspire you to create great stuff! I'll be back in a few weeks with more ideas to share with you! Cheers!


Thursday, August 22, 2019

Happiness is this by
Sabrina Turpin

Hello 2Crafty fans!

I'm still in a very cheery mood as we're having beautiful weather this summer and a great time having fun before it's back-to-school time next week!
 Today I'd like to share a layout that fits this mood, featuring my husband eating his favorite candy, sour watermelon slices, wearing his watermelon slice shirt! I prepared a layout with fresh, bright colors to go with the watermelon theme, choosing a palette that I don't often pick for my hubby.

"Happiness is this"


On the "Mini Tags", I applied pink embossing ink and traced the contour with black ink. For the "Stars", I applied jade-green shimmering paint.


For the "Mini Branches", I used two coats of peach embossing powder infused with mini sequins and traced the contour with black ink.


On the "Star Bubble Set", I applied two coats of yellow embossing ink.


For the title, "Happiness is this", I simply applied black paint.

 The following 2Crafty chipboards have been used in this layout:
Star Bubble Set [M00666]
Mini Branches [MB013]
Happiness  is this [W00163]
Mini Tags [M00363]
Stars [M00265]


That's all for me today! I hope my layout helped give you some inspiration for your own creations! I'll be back with more ideas soon, wish me good luck for back-to-school week!


Monday, June 10, 2019

"Handsome"
By Sabrina Turpin

Hello 2Crafty friends!

For my layout today I wanted to build around a photo of my pre-teen son showing me his true smile, something that is getting a bit as he's growing up! One moment he can be showing his newfound attitude and the next one he can be the sweetest human being on earth!

With this layout, I wanted to highlight these both sides of him, combining both soft and hard elements. It's one of my simplest layouts in recent times, but I think it really allowed the vibe to come through.

"Handsome".


On the smallest circle of the "6" Circle Revolution Frames", I applied red embossing ink an then applied black embossing ink on top. On the "Mini Tags", I applied gray ink roughly and then I traced the contour with black ink. For the title, "Handsome - script", I used gray pearl metallic paint.


On the "Stars", I applied black embossing powder roughly, then dabbed red embossing ink on top so the black and the original chipboard color would stay visible in certain parts. For the "Circular Panel", I used silver embossing powder.


In this layout, I used the following 2Crafty chipboards:
Mini Tags [m00363]
Circular Panel [m00462]
6" Circle Revolution Frames [66030]
Stars [m00265] 
Handsome - script [w00511]


That's all for me today!
 I will be back in a few weeks with more ideas to share with you.
Until then, have fun creating!