Showing posts with label 4" Mandala No3. Show all posts

Tuesday, April 6, 2021

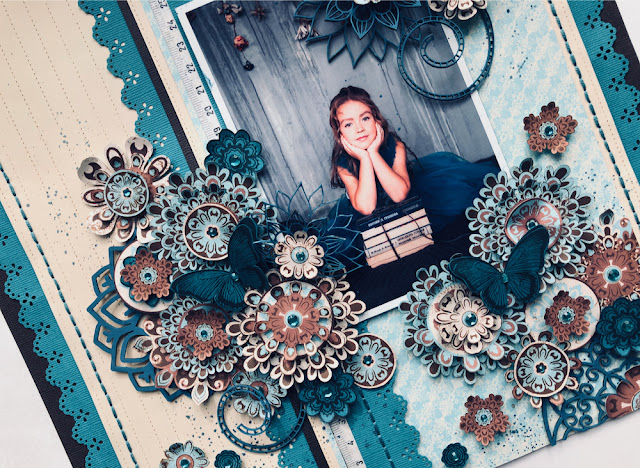
“Mandala magic!!" Layout By Chrissy Tingey


Hi everyone, I have had these gorgeous papers in my stash for years, 
I love them so much with the mandala type designs -  
I now had the perfect Chipboards to use with them. 
My first job was to fussy cut all the beautiful images from the papers
once that was done I began to layer them up, in readiness for assembling on my layout. 


Chipboard used: 
Aztec Flower Set 1.
2c 4 inch Mandala 3.
2c 4 inch Mandala 1.
Fifi Flourish. 


I wanted all the chipboard to colour coordinate with the papers, 
so I picked out the gorgeous teal colour.
 I didn’t have the exact match of medium so I just mixed a few colours of paint and mists together
 until I was happy. 
A couple of coats and they were done. I love that these chipboards take anything 
you put on them. Even those very delicate Aztec flowers took the paint mix perfectly. 
I started to make clusters of the fussy cut and layered paper elements around my layout
then tucked a piece of chipboard in with them. 


The Aztec flower chipboards are stunning! - I carefully lifted & shaped the inner section to give
some height and dimension. 


I just love the added texture the chipboards give to a layout or project - 
the chipboard mandala’s are so beautiful, they would also look fabulous layered up
like the fussy cut paper elements. 
Mmmm I feel another project coming on using them this way.


Don’t forget, if you want to colour coordinate your
chipboard but don’t have the right colour, just mix a few colours of mediums up - 
I used acrylic paint and mists, it
worked perfectly. 

Thanks for stopping by, you can find lots more close-ups of this layout over on my Instagram page 

Hugs Chrissy xXx 


Friday, December 11, 2020

Live Laugh Love
by Sabrina Turpin

 Hello 2Crafty fans!

I hope you're doing great! The layout I'm sharing with you today all started from a nice mix of colors I had started to play with. It's one of those times where you actually start backwards from what you're used to and you're not too sure where you're going to end! But I'm very happy with the result, and it was even approved by my daughter (which is quite a big endorsement)!

Live Laugh Love


For the "Summer Leaf Stems", I rubbed an antique silver wax with my fingers
 and used my heat gun to get a smoother finish.


On the "4" Mandala No.3", I applied one coat of navy watercolor then added
 one coat of pink on top to get a dark blue-purple color.


For the "Frame Allegra", I used pink metallic paint and dabbed some 
teal metallic embossing ink on top of it.


For the title, "Live Laugh Love", I applied a pink-gold embossing enamel.

I used the following 2Crafty chipboards in this layout:

Frame Allegra [fr0001]
4" Mandala No. 3 [m00788]
Summer Leaf Stems [m00411]
Live Laugh Love Title [w00223]


That's all for me today! I hope you enjoyed this layout and that 
it gave you some inspiration for your own creations! I'll be back in
 a few weeks with a new creation to share with you.

 Until then,
 I wish you happy crafting!


Thursday, April 4, 2019

"Adorable" Ballet Layout
by Elena Martynova


Hi 2Crafty Fans!
Today I'd like to share this layout I created with a photo of a ballerina. 
I admire ballerinas, their hard work, grace, strength and artistry!
 You need to have an iron character to achieve heights in this art form.


At first I wanted to make the layout very soft without bright colors,
And then a bright butterfly was added as something of themselves
I wanted to make the title stand out in parts.

A chipboard Mandala became a little sun.


I painted the leaves in bright green 
and added shine with the help of embossing powder.


Some golden sequins to fill the work with shine.


2Crafty СhipboardUsed:

I hope that I have inspired you today!
Happy Crafting!


Saturday, January 5, 2019

"Oh What Fun" Christmas Inspiration
By Karan Gerber

Hello friends.
Welcome to my first post for 2 Crafty Chipboard.  For my first project
 I thought I would do an "off the page" wall hanging titled "Oh What Fun".

The base of it is on a 8"x8" corrugated cardboard backed on thick chipboard
 so it can be set on a plate stand. Perfect for holiday decor.


All of the chipboard pieces were gessoed prior to adding my color. 


After the gesso was dry, I added a coat of Cosmic Shimmer
 to the sentiment and the Mandala.


I cut the Mandala in half and placed a piece on either side of my paper layers.
 I also added some gold antique wax on random areas to highlight the piece.  
Some frosting powder was added to blend in with the details on the project.

The lattice leaves and Leafy shrub were prepped the same way, 


I used two of the leaves from the Leafy shrub piece and I cut them apart
 so I can add them under my flower layers throughout my project. 


I hope you have enjoyed my first project with 2crafty Chipboard today,
& I look forward to inspiring you this coming year. 


2Crafty Chipboard Used...
"Cherish the Moments" - title
Lattice Leaves
Leafy Shrub Set #3
Mandala #3


Happy Scrapping! 

Thank you for stopping by!


Tuesday, November 13, 2018

'Choose Happy' by Elisa Ablett - Mandala inspiration for November


Hi Crafters 💙💚💙💚💙💚

Elisa here with the first of my November inspirations for you.

Have  you seen the gorgeous new Mandala Chipboard Designs as yet??

If you haven't check with your local stockist to order your sets today, they are absolutely beautiful.

For my latest layout, I wanted to create a free spirited boho inspired layout to go with the Title piece - Choose Happy and the funny and cheeky photo of my great niece who is quite the free spirited character.

I had some lovely new inks from Avery Elle I wanted to try and some lovely metal flowers as well.

A tip for you all - grab out all your old hand punches I love using my circle punches, punch out some lovely watercolour paper and stamp with a mandala stamp or flower stamp to match the chippie. Then add your inks over the top, handy little hand crafted embellies for your page.

Here are the 2Crafty Chipboard products and links that I used on my layout:- 


Here are my close ups, lets have a look at how I altered my chipboard to match:-

 The title 'Choose Happy' I decided I wanted a two toned embossing to match the inks 
featured in the background. I started with the lightest powder at the top, embossed and then added the darker blue powder to the bottom half of the title and then embossed. 


I also embossed the 4" Mandala and Flower Medallion piece, firstly with a white glitter powder and then while still hot I sprinkled the middle of each piece with the lighter turquoise and blue colour and heat embossed so they melted together.
 I hand coloured each of the hearts with a blue posca paint pen while they were still in the negative chipboard frame to make it easier, then when they had dried, I carefully popped them out and glued them to my page.


To add extra interest to my chippie pieces, I added hand stamped punched circles that I had coloured with the inks and mounted them to the page over the top of the Chipboard with 3D mounting foam, this ties the page and boho theme in quite nicely.


That's it from me today, make sure you leave me some love in the comments!

Hugs xx

Elisa 


Tuesday, October 23, 2018

More October Inspiration
By Rachael Funnell

Hello 2Crafty fans!
Rach with you today sharing a layout I recently created using some gorgeous
 2Crafty Chipboard pieces... This layout featuring my gorgeous girl!!!

'#ADORE'

2Crafty Chipboard used: 
Soft Feather 
4" Mandala No 3.
Indian feathers
ATC - hearts (from ATC Hearts & Stars pack)
Dream Catcher
#ADORE from Mini # word set 1

I started off with treating all chipboard pieces with a coat of gesso.....


Next: I cut the beautiful 4" Mandala No 3. in half and before placing a piece either side
 of my photo I randomly added some blue using a Tim holtz Distress Crayon! Doing the
 same with the Large Soft Feather and the 3 Indian feathers just adding a bit more colour
 to these....
Don't they look really PRETTY!!


Next: Adding a another coat of gesso to the few ATC - hearts before attaching them....


Also! adding another coat of gesso to the Dream Catcher once dried & with my finger 
rubbing some colour onto the catcher using Time Hotlz - Distress Oxide 'Seedless preserves'.


Next: Inking the chipboard piece #ADORE with Versa Color - Violet ink & adhering
 onto my B& W photo... I was really HAPPY with how this looked sitting on the photo!!


Finishing off by adding an assortment of  flowers, a couple some fussy
 cut out ones as well as a couple of purple flowers just to bring it altogether nicely.

Thank you for stopping by & I hope you like & felt a little inspired...

Until next time HAPPY Crafting xx