Showing posts with label 2Crafty design team. Show all posts

Tuesday, July 9, 2024

'Adeline' - By Emma Zappone

Hey friends,
Em with you today, sharing my 1st project for July.


"Adeline"


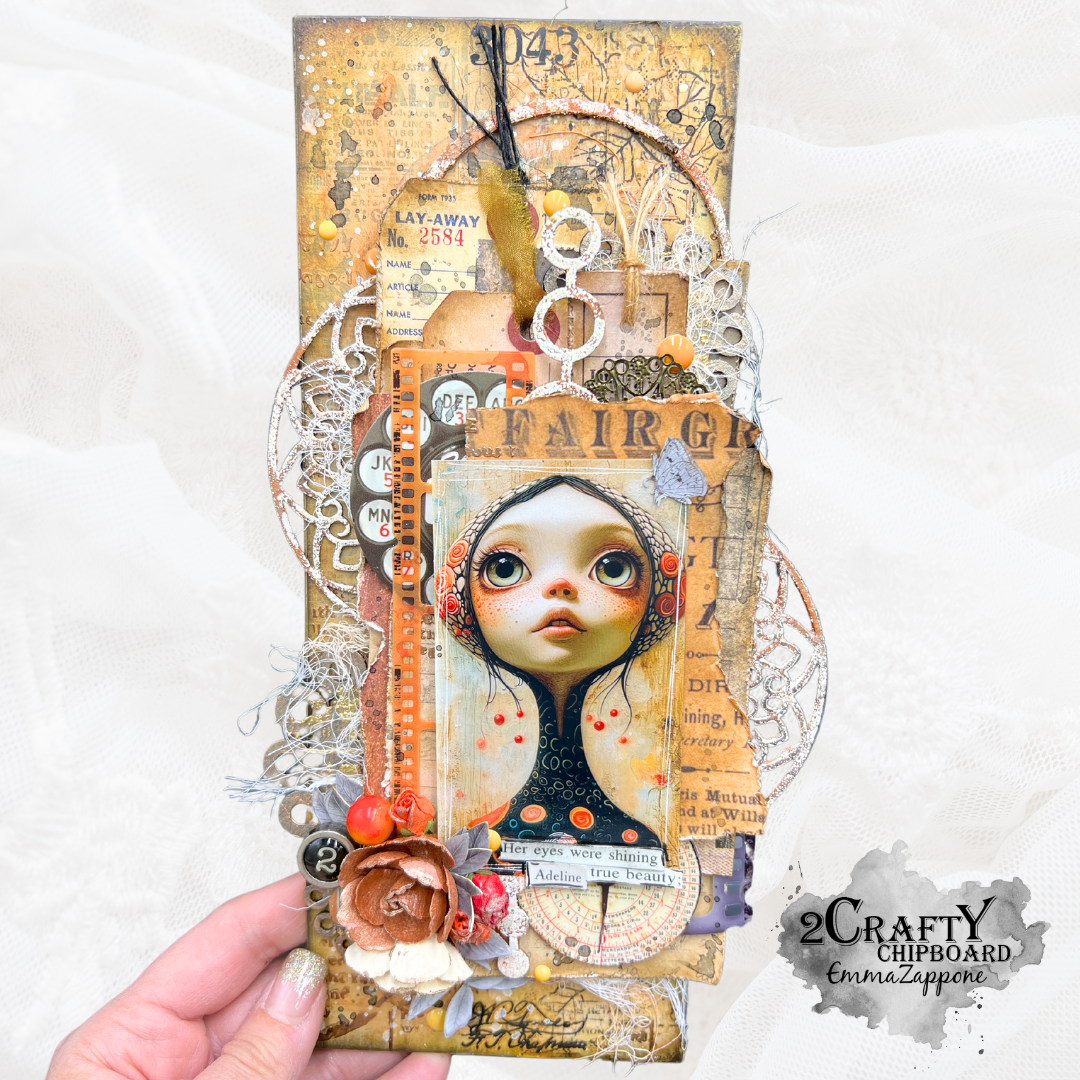
Here are the chipboard elements used:

6" Mandala
Beaded Hanging Heart
Circle Flowers


I started by painting all the chipboard with black Gesso.
Then I applied a metallic gold acrylic over the top.
The circle flowers show this colour the best.


Once these were dry, I added the same paint through a stencil and added gold emboss powder to add some visual interest on these pieces.


The remaining chipboard all had some chunky emboss powder unevenly dusted over to create a weathered look, or peeling paint look.


The beaded heart chipboard, had the heart cut off and then I dissected even further by cutting the circles in half again to add more variety to my layers.


The Mandala was also cut in half to extend the use amongst my layers.


I hope you feel inspired and get your create on too.

Till next time, Em xx


Monday, October 30, 2023

'Dreamer of Dreams' by Emma Zappone

Hello all you glorious 2Crafty friends!
Emma with you today and I have a 10x10" layout to share.
I have been loving the monochromatic feels lately when I create and so this page is full of pink shades.


I have used all sorts of chippy for this one, 5 different pieces are featured.....

ATC Scissors
Foliage set 9
Foliage set 10
Mini Checkerboard pieces
Irish Knot border


I have tucked and layered these pieces with my paper and flower elements.


I started with the Irish Knot border as I wanted something delicate but would go with a small amount of grunge.
I painted this with a pink acrylic and then applied pink emboss powder to give it a simple shine.


Both the Foliage pieces were painted first with acrylic, keeping it simple by painting it either white or pink and then applying the emboss powder over the top.
With the Foliage set 9 pieces I added a 2 tone effect with a chunky white emboss and the pink emboss.


The mini Checkerboard pieces were covered with a thick white chunky white emboss powder. I wanted these to be really white to stand out amongst all the pink layers and give more textural dimension.


This same white emboss was added to the pair of scissors, that I place delicately on top of the flower as one of the main focal features.


I hope this page inspires you a little today and I look forward to catching you all again in the new month.

Till then, Stay Crafty, Em xx


Wednesday, March 8, 2023

'Let It Be' - by Emma Zappone

 Hi there 2Crafty friends.
Em with you today sharing a layout featuring a neutral palette with hints of colour.
This style is becoming a real fave of mine.


I have used these pieces amongst my layers.....

11" Fine Floral Frame Set
Grid Panel
Mini Decorative Frames Set 9


I thought about keeping my chippy raw for this one as I wanted to utilise the neutral, brown tones. 
But I chose to paint the Grid panel and the Frames with a cream acrylic paint, so that I could antique them instead.


Once the acrylic was dry on the frames, I added an Umber liquid acrylic to add some depth in colour. Dried that and then applied an antiquing wax to them. Loved this effect.


The Grid Panel was left cream with some stamping to finish it off.
I added some stamping to the Frames as well.


The Fine Florals were painted with colour acrylics to match the tones I wanted to pull from the image.
These were then set with a clear emboss powder. Which gives it a beautiful shine.


I love how tonal all the chipboard is. They really are the perfect layering embellishment.


Thanks for joining me today. I hope I have inspired a little.
I look forward to seeing you again later in the month.

Till then stay crafty, Em xx


Monday, October 10, 2022

'No Grit, No Pearl' by Emma Zappone

Happy weekend 2Crafty friends.
Emma with you for today's project share. 


And these are the chipboard pieces I chose....

Flourish Adornment Set 5
11" Celia Frame
Lace Doily Frame


Striking chipboard to really compliment my picture and papers.


Let's talk about the finishes on the Flourish's first. Yet again I love a simple yet fun finish. I painted these with Black Gesso and once dried stamped emboss ink and added a cream emboss powder over the top. I chose a stamp with a small texture to really add some pattern to the chippy.


The Celia frame is just stunning and for this piece I painted it in an Impasto brown first. I added the paint with a sponge to create a slightly raised texture to the paint as it dried. Then I added some wax in white Gold. This over the brown acrylic really helped add a vintage/antique feel.


I really wanted to add a small amount of the lavender colour which comes through the cat in the image chosen for this layout. So I added a few layers of colour to the Lace Doily and chosen resin pieces.


The Doily pieces were painted black to start with and then I painted a lavender acrylic but wiped back a little also, as I didn't want it to be super purple. I then added a couple of waxes over the top including a lavender wax to help nurture the colour. 


Thanks again for joining me today and I do hope my project has been a little inspiring.

I hope you have a lovely weekend.

Stay Crafty, Em xx


Monday, January 20, 2020

My Lovely Daughter
By Jenny J.

Good morning everyone!

Here is my second January inspiration at 2Crafty.


You will see below all the gorgeous pieces that I've used on that layout.

2Crafty Chipboard Used
-Star circular frames
-Interlocking grid panel
-Isn't she lovely
-Foliage set 6
-Foliage set 1
-Dandelions


As usual, I've started by covering my background paper with clear gesso.  
Then, I've used modeling paste, 2 different stencils and some sprays to add a bit of textures.  
I've displayed my photo on layers of cardboard and papers and of course, 
a beautiful piece of 2Crafty chipboard: "Interlocking grid panel".  
Both  pieces of this set are treated with black gesso and Finnabair's waxes.

The "Star circular frame" on my photo is simply sprayed.


 That title, "Isn't she lovely" was the perfect one for my daughter's picture, don't you think?
That chippie is embossed with a gold embossing powder.

Below, you will see the "Dandelions" painted in white, 
and one piece of the "Foliage set 1", sprayed with the same color as the Star circular frame.
There's another piece of that set under the title ;)


Finally, the other pieces named previously:
"Interlocking grid panel"
"Foliage set 1" but also
"Foliage set 6" which is  embossed with a teal powder.


Thanks for stopping by 
and don't forget to visit 


Saturday, January 5, 2019

"Oh What Fun" Christmas Inspiration
By Karan Gerber

Hello friends.
Welcome to my first post for 2 Crafty Chipboard.  For my first project
 I thought I would do an "off the page" wall hanging titled "Oh What Fun".

The base of it is on a 8"x8" corrugated cardboard backed on thick chipboard
 so it can be set on a plate stand. Perfect for holiday decor.


All of the chipboard pieces were gessoed prior to adding my color. 


After the gesso was dry, I added a coat of Cosmic Shimmer
 to the sentiment and the Mandala.


I cut the Mandala in half and placed a piece on either side of my paper layers.
 I also added some gold antique wax on random areas to highlight the piece.  
Some frosting powder was added to blend in with the details on the project.

The lattice leaves and Leafy shrub were prepped the same way, 


I used two of the leaves from the Leafy shrub piece and I cut them apart
 so I can add them under my flower layers throughout my project. 


I hope you have enjoyed my first project with 2crafty Chipboard today,
& I look forward to inspiring you this coming year. 


2Crafty Chipboard Used...
"Cherish the Moments" - title
Lattice Leaves
Leafy Shrub Set #3
Mandala #3


Happy Scrapping! 

Thank you for stopping by!


Sunday, December 16, 2018

"Merry Christmas"
Layout by Marie Sabatier


Here is my third page for this month of December, I love to create for this
 period of the year, the colors, the shine, the magic of Christmas.

The inspiration for this page is this beautiful "Merry Christmas" title, it is so 
generous in detail and also my first creation for my little little niece "Romy"

"Merry Christmas"

As I often say, first apply a layer of gesso to prepare and protect the chipboards.

Here I covered some embossing powder of Oakleaf Olive color to try & bring 
out the details on the title & I also added a second color Tannenbaum 
Green Gold on the  stars on the flakes too.


For all chipboards I applied embossing powder. I love this effect of softness
 that it brings to the touch and it gives relief to the chipboards.

Some details :...


2Crafty Chipboard used :
- Christmas Cluster 1
- Star Circular Frames
- Stellar Snow Flakes
- ATC-Tiny-Hearts-Stars-Pack


This is my last page for 2018 & that brings me happiness, for me to be
 able to create with these beautiful chipboards and this great team.

I am very happy to be back with you again next year.

I wish you a very good end of the year, & a lot of happiness.

See you next year....

Thank you