Showing posts with label "Chicken Wire Panel". Show all posts

Monday, November 11, 2024

Totally Awesome - Laura Gilhuly

 Hi!
I am back today to share a layout I created using a school photo of our oldest many years ago.


2Crafty Products used;


Circle Stack
1 inch hexagon 
Totally Awesome
Chicken Wire Panel


I inked the chicken wire panel and the title piece in the same burnt orange color and then
heat embossed the title.


Chicken Wire piece is great to stack in between layers, adds a bit of contrast without being too cumbersome on the layout.


I created clusters using the hexagons and circles that I simply inked to coordinate with the paper, 
love the effect of this combinations, great for masculine pages.


Such a fun paper range for my photos, and love the versatility of the chipboard which allowed me
to add small clusters so not to take away from the scene on the paper but still allow for some
contrast and texture that the chipboard brought to the layout.


Thanks for stopping by


Monday, September 4, 2023

Love You Millions Layout by Tania Ridgwell

Hello there!

Tania joining you today to share the first of my DT projects for September.  I have created a layout.

"Love You Millions"


2 Crafty Chipboard Used:

*Chicken Wire Panel
*Chloe's Vines
*Delicate Lace Border
*6x4 Phrase Stick Set 4


I used the gorgeous Mintay Precious Moment Collection to create the base for my Layout.


I built up the layers under my photo with some patterned paper and fussy cut elements.  Once I was happy with the layers I added the photo.  I painted the Chicken Wire Panel and Delicate Lace Border Chippies with Mont Marte Silver Paint.  When they were dry I cut them up into pieces and randomly tucked pieces in amongst the paper layers.


I added various coloured blooms around the paper layers and along the bottom of the photo and to the top right corner too.  I kept the Chloe's Vines raw and tucked one of each into the flowers along the bottom of the photo.  To finish off my page I added a raw Title from the 6x4 Phrase Stick Set 4. 


Thats' all from me today, I hope I have inspired you all with my Layout.  Until next time thanks so much for stopping by.

Tania xx

Saturday, November 21, 2020

Life Documented
By Marie Claude Rodier

 Hi everyone,

It’s my turn to show you my latest 2Crafty project. 

 I was inspired by the soft tones in my picture. I rarely use color photo and even more rarely green!!! But combined light brown and beige, it creates a natural and feel good vibe that I really love!

Life Documented

Chicken Wire Panel was cut into pieces and tucked under the central clustering.
The pieces were treated with a few touches of white gesso.


Both Mini Branches were embossed with Angel Wing Gold embossing powder
 and placed among both flowers clustering.


Life Documented title was also embossed using the same golden color.


2Crafty Product used...
Mini Branches
Life Documented
Chicken Wire Panel


Until next time, be happy and be creative!

Marie Claude
xx


Wednesday, January 22, 2020

This moment
by Sabrina Turpin

Hello 2Crafty fans!

Today I'd like to share a layout I did last week that about one of those little moments of pure joy in life where you remember that being with the ones you love is all that matters.
 Sometimes you're not doing anything special, just sharing a little moment of cuddling and playing, and it is still the most rewarding moment as a mom.

"This moment" 


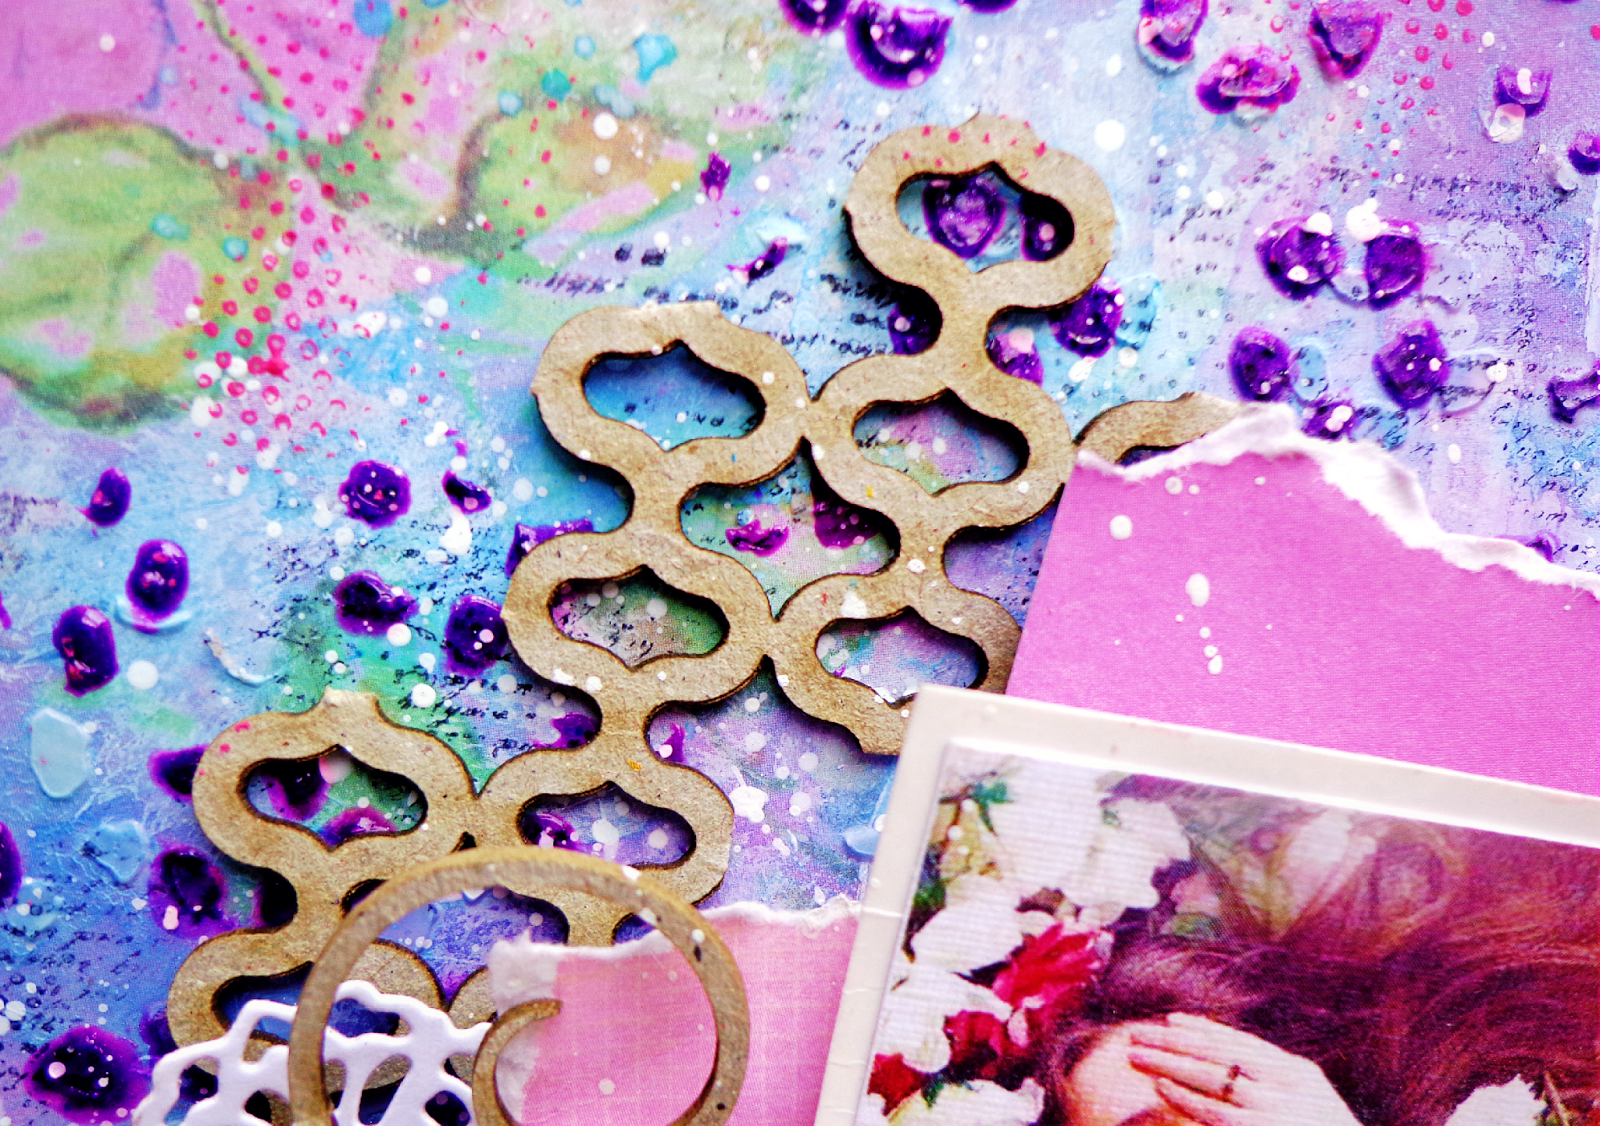
On the "Chicken wire panel", at the back, I used silver embossing powder and dabbed some black embossing ink on top. For the "Steampunk Cog Strips", behind the button, I applied blue embossing powder roughly and then traced the border with black ink.


On the "Frangy", I applied blue embossing enamel and then traced the borders with black ink.


For the "Frame Alissa", I applied white paint to which I had added blue pigments. Then, once it was dry, I used a sandpaper to give it a more rustic look.


For the title, "This moment", I applied textured embossing powder, giving something of a coal look.

I used the following 2Crafty chipboards in this layout:

Frame Alissa [fr0125]
Frangy [m00121]
Chicken wire panel [m00400]
Steampunk cog strips [m00783]
This Moment [w00526]


That's all for me today!
 I hope you enjoyed this layout and it gave you some ideas for your own creations.
 I will be back in a few weeks with more ideas to share with you guys.
 Until then, I wish you the best.


Wednesday, October 25, 2017

October Inspiration by Noura Pompilla


Hello 2crafty friends  !!

I hope this finds you all well.
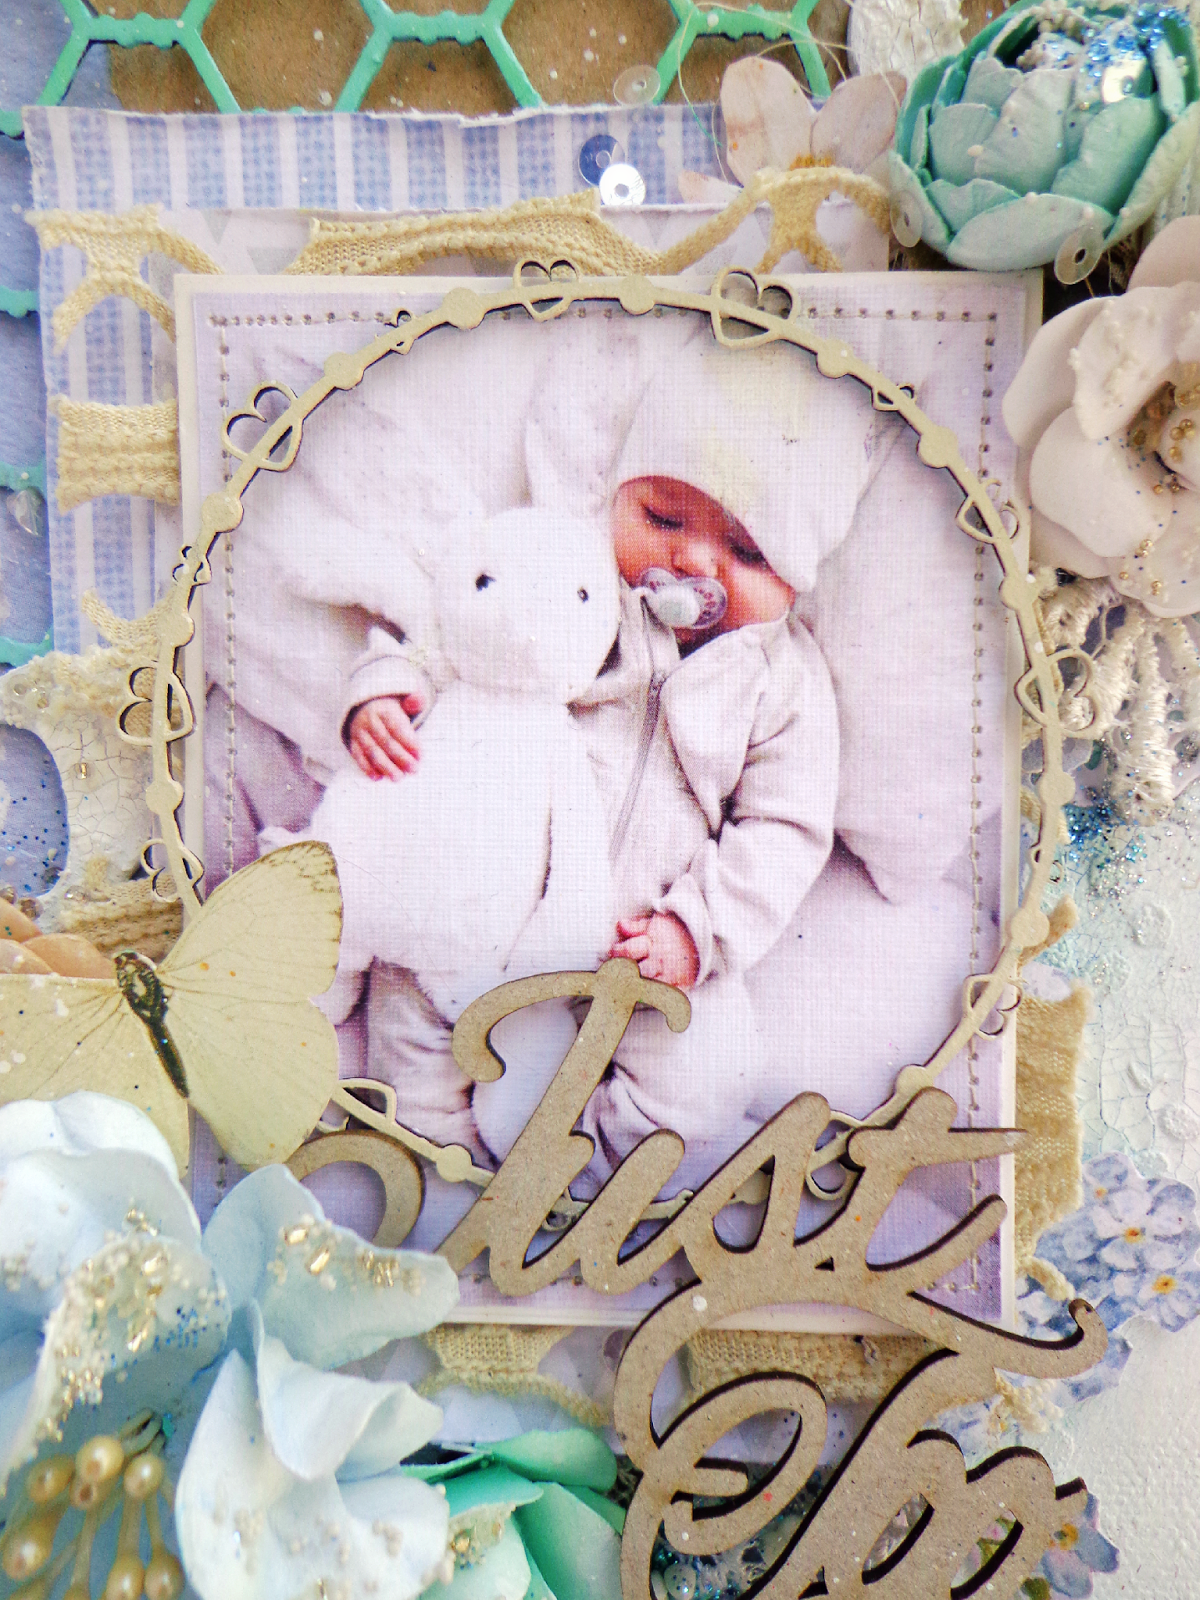
This is my first project of the month which was inspired by one
of the most delicate things for me which are babies.
  
Canvas-"Just too Cute"

Some details...


I used Circle heart frames to frame the photo of the cute beautiful baby
and then I gave it just one layer of acrylic paint.


Chicken Wire Panel, I painted it with acrylic paint and afterwards
I covered it with clear embossing powder.


To decorate some parts I used Everyday Font L/C which I painted with gesso
and white crackle paste, adding the letters A, B and C.


Finally I left the title in its natural states as it goes well with the soft colors.

2Crafty Chipboard used:
-Just too Cute tittle
-Chicken wire Panel
-Circle heart frames
-Everyday Font L/C


I based this on  the following challenges...
Maja Design


*****


Layout - "Hapiness is This"


For my second project I decided to maintain the majority of the chipboards in
their natural state for a lovely contrast on the very bright background.


To the background I've added some pieces from the Turkish Panel.


I added to the sides of the photo Mini Flourish Bits.


The "Happiness is this " title in black acrylic paint.

2Crafty chipboard used :
-Mini Flourish Bits
-Turkish lattice panel
-"Happiness is this" title


I hope I was able to help you with some ideas, thanks for reading,
see you next month.


Noura
xoxo


Wednesday, October 11, 2017

Tammy's October Shares
Plus a VIDEO TUTORIAL

Hello lovely 2 Crafty Chipboard fans.
Today I'm sharing with you my most recent creations.
 
 
My first page is titled:


'Loving These Moments'


It's a layout that celebrates my brother and his son.
I used the following 2Crafty Chipboard on this layout:
'Loving these Moments title'
'Chicken Barbed Wire - Small'
'Steampunk Gears - Small'
'Steampunk Gears - Medium'
'Chain Circle Frames'
I cut down the 'Chicken Wire Panel - small' and smeared Finnabair's Rust Paste in
 Gold, Brown and Red randomly over it.  I just used my fingers.
I love the rust look and the texture this creates.
I then added some Silks Acrylic Glaze Paint in 'Ocean Wave'. 
I love how this blue colour matches the blue in my photo so well.
 

I repeated this process on the 'Steampunk Gears - Small'
and the 'Steampunk Gears - Medium'.


I just love the rusty finish, especially with that metallic blue added in!


I used some of the 'negative' part of the chipboard from the 'Chain Circle Frames'.  
I added it to the background, and painted it in black gesso for a bit of contrast.

Don't forget to look at the leftover bits from your chippy - they can be awesome!
They also make great stencils.

Can you tell I don't like to throw anything away?


 I also applied black gesso to the 'Loving these Moments title'.


  I just love the clusters and dimension that the chipboard gives my layout.


I love how many different options you have with chipboard - you can create
so many different finishes and so many different looks. 
Don't these look just like metal?


I created a video tutorial so you can see how I created this page:
I hope you enjoy the video.


My second creation is titled:


'Magic Happens'


  This layout is a fun one celebrating meeting the characters at Disneyland.

I used the following 2Crafty Chipboard:
'Magic Happens Title'
'Stars'
'ATC Tiny Hearts & Stars'
'Circular Panel'


I used white gesso and Dylusions Sprays to create the background. 
I went with the teals and limes that are dominant in Goofy's suit.
I painted some of the 'Stars' and some of the tiny stars from the
 'ATC Tiny Hearts & Stars' in a deep purple. 
I like how this purple contrasts against the teal and lime.


 I stamped them very randomly with some black archival ink to make them look a little more grungy.


 I painted the 'Magic Happens title' in black. 
I then went over the top of this, just on the 'Magic', with Clear Kindy Glitz. 
 I haven't used this product in years!!
It was fun to get it out and play with it again. 
I love how the clear Kindy Glitz turns this gorgeous teal colour when applied to black.


I repeated the same process with the 'Circular Panel' and poked these randomly around my photos.


I wanted this layout to be fun to complement the story about 'goofying around'
 with Goofy at Disneyland.
I think the glitter finish really adds to the fun magical vibe.


 It really is a gorgeous finish.


Well that's it from me for this month.

I will be back again very soon for some more sharing.


 If you'd like to see more of my work you can head to my BLOG.