Showing posts with label Keyholes & locks. Show all posts

Wednesday, July 8, 2020

'Love Life With You'
layout by Rachael Funnell


Hello 2 Crafty Fans!
Rach back today sharing another layout
This romantic / lovely dovely page 
and have included some beautiful 2 Crafty Chipboard.....


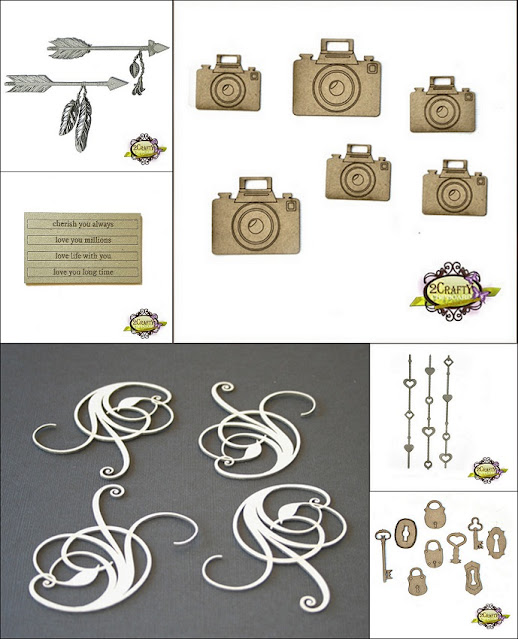
Large Tribal Arrow
Flourish adornment set 4
6x4 Phrase Set set 4
Bead heart border
Mini Camera
A Lock from Keyholes & Locks set


Starting with my title using the
 "love life with you' stick from the  6x4 Phrase Set set 4 
using a sponge adding light coating of gesso...

Personally - I am obsessed with these phrase sets ...  
 when I am wanting to add a title but without the bulkiness
as the usual titles...  I think these are  GREAT!!!


Did the same to the Large Tribal Arrow
A light coat of gesso then inking light with
pale blue, before adding the 'Love life with you'
phrase set attaching it with foam tape...


 I then decided to add this lock 
I first inked lightly with rose gold ink then, 
cut the chain element and placed lock with foam tape..


The rest of chipboard pieces - 
Bead heart border, Mini Camera and Flourish
I have given them a couple of coats of gesso 
before adhering them to my page...


I'm really happy with the end result of this page...
 and I hope you got inspiration in some way...
 
Until next time!!!


Tuesday, January 9, 2018

January Journal with Kripa Koushik

Hello friends,

I hope you all had a relaxing holiday with friends & family. 
My January projects are both art journal pages that incorporate my chosen words/intent for this year.

 'Embrace possibilities'

My year started with a box full of goodies from 2crafty chipboard. My first project is inspired by the delicate and beautiful pieces that you see in the close up below: Ella's border and Scroll 3. I layered them vertically between pieces of lace, ribbon and net alongwith a keyhole chipboard.
 

For the opposite side of the page, behind the sentiment, I tucked in a single flower from Ella's border and a key. All chipboard pieces first got a layer of texture paste applied with a palette knife followed by Colourarte acrylic silks & twinkling H2Os. For a distressed grungy look, all the paint was also applied with a palette knife.

2crafty chipboard used:
  • Scroll 3
  • Ella's border
  • Keyholes & Locks 

'Live with intention'


Here is a step by step of how this page came together.

Start by gluing down squares of pattern paper using matt multi medium.

 Apply a layer of gesso on the page and then some texture paste mixed with gesso 
through a gears stencil.


Once dry, apply twinkling H2Os in shades of brown, rust & teal.

While that dries, apply white gesso on a selection of chipboard from Steampunk gears medium, Giant gears, cogs and gears, clock faces and light bulb. On a few dab Vivid Ultra Metallics with a make up sponge. The light blue colour is by using Twinkling H2Os on the gessoed gears.

For the title, Ive used gold metallic paint and dabbed some white gesso after the blue paint dried for a distressed effect. Below is a close up from the completed art journal page.


I've layered the gears and cogs on top of a sheet of chipboard left after removing the small steampunk gears. It gave me a flat base to layer the gears and cogs.


2crafty supplies Used:
  • Gears
  • Cute Cogs
  • Light Bulbs
  • Giant Gears
  • Clock Face frames
  • Vintage Clock Hands
  • Steampunk gears medium
  • Live Everyday with Intention Title
  

I hope you enjoyed today's post. 
Wishing all of you a 'Very Happy 2018'
Kripa


Saturday, December 9, 2017

December Inspiration with Kripa & Video Tutorial

'Life is Amazing'

Hello creatives, this month, 2crafty chipboard is sponsoring Kraft Plus Challenge
I'm not sure if this a scrapbook layout or an art journal page, but its perfect as the first
 page of my family scrapbook album.
 My project is based on their mood board which you can see here.

Here is a close up of the focal point of the page made using 4 pieces from the  Family Symbols Set & a heart from the ATC hearts & stars set.All the chipboard pieces were first treated with white gesso and then painted over. On the left is a shaker frame made with one of the smaller frames from the Polaroid Assortment Frames set. Here is a tip : To ensure the tiny star sequins don't slip through the shaker frame, seal it around with washi tape.
Ive tucked a Handrawn heart frame behind this to frame the focal point. Now to the 'Life is Amazing' title piece because of which I decided not to use any photos on this layout. I had been saving this for my gratitude journal but the moodboard at Kraft Plus Challenges provided the perfect inspiration to use it on a 12x12 layout.

I hope you enjoy the video of how this page came together.

2Crafty Supplies Used:
  • Family Symbols
  • Life is Amazing Title
  • Frame Handrawn hearts
  • ATC Tiny Hearts & Stars
  • Polaroid Assortment Frames
 

Altered Paint brush

My second project was literally inspired by the Modern Swirls chipboard
For some reason it reminded me of music and a brush stroke. 


To begin, the paintbrush & all the chipboard pieces were coated with white gesso. 
The keyhole piece was treated with a mixture of crackle paste & texture paste. 
I then applied paints on the gessoed paintbrush using a palette knife to create some texture.

For the chipboard pieces though, I dabbed the paint with a make up sponge so that the paint application would be even and smooth. Finally, some micro beads, sequins & glitter.


2crafty chipboard Used:
- Angel Wings 
-Modern Swirls
- Keyholes & Locks
- Pointed Doily Frames
- Steampunk gears small

Thank you for visiting us today.
Happy creating.


Monday, December 5, 2016

December Layouts + 2 Videos
By Anita Bownds

Hi
Anita here with you today sharing my last layouts for 2Crafty.
I've had an amazing time on the team & with that being said here are my layouts.


"We Are Family"
With this layout I wanted to use the colors pink,black and gold
I inked "fancy damask doily shapes" with gold ink and half my "title".


Here is my process video of my layout.


Here is a close up of my title with the two colours.


Here is a close up of the "Big fancy damask" tucked under my photo layers.


I added in the "Little fancy damask" in  and added a embelishment on top.


  2 crafty Products used...
word-we are family
paadornments1
Fancy-Damask


"Cherish"
I was thinking when I started this layout I wanted it  to be really girly 
so I chose the colour pink,yellow and grey with the greens of the leaves
and lots of bling.


Here is my process video of my layout.


I inked the frames with pink ink and took out the centers.


I made my own little crape paper embellishment with a punched glitter heart
in the center for my title to sit on and I inked my title with gold.


Here is a whole view of my frame with bling.
I inked with light pink ink.


 I added the key under a punched glitter heart 
I inked it gold.


Here is the other frame I inked light pink and added a little banner in the middle.


 2Crafty products used...

Circle-Dot-Frames
Keyholes-Locks
Mini-Words-2
Frames Tiny Kathleen's


Thanks for popping by, I hope you have enjoyed my layouts & that 
I have given you a little inspiration.
Happy Crafting..xx


Thursday, August 11, 2016

August Layouts by Debbi Tehrani

We've Been Friends Forever


Hi, 2Crafty fans! I"m here to share a couple of layouts with you today. 

My friend Laurie is a little camera shy, so I was so happy to have a recent snapshot with her.
 We've been friends forever--well, since high school anyway! I made this page for her birthday.


To frame the photo, I used the "Chained Circle Frames." First, I coated the chipboard
with gesso. I didn't have any paint or ink in a color to match my papers, so I mixed up a
 bunch of different watercolor paints until I got a matching color and painted the circle.
For some reason, it wasn't wanting to dry, and I was getting impatient, so I sprinkled
some clear embossing powder and heat embossed it. 

For my title, I used words from two different sets, "Friendship Mini Word Pack" and
 "Mini Word Set 2." I used black embossing powder for the "forever" and mixed up
different watercolor paints for the friends, and used clear embossing powder over that."


I wanted the detailing to show up on the "Mini Camera," so I used a silver leafing pen by Krylon.

I echoed the checkered tile floor in my photograph with the 2Crafty  
"Checkerboard Clumps," which I colored with a paintbrush dipped into
 Heidi Swapp Black Velvet Color Shine spray, which gave it a little shimmer. 


I used the silver leafing Krylon pen on the "Light Bulb" to preserve the lovely etched detail.
 The little heart, from "ATC Tiny Hearts & Stars" was treated the same as the word "Friends." The arrow from the "Asst Arrows" was cut off in the closeup photograph (you can see it in my layout above). I left it white from the gesso coating it.


2Crafty Products used on this layout:
Chained Circle Frames
Friendship Mini Word Pack
Mini Word Set 2
Checkerboard Clumps
Mini Cameras
Light Bulbs
ATC Tiny Hearts & Stars
Asst Arrows


Hello Sweet Home


My niece and her husband just bought their first home, so I thought I'd make a page
 for them to commemorate this important milestone. I used a sketch from Stuck?! Sketches:


I just love the new lovely loopy "Hello" and wanted to make it a focal point of my page. 
It looks enormous on my page because I scrap 8 x 8, but I love how big it looks--
it makes a statement! I coated all my chipboard with gesso, as I almost always do when
 I set out to make a page because I'm never sure how I'm going to treat the chipboard.
 I used two colors of stamp ink to coat the Hello. I also used stamp ink on the word
"sweet," which" was from the "Friendship Mini Word Pack," and then I used a
 tiny polka dot stamp with gray stamp ink to give it a little texture. 

I left the birdhouse with the gesso coating and then colored in the entrance hole with a
 teal marker and used stamp ink and a paintbrush to color the roof. The little bird was 
coated with blue stamp ink, and then added their address on top. The bird and house are
 from the "Birdhouse" set.

The leaves poking out above the flower were snipped from the "Tiny Leaf Stems."
  I also used several shades of stamp ink to color them.


The key, which came from the "Keyholes and Locks" sheet, was coated with silver
embossing powder. The little hearts are from the "ATC Tiny Hearts & Stars," and I 
treated them the same as I did the word "sweet" in my title.


To echo the doily I used, I chose a piece from the lovely "Lacy Border Set" at the
 top of my page and left it with just the gesso coating.

2Crafty Products Used on this layout:
Hello
Friendship Mini Word Pack
Birdhouse
Tiny Leaf Stems
Keyholes and Locks
ATC Tiny Hearts & Stars
Lacy Border Set


A Fond Farewell

I'd like to share an extra layout on which I used the fabulous 2Crafty filmstrip.


I made this page for the current challenge at CSI: Color, Stories, Inspiration.


I used the "Small Filmstrip," coated with a lovely glittery embossing powder,
 to fulfill the filmstrip clue in the Case File.


Thank you so much for stopping by to look at my pages. I hope I've given you
some ideas for using the awesome 2Crafty chipboard!