Showing posts with label Skeleton Leaves. Show all posts

Tuesday, June 4, 2024

Love you Millions by Tania Ridgwell

Hi there!
Tania joining you today to share the first of my DT projects for June. 
 I have created a layout.

"Love you Millions"


2 Crafty Chipboard Used:

*Florence Swirl Set
*Skeleton Leaves
*6x4 Phrase Stick Set 4
*Lacey Border Set 1


I used the gorgeous Unmistakable Creations Heartfelt Collection to create the base for my layout. 
 Once I had created my background I set about putting my page together.


I added lots of paper layers to my base page and then added my photo.
I coloured the Florence Swirls, Skeleton Leaves and Lacey Border Chippies all with
Heidi Swapp Color Shine Mists in blacks and greens.  I added lots of fussy cut flower
 elements and paper blooms to the top left and bottom right of my photo and then tucked
 in the Florence Swirls and Skeleton Leaves chippies amongst all these elements and
the paper layers.


I cut up the Lacey Border Chippies and tucked pieces into the top and bottom torn layer
 edges of the background page and also added a piece to each side of the page.  I finished
of my layout by adding the Love you Millions Chippie Title from the 6x4 Phrase Stick Set 4
 along the bottom of my photo which I left raw.


Thats' all from me today, I hope I have inspired you all with my Layout.
  Until next time thanks so much for stopping by.

Monday, May 20, 2024

"Altered Box" with Amy Voorthuis

 Well hello there crafty friends, 
I am very delighted you are her with us, for today I'd like to share a altered box that I created for my colleague who is leaving us to enjoy her well deserved pension. Although it's with a raw edge since she heard that her cancer is back since the beginning of march {throughout her bones this time} but that doesn't keep her from being a very positive lady and I really admire her for that and so much more. This box holds cards from her colleagues who worked with her a lot longer then me, since I started working there september 2023. But that doesn't mean I didn't make her a card,  I of course did and a nice box to hold them in, in her favorite color yellow. Enjoy this post.....


Amaze Yourself:

2Crafty Chipboard used:
Skeleton Leaves
BeeYoutiful Set
Oversized Flower Stem Set
Fine Word Set 2
Amaze Yourself
Mini Word Set 3

You know what's amazing, you can order directly from the
2Crafty website here so you can also play with their amazing chipboard pieces.


I painted the oversized flower stem set with some spray paint and a pencil in defferent colors. But fistly I cut them up and only used pieces of them. For the skeleton leaves I used the same technique. Undertneath the big green piece of paper there is a picture of "Riek" but I wasn't sure if she wanted me to post it online so I didn't. 


The words & phrases are threated with two layers of white gesso after that I added some white shiny embossing powder {three layers} then I added some stained wood wax on all of tehm some a little more then the other. The beeyoutiful set was only altered with white gesso and tucked in flower clusters. 

  Thank you so much for stopping by I will be back later this month with another project hope to see you back then....

Meanwhile if you would like to see more you could visit here: 

Amy's Pretty Papers

Tuesday, April 9, 2024

'Be a Wildflower' by Emma Zappone

Hi everyone,
Em with you today, sharing an '8x10' canvas. 
I have been playing rather grungy of late, so for this one I thought I would pretty things up a little.


Using some stunning papers and colours along with the fab chippy this project evolved.

Here are the chipboard elements used....

4" Mandala
Skeleton Leaves
Fine Floral Photo Adornment
Frame Round Ornate


I painted all but the leaves with different Color Glow powders.
The Color Glows leave such a stunning shine on the chipboard.


I cut the frame in half and tiered them amongst the layers.


 Placing the Mandala behind the winged beauty, added depth and a halo like feel. I added white Gesso as a finishing touch to add detail and interest.


The leaves were left raw, with only the White Gesso giving them some dimension and character. These I also bent a little to give lift and curve. Hard to see in the photo sadly.


The delicacy of the photo adornment softened the overall concept.
 Adding that touch of whimsy and femineity.


I do hope my page inspires you to get crafty.

Till next time, Em xx


Monday, September 19, 2022

Just Adorable Layout by Tania Ridgwell

Hello there!

Tania with you today to share the last of my DT projects for September.  I have created a layout.

"Just Adorable". 


2 Crafty Products Used:

*Just Adorable
*6"Mandala No 1
*Berry Vine Set
*Skeleton Leaves


I used the beautiful Mintay Love Letters Paper Collection to create the base for for my layout.
I fussy cut the floral wreath from one of the papers.  


I painted the Berry Vine Set and Skeleton Leaves with Opal Shimmer paint and the
Just Adorable was sprayed with Dylusions sprays.  I created two floral embellishment
clusters one to the top left of my layout and one to the bottom right.


  I tucked in the Skeleton Leaves and Berry Vine Set chippies in amongst the flower clusters.
I cut the raw Mandala chippie in half and placed one under each of the embellishment clusters.
I added my photo and finished off my page with the the Just Adorable Title.


Thats' all from me today, I hope I have inspired you all with my Layout. 
 
 Until next time thanks so much for stopping by.

Tania xx


Friday, May 6, 2022

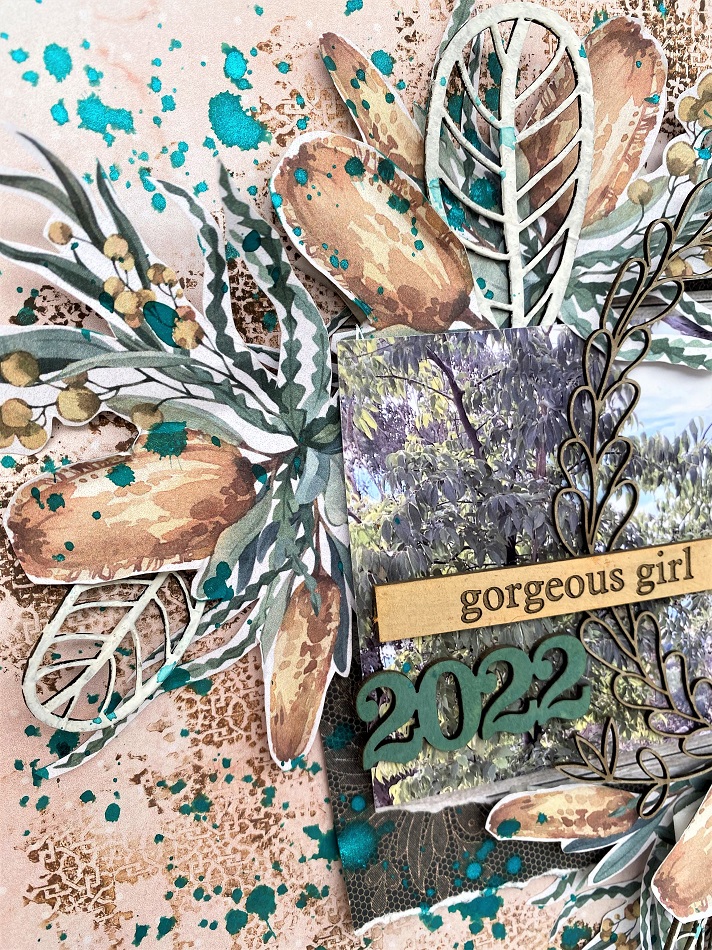
'Gorgeous Girl' layout
by Rachael Funnell


Hello there!
Rach with you sharing some more 2 Crafty inspiration...
This layout features my gorgeous niece 
and of course some GREAT 2 Crafty Chipboard pieces...


2 Crafty Chipboard used:
Skeleton leaves
2022
6" Fine heart leaf wreath frame
ATC title Stick set 1


Let's start with the 2022,  inking it with nice green.
Then the ATC - Gorgeous Girl title stick I have combined two colours
Using the Tim Holtz Distress inks and inking the Title Stickcolors first with the Spiced Marmalade (orange) 
& then finishing off with a coat of Fossilized Amber (yellow) 


 Next up is the  6" Fine heart leaf wreath frame. and as I wanted to have it sitting on my photo
but not overpower the photo, so what better way than to keep this frame as is, raw.... 
And lastly for the Skeleton leaves, where I have given them a thick coat of gesso
then placed them throughout the fussy cutting layers....


That's it from me, 
Hopefully, my layout has inspired you in some way..,
Until next time


Saturday, June 20, 2020

#Capture
A Beautiful Destinations Layout by
Jenny J.

Hi everybody!

Here is my lastest creation with the most gorgeous chippies on Earth!


  2Crafty Chipboards I have used on this layout...


*Mini #word set 2
*6x4 phrase sticks set 1
*skeleton leaves
*Charlotte flowers

First, I have started by applying some platinum crackle paste on my layout.
Then, I've built up my focal point by layering paper tags under my picture.


Above, you can see that "Charlotte flowers" are really gorgeous and 
they are among my favorite chippies of all categories.
They are simply heat embossed with an ivory powder.

My title, which is part of  "mini #word set 2", is treated with a pearl white spray from Prima.


At the bottom of my picture, you will see a piece of "6x4 phrase sticks set 1".
This chippie is covered with blask gesso and then, treated with 2 colors of waxes.

Finally, the "skeleton leaves" are also heat embossed, but this time, 
with a taupe colored powder.  
They are many of them on this layout.


After that, I added a bunch of flowers and that was it for this time.

See you next month with new inspirations.

Stay safe xxx


Thursday, May 2, 2019

Live Your Adventure - Layout with Karan Gerber

"Live Your Adventure"

Hi friends and welcome to my blog today, It is Karan Gerber here to host the blog today
 and I have a masculine layout to share with you.  

This one is designed with their fabulous array of steampunk chippies
which I seem to go to for my masculine layouts. 


To start off with I used the large clock face set of frames and only using the medium clock, 
cutting it in half, applying a coat of gesso then added some sprays from my stash, after
 that was dried I added some gold wax.


For the title I covered the title with clear embossing ink and heat set
 with Embossing powder called Rocky Road.


At the left side of my photo, I set the large clock underneath and wanted the gears
 and steampunk cog border to set on top; I then gessoed all the pieces,  including the
 skeleton leaves. Some of the gears I added bards to in the center to add some detail. 


I let dry then added in some patina spray along with some coffee delusions and
 topped off with some gold wax, the rest of my chipboard was all completed.

Hope I have inspired you to try some masculine pieces
 from the 2 Crafty Array of Fabulous Chipboard


2Crafty Chipboard Used...