Showing posts with label Corner Thick Vine. Show all posts

Thursday, December 11, 2025

Holly Jolly Star by Tania Ridgwell

 Hi there!
Tania joining you today to share a bonus DT project for December.  
I have altered a Wooden Star for  Christmas.


2 Crafty Chipboard Used:

*Merry Christmas with Holly Branch
*Corner Thick Vine
*Poinsettia Set
*Foliage Set 18


I have used the gorgeous Mintay 'Holly Jolly' Collection to create the base for my star.


To colour my Merry Christmas chippie I painted on some Dylusions Dirty Martini onto the leaves, I painted Kaiser Red Iridescent Spray onto the berries and once it was dry I sprayed the whole piece with Kaiser Gold Shimmer Spray.  The Corner Thick Vine chippie was coloured with Chopped Pesto Dylusions Spray and once dry I dabbed on some Kaiser Gold Shimmer Spray.  The Poinsettia chippie I coloured with a mixture of Kaiser Red Iridescent & Gold Shimmer Sprays.  The Foliage chippies were first given a coat of gesso and then coloured with a mixture of Kaiser Red Iridescent & Gold Shimmer Sprays.


I decorated the star using fussy cut elements from the Holly Jolly Collection, added some coordinating paper blooms.  I tucked in the Corner Vine & Foliage Chippies amongst the fussy cut elements.  Added the Poinsettia chippie to the top left of my star and finished off by adding the Merry Christmas Title chippie.


Thats' all from me today, I hope I have inspired you all a little with my Christmas Star.
  Until next time thanks so much for stopping by.
Tania xx

Monday, February 27, 2023

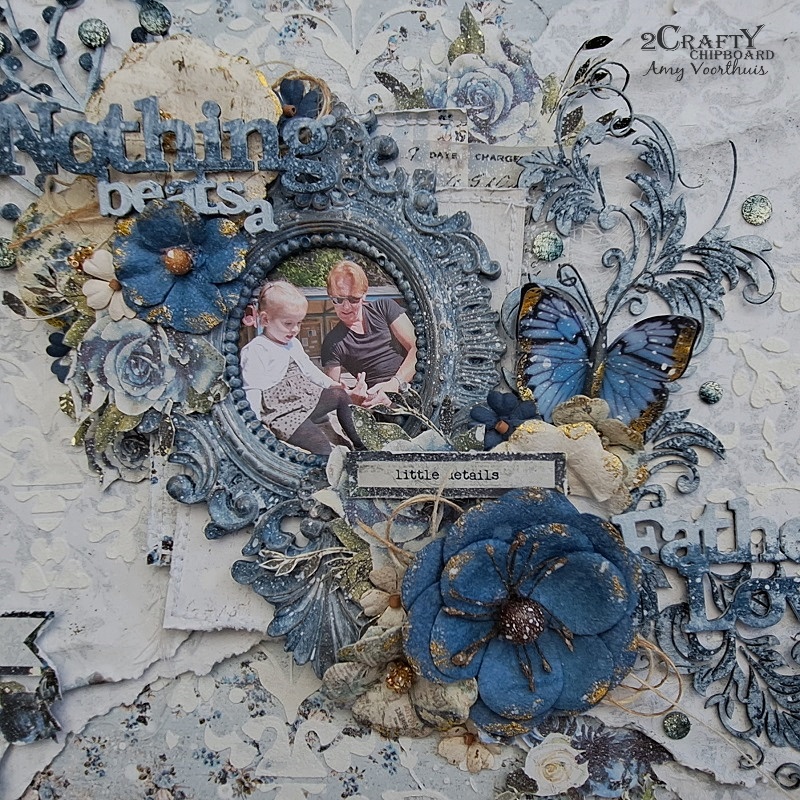
"Nothing Beats a Father's Love" by Amy Voorthuis

 Goodmorning sweet 2Crafty friends, 

I am so excited that you are here with us today as it's my turn to bring you some inspiration. For this occasion I created a layout with a picture of my husband and darling daughter. For this layout I used a older prima marketing collection. 

Nothing Beats a Father's Love: 

2Crafty Chipboard used: 
Nothing Beats a Father's Love 
Corner Thick Vine
Snowball Tree 


All the chipboard pieces are treated with a layer of white gesso after that I spraypainted it with several sprays in a light blue color trying to mimic the color of the papers. Then I added some darker blue acrylic paint on every piece randomly. 


On the snowball tree I added some bling as I did throughout my layout after that I used some white spray to finish my work. 


Thank you so much for your visit today and if you would like to see more of my work please visit here:

Amy's Pretty Papers

Much love and happy crafting...

Tuesday, August 21, 2018

Forever - A layout by Bec Genet

Hi all, this month 2Crafty are sponsoring the More Than Words Challenge and their theme is Yesterday and Vintage. Here is the layout I made for this challenge. The word YESTERDAY made me think of old photos. The reason why I started scrapbooking was to preserve these photos, so I chose a favorite old photo of my daughter from 9 years ago. I followed the VINTAGE inspiration on my layout with my colour choices of warm classic tones, plus the use of antique lace and pearls.


2Crafty Chipboard Used:
Corner Thick Vine
Frame Celia's Flourish
Flower Doilles
Friendship Mini Word Pack
Lacey Border Set


The More Than Words August Challenge - Yesterday & Vintage

I kept all the chipboard very basic on this layout and only used black ink and white gesso on them.


The Corner Thick Vine and Frame Celia's Flourish I covered with the black ink. I placed the frame over my photo, then I cut the Vine in half and placed half on the top of my layout and half on the bottom. 


I used two coats of white gesso on the Flower Doilles, Friendship Mini Word Pack and Lacey Border Set. This gave them a crisp finish. I only used the largest  Flower Doily in the pack, I cut it in half to place on either side of my photo


Thanks for visiting 

Sunday, October 1, 2017

October Inspiration By Sandra

''Live everyday with intention''

I love making white and black layouts with one touch of color... Always make me satisfied.
That is what I created for my first layout this month.

2Crafty chipboard list

Corner Thick Vine

Frame Georgian

Live everyday with Intention


I began my background by sticking the Corner Thick Vine chipboard to a watercolor paper. 

I also add the bigger Frame Georgian in the middle. You can't see it a lot, but there is. 


I added a mixture of balls synthetic material with the medium gel to add more textures. 

Then, I put some white gesso to color my chipboards. 


I put some black ink with some water to make an ombre finish on my 
background around the chipboards and the textures.


I cut the small Frame Georgian and I embossed it with black powder.
 I made the same treatment to the title.


At the end, I just put some other white gesso on my textures, some drops white
 and black and added some flowers and a badge. 


''This is Me''

I love altered paper for my background to fit with my layout's finished idea. 

2Crafty chipboards list

Ivy's Squares

6" Clock Face Frames

This is Me


I made a lot of things on my background...I started by adding some acrylic paint with
 water to add more colors. I used a stencil with black gesso to make some contrasts,
and I added stamps and also some embossing powder on some medium gel. 

For the all the Ivy's squares, I used 4 colors of embossing powder,
 blue, green, light turquoise and black. 


To add more textures, I put some balls acrylic with yellow ink and medium gel, before
they were dry, I added some turquoise embossing powder in it and I used my embossing iron. 


I used one piece of clock from 6''clock face frames and 2 parts which serve has to hold the clock together. I embossed them with yellow embossing powder.


To add more contrast, I put some black flowers and two turquoise. 

I painted the title This is me-title with black acrylic paint. 


you can see all chipboards on the website.


Thanks and see you next month...
San xx

Monday, March 27, 2017

March Projects Plus a PHOTO TUTORIAL
By Kavitha

Hello 2crafty fans, 
 Kavitha here today to share my March projects.This month I
 have a couple of layouts and a canvas to share.

"Magical Garden"


I created a mysterious/magical garden theme layout on
a black background with metallic colors. 2Crafty has lots of
 beautiful flourish designs which are my absolute favorite
and I have used quiet a lot of them in this layout.


The large leafy vine is heat embossed with blue shabby embossing enamel,
I cut them up into two pieces and used among my floral cluster.


I have also used the corner twisted vines with
my embellishment cluster in the corner.


2Crafty chipboards used:
Angel Wings
Corner Twisted Vine
Large Leafy Vine
Ava's Frame
Addy's Butterflies


"Dream"


The main highlight of this layout is Angie's vines. It is so beautiful and big 
enough to cover a lot of area. I heat embossed it using
brown sugar embossing powder, cut up the biggest one into two pieces
and used them on all three sides around the photo.


I heat embossed lattice leaf with gold and used among the floral arrangement.
Finished off the layout with the title "Dream" which is heat embossed with white.


2Crafty Chipboards used:
Angie's vines
Lattice leaf
Mini word set #2


"Living the Dream" - Canvas tutorial


My last project is a canvas with a short tutorial.
I applied a thick coat of black gesso over the canvas and sprinkled some art stones.
Once it dried I arranged an old paint brush, clay/metal embellishments
along with 2crafty chipboard. I gave it another coat of black gesso for the whole canvas.


With a dry brush I colored the raised areas with dark velvet
and watermelon mist acrylic colors

Now for the highlight I used rose gold and violet gold opal magic paints.


2Crafty chipboards used:
Corner thick vine
Living the dream
Moroccan panel 6x6


Thank you for stopping by.