Showing posts with label Corner Lorena. Show all posts

Monday, October 9, 2023

'Travel the World' by Emma Zappone

Welcome to a new week everyone.
Em with you all today.


This page is full of clustering and soft colours.
Let's check out the chipboard used.....

Fern Leaf set
Corner Lorena
Foliage Set 7
Pretty Flowers


I wanted the focus on the left side of the picture, to compliment and add to the floral composition within the image.
I chose to start with a piece of the foliage 7 and a Lorena Corner. These were painted with complimentary acrylics and distress oxides. With a silver wax finish. These were my starting layers.


Next I really wanted the Flowers to pop against the teals. The base part of the flower was painted in a liquid acrylic and the top layer a complimentary orange acrylic. Before I glued the 2 elements together, I stamped a ticket stamp with white ink to add some extra visual interest. 


These really are a special feature for me.


Finally to add to the foliage feels, I added one of the Fern pieces in the same orange as the base of the flowers. And Also with a light amount of stamping to tie all the elements in together.


I think the combo of chipboard used on this page is one of my favourites so far.


I hope this has inspired you to get a little crafty this week. 
I will catch you all again later in the month.
Have a great day.

Stay Crafty, Em xx


Wednesday, March 30, 2022

'Alice' by Emma Zappone - VIDEO TUTORIAL

 Hello everyone.
Emma with you on the blog today with a 12x12 Layout and Video.
Here is what I'm sharing with you today....


And the beautiful chipboard used.....

Fine Floral Corner
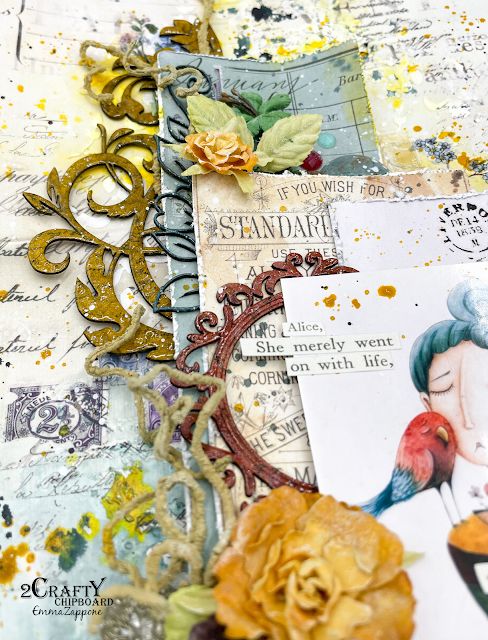
Lorena Corner
Mini Decorative Frame set 6


The image I used today really inspired the whole story behind this project. It is by an amazing artist named Femke Muntz and they are just the best melancholy artworks.
The girl in the painting had an emotion I could match and feel. But yet a softness and vulnerability.
So I wanted chipboard to match the softness and yet fill the page with hope.


The chipboard all had a similar finish to them, but also an individuality.
The Lorena corner was painted with a liquid acrylic paint, then stamped with black ink and a script stamp and then had a clear glaze over the top to add super shine.


The beautiful delicate mini frame had the same finish as the corner piece except instead of a clear glaze I added a emboss glaze in a tattered rose colour, which deepened the colour and mage it a beautiful feature to the page.


Finally this stunning Fine floral corner was cut into 2 pieces and had a denim blue acrylic painted over it. No stamping was done on these, but a double quote of clear glaze was applied that added life to the florals of the piece.


I love that I have become a story teller in my scrapbook art. And I do this by using small quotes to create the story of the page. This one is - 'Alice, She merely went on with her life, to the best of her ability where only the imagination can go.' 


I think you will see more of this style artwork included in my projects. 
I hope you enjoy the process video too.


Have a great week everyone, and I will see you soon.

Em xx

Tuesday, May 22, 2018

#Capture by Sabrina Turpin
PLUS A VIDEO Tutorial

Hello 2Crafty Fans,

It is now the moment to reveal my second May inspiration.
At the end of this blog post, you'll find a video tutorial that shows how
I did my layout. I really like the mischievous look my son sometimes make and
 I was able to capture it on photo for the first time.

 Thus came the inspiration for my "Capture" layout.


This shot is a highlight of the left cluster of chipboard that includes "Triangle Clusters",
 "Parisian Border" and, in dark brown, the chipboard support that was holding the 
"Messy square frame" chipboard (let's not waste perfectly good material!).


For the "Messy square frame" chipboard support, I used 
brown embossing ink and then applied black ink on top.


For the "Triangle Clusters", I used red-gold embossing powder
 and then inked it with a black ink.


For the "Mini #Word Set 2", I used midnight-brown embossing powder.


For the "Parisian Border", I inked them with a brown ink and then I applied black ink.

For this layout, I used the following awesome
 2Crafty chipboard:

Mini #word set 2
MB018
Parisian Border
DB0039
Corner Lorena
CR0056
Triangle Cluster
M00720
Messy Square Frames
FR0085

Here's the video showing how I built that layout:
TO VIEW VIDEO CLICK HERE


Thanks for joining me for this layout, I hope this gave you new ideas!
 I look forward to hear from you guys! 
See you next month for more inspirations!


Monday, November 27, 2017

November Projects by Kavitha

Hello 2crafty fans!!

Kavitha here with you all today to share my 
November inspiration

"Adorable" - Layout


I love the flourish/swirly designs from 2crafy ,today
I have combined some frames and swirls to compose a elegant design.

I used Lucy's flourish frame and Celia's flourish to frame the
picture which is heat embossed with glitter mint embossing powder.

Around the frame I used Celebration swirls which is heat embossed 
with sassy sapphire embossing powder.

I finished off the layout with the title "Adorable" which perfectly suited the little girl.
It is heat embossed thrice with white embossing powder.

2 Crafty chipboards used:
Adorable
Celebration swirls
Lucy's flourish frame
Celia's flourish


"Forest Fairy" - Canvas


I created this canvas in forest theme,after creating the mixed media
background I used some real tree barks and green moss
to create the composition.

 All my chipboard pieces are concentrated in the center of the canvas,
for the first layer I used cut up pieces of Viney page frame which 
are painted with light and dark green acrylic paints.


 For the second layer I heat embossed a 6" clock face with black embossing
powder and rubbed some silver wax over it.

 For the last layer I used corner Lorena & I just left it raw for contrast.


2 Crafty chipboards used:
6" clock face
11" page viney frame
Corner Lorena 


Thank you for stopping by.


Saturday, October 21, 2017

October Inspiration by Debbie Burns

Hi everyone, Debbie here with you today to share my October projects. 

"Beauty"

I love this time of the year.  Usually the temps are on the cool side and the leaves are changing colors,  but so far we've had an unseasonably warm Autumn.  Thoughts of Autumn past spun around in my head and lead to me create this layout featuring a picture of my grandmother.  I was also inspired by the October Challenge at Words &  Paintery.  I added several colors of distress stain to my background paper along with some stamping, micro beads and glass glitter.


I love the detailed Marianne's Butterfly.  I embossed it with some Nutmeg 
embossing powder and added paprika, twig  and gold micro beads.


Lots of warms Autumn colors.  The Corner Vine Leaves embossed with Sage embossing powder,
  the Large Leafy Vine embossed dark brown and beneath them I used the Corner Lorena, embossed with an antique teal powder.  


Tucked under my photo I used the Large Leafy Vine, Corner Vine Leaves and
Mini Flourish Bits, and my title is from the Mini Word Set 1.


2Crafty Chipboard used:


Corner Lorena
Corner Vine Leaves
Mini Flourish Bits
Marianne's Butterflies
Mini Word Set 1
Large Leafy Vine


My next layout features my friend's beautiful daughter.

"Be Your Own Kind of Beautiful"

Soft colors adorn this layout from the background paper with added distress stains,
stamping and paint splatters, with detailed chipboard that encircle the photo along
with flowers edged in gold glitter.


The Celebration Swirls and 6" Circle Dot Frame were embossed teal.  The Decorative Disc Set 1
 and Foliage Set 3 embossed gold.  Gold microbeads were added to the Celebrations Swirls.


Here you can see more of the Foliage Set 3 and Celebration Swirls.


In keeping with the color scheme, I embossed the title an antique teal.

2Crafty Chipboard Used:


6' Circle Dot Frame
Foliage Set 3
Decorative Disc Set 1
Celebrations Swirls
Be Your Own Kind of Beautiful


I hope I've inspired you today.
See you next month!
 . . . Debbie