Showing posts with label Mini Word Set 3. Show all posts

Wednesday, September 20, 2023

'Spring Delight'
Lisa Amiet


Hello all!
It's Lisa here today to share some spring delight with you!
I have created a set of two cards
to celebrate spring arriving!


2Crafty products used: 


For my first card, I have used one of the large 'Flower Doilies',
that I have embossed in white, for the centre of my card.


I have also used one of the words from the 'Mini Word Set 3',
also embossed in white, and layered with my elements. 


I have then used one of the branches from the 'Foliage Set 11',
again embossed in white and added to my layers.


I love how the bright white pops against the yellow. 


For my second card, I have used one of the 'Pointed Doily Frames',
embossed in white, and layered with some sunflower elements.  


I have again used another of title words from the 'Mini Word Set 3',
embossed in white and added to my card. 


And another of the branches from the 'Foliage Set 11'.


I love the bright sunny feeling of these cards, 
perfect for spring!

Until next time!

Lisa 


Saturday, September 2, 2023

Spring Inspiration
with Lisa Amiet

 Hello 2Crafty lovers!
It's Lisa here today to share some spring inspiration with you.
I have created this sunflower layout featuring my daughter. 

'Gorgeous'


2Crafty Products used:


For this layout, I used a few of the 'Leafy Silhouettes',
that I have embossed in white. 


I used two leaves 
in opposite corners of my page,
overlapping them slightly.


I have also snuck in one of the bees from the
'BeeYoutiful Set',
which I left raw. 


For my title I have used the word gorgeous from the
'Mini Word Set 3',
that I also embossed white. 


I am really happy with this bright and happy layout.
I hope that you like what I have created!

Until next time

Lisa


Wednesday, March 1, 2023

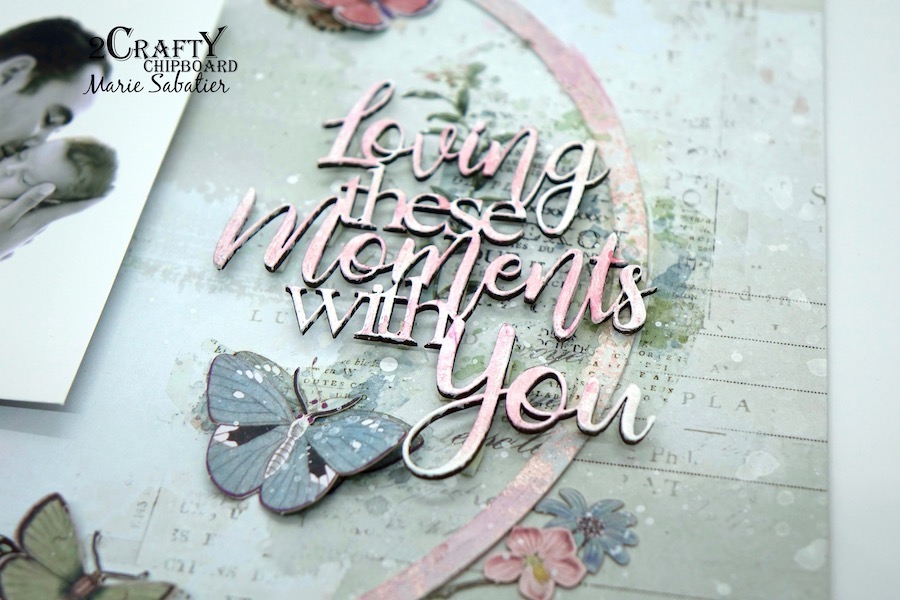
"Loving these Moments with You"
Layout by Marie Sabatier


Hello everyone,

This is my first inspiration for this month of March. For some reason, 
March is a month I don’t like very much. 

So I decided to start with a layout that reminds me of beautiful memories. 
 With this picture of my eldest son and Mia who was only a few days old.

"Loving these Moments with You"


The 2Crafty Chipboard used: 

- Title Loving these Moments with You
- 12 x 12 Circle Frames
- Lattice-Hearts
- Mini Word Set 3 "Cute"


As always, I prepare the chipboards by applying a layer of white gesso. 

I chose pastel shades that harmonize with my photo and give a lot of softness to my layout.

I begin my arrangement with the large circle that I embellished in a random way 
with powder to emboss and ink in shades of pink. 


For hearts, I used pink embossing powder uniformly, then in the center I added white.

I voluntarily left some parts of the chipboard, this is not a defect (lol).
I didn’t stick them flat to relieve them.


For the title I did the same thing, but in white and then I added pink paint to the brush.
I fixed it with adhesive foam to lift it.


With the word "cute" I add a feeling to my layout I love these mini-words.


Good scrap to you. See you soon.


Thursday, September 1, 2022

"Perfection"
Layout by Marie Sabatier


Hello everyone,

Like every first of the month, I meet you to present my inspiration created
with our wonderful chipboard. 

With this picture of my grandchildren I chose these chipboard that inspire their sweetness.


"Perfection"


The 2Crafty Chipboard used :

- Mini Word Set 3
- Half Circle Flourish Frame
- Angel-Wings


As always I apply a layer of white gesso on each chipboard.


To embellish the chipboard "Half Circle Flourish Frame" I used white and golden embossing powder. 
For my layout, I first arranged my photo in layers with cardboard and die-cuts to give volume.


I stick the chipboard on my photo that shows every detail and gives a feeling of being rocked.

For the title I simply added a layer of powder to emboss "holographic".


I end by adding this angel wing that I find perfect to harmonize with my photo.

To recall the gold of the chipboard, I add on the bottom of my page touches of powder 
to emboss white and gold.


I hope you will like this layout, very simple to reality.


Thank you again for visiting us. 


Wednesday, August 24, 2022

"Gorgeous"
Layout and tutorial video by Marie Sabatier


Hello everyone, 

I am pleased to meet you again to share my second inspiration for the month of August.

I chose to create a summer layout, here in France it is soon the end of the summer holidays, 
we must take advantage of it. I was inspired by my grandniece’s photo, the sand, the sunglasses 
her look that I love.


"Gorgeous"


I made a video tutorial that you can watch HERE 


The 2Craftychipoard used:


- Mini Word Set 3
- Flamingos
- Intricate Seahorses
- Seaweed Grass Set 2
- Sea Shells Set 1
- Fishing Net Bits 


To match with my photo that to a retro look of the 50s especially with the sunglasses 
in the shape of flowers I wanted to create a vintage atmosphere.


I applied a layer of white gesso to each chipboard. 

On the net, the shells, the plants, the seahorse I used wax of different shades. 


On the "Flamingo" chipboard, I used pink embossing powder, which I then darkened with a darker wax.


I created my layout by first placing my photo and then I arranged the chipboards and paper embellishments.


For even more details, do not forget to watch the video and especially do not hesitate to leave your comments.

Personally as always I enjoyed creating with these wonderful chipboards. 


See you soon!


Friday, July 1, 2022

"Angelic"
Layout by Marie Sabatier


Hello everyone,

Already in July, time passes so quickly. Here is my first achievement.

I miss the pictures of my granddaughter when she was still a baby. 
I chose this photo as it contained both purple and lilac.


"Angelic"


The 2Crafty Chipboards used:

- Mini Word Set 3
- 11 inch Celia Frame
- Scribble Flower Set
- Leafy Shrub Set 


As always, I protect chipboards with a layer of white gesso.

After preparing my layout. I decided to embellish the "Celia Frame"
chipboard with "Midnight Violet" embossing powder.
To bring relief, I didn't hesitate to cut it out and superimpose it on the layers of paper.


On the frame I added this chipboard "Leafy Shrub" that I embellished with powder 
to emboss "olive green" then I applied a hint of "turquoise" wax.


I chose this title which perfectly illustrates the meaning of my photo!


This is the first time I’ve ever used these "Scribble Flowers" chipboards, they go perfectly 
with the drawings of my paper.

Here I left the wooden support then I added a paper embellishment and I glued the flower.
I liked to add several in my clusters of embellishments.


A new layout that ends, I hope I have given you some inspiration.


Thank you for your visit, and see you soon!