Showing posts with label Embossing Powder. Show all posts

Friday, April 26, 2024

"Spring Tags" with Amy Voorthuis

 Hi lovely creative peeps, 
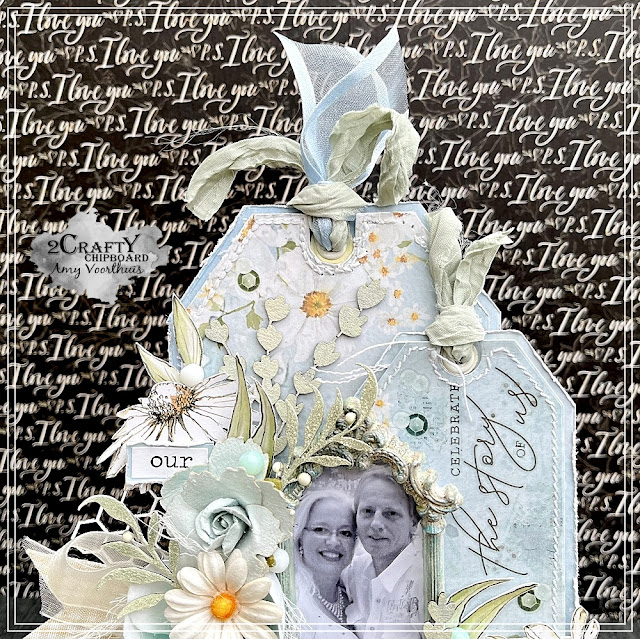
Hope you are having a warm & sunny day here in my part of the world spring is not breaking through yet! So for this post I made a couple of happy spring feeling tags sometimes it's very therapeutic to just make tags and fussy cut a little in front of the tv. My first tag is with a picture of my husband and I the 20th of this month we had our 12 year wedding anniversary.

Our Forever Jouney: 


For this tag I altered the chipboard pieces in a very simple way I just added some spray paint on the Foliage Set 6 & the Spring Flower Bunches and the first one was altered with a thin later of embossing powder and some crystal drops. 


The ATC banner was just altered with some white gesso and some wax. On the word arrow I added three layers of white embossing powder to create a thick layer. 


My second tag was made for a tag challenge {it was to add some bees} I had so much fun making these tags that I just can't stop hihi.

Bee Gorgeous: 

2 Crafty Chipboard used: 
Lattice Leaves
Frame Jenna
Mini # Word Set 1
Frame Viney Circles
ATC Word Banner Set 1
BeeYoutiful Set


I altered my pieces the same way as the first tag above only for the bees I used some posca pens in black & yellow but also some orange watercolour paint and to finish them of I added a piece of paper behind them 


For the leaves and frame I also used some spray paint and waxes. The big frame & word bee are altered with three layers of embossing powder to add a little dimension. 


My third tag is my last for this post and was made with the same collection as the first two that collection make my heart very happy & sunny oh how I long for spring & summer. 

Finding Beauty in Everyday: 

2 Crafty Chipboard used: 
Mini Branches
Phrase Stick Set 2 {6x4}
Leafy Sihouettes


I cut up the Phrase Stick Set 2 {6x4} in two and just added a thin layer of white gesso later I added some rusty brown wax the make a little woodgrain effect. 


Both leaves I used here are altered with some green spray paint both in two layers after that I added some matte white wax & some shinning white wax. 


 Thank you so much for stopping by, I will be back soon with another project hope to see you back...then it's may already wow.

Meanwhile if you would like to see more you could visit here: 

Amy's Pretty Papers

Thursday, October 12, 2023

"You Make Me Happy Handsome Lad" by Amy Voorthuis

Goodmorning 2Crafty friends, 
So glad you are visiting this amazing blog, I really love creating with beautiful chipboard
 pieces like these. For today I have another 12 by 12 layout as those are my favorites to make.
 This time I used a older picture of Kevin and myself.
 Since my printer was acting up I couldn't use the picture I wanted to use.
 You got to love technology right???


You know what's amazing, you can order directly from the
2Crafty website here so you can also play with their amazing chipboard pieces

You Make Me Happy Handsome Lad:

2Crafty Chipboard used: 
Mini Title Stick Set 1
Corner Steampunk 4 
12 x 12 Weatherred Clock Face Frames
11" Holly Frame Set
Holly Twig Branches
Hinges Pack 
You Make Me Happy Title 
Fine Word Set 3


I just love to wrinkle my papers so that's what I did for this layout. I also machine stitched the outside of my base sheet. Most chipboard pieces are treated with some rust paste and waxes as for the title "you make me happy" the top was embossed {with white powder} and the happy part was also treated with rust paste. 


The 11" holly frame set was firstly treated with some white gesso and later on I added three kinds of green acrylic paints and a lavender acrylic paint. Then on the berry circles I added some wishing bubbles to make them pop a little. 

 Thank you so much for your visit today and if you would like
 to see more of my work please visit here:

Amy's Pretty Papers


Monday, June 12, 2023

"BeeYOUtiful Journey" by Amy Voorthuis

  Good morning lovely 2Crafty friends, 

Today is my turn to show you some inspiration on this wonderful blog. For this occasion I made a layout and again I used some of my favorite colors like purple and green & chipboard pieces by 2Crafty Chipboard. I used a picture of our beautiful children and a colorful paper collection. Not  so long ago I discovered that 2Crafty Chipboard lends itselfs really good to sew on it and so I did here with the pretty Frame Maria's . 

BeeYOUtiful Jouney: 

2Crafty Chipboard used: 
Frame Maria's 
Ginny's Flourish Set
Photo Adornment - Flourish Set 5
Fine Word Set 3
BeeYOUtiful Set


I treated all the chipboard pieces with white gesso and for the swirly pieces & the word journey. I made them green with some matte acrylic paint then I added some wax in a stained wood color. The word "BeeYOUtiful" was treated with three different acrylics in the color purple. 


I just love adding the fine word set words to other phrases or words that gives it more demension don't you think so too? The pretty Frame Maria's was treated with several layers of different colors of embossing powders {white & light purple} Then I machine stitched around the circle & the straight and ik that circle I added a phrase from the paper collection I used here. 


Thank you so much for your visit today and if you would like to see more of my work please visit here:

Much love and happy crafting...


Thursday, January 12, 2023

"Sweet Love Thank you for being Mine" canvas by Amy Voorthuis

Goodmorning creative 2Crafty friends, 

Happy 2023 to you all, I hope you had a lovely New Years eve here it was rainy with lots of pretty fire works but I was in bed by 12:15 lol since my husband & kids all have the flue they were not in a festive mood. Since we now have Valentines day approaching I created a canvas with my husband as the center pieces well him kissing me that is. This year in April we will be celebrating our being together for 25 years. So you will see some more works of me in honour of that. 

Sweet Love Thank you for being Mine: 


2Crafty Chipboard used:
Berry Branch 
Festive Vine
Frame Handrawn Hearts 


All the pretty 2Crafty chipboard pieces are firstly treated with a layer white gesso. After that I added two layers of aqua embossing powders and one layer of pure white embossing powder on the berry branch & festive vine. 


On the berry branch I added less white embossing powder then I did on the festive vine since I wanted them to look slightly diffenrent from each other. In the end I added some crystal drops on the circles to give them more demension en also some white matte wax. The heart frame was painted with two different types of acrylic paint the first with a shiny finish and the second one with a matte finish. 

 Thank you so much for your visit today and if you would like to see more of my work please visit here:

Amy's Pretty Papers

Much love and happy crafting...


Monday, March 14, 2022

"A Moment With You is Magical"
by Amy Voorthuis

 Hi there 2Crafty fans. 
I am excited to show you my newest layout, for this one I used the color yellow which I don't
use that often. But when I got my new 2Crafty chippies I knew exactly which ones I wanted 
to use & with what paper collection I was going to use it.

 The picture is a oldie and I wanted 
to use it since we are going to celebrate our 10th wedding anniversary next month. 

A moment with you is magical: 


2Crafty Chipboards used: 
 Fine Word Set 2
Frame Fine Circle with Butterflies
11"Fine Floral Frame Set
Foliage Set 6
A Moment With You


All the chipboard pieces are treated with gesso and "purely white"embossing powder,
  then I added a layer of wax with two different colors {rusty brown and old white}, on the 
foliage pieces I added some green matt acrylic paint and on the little circles I added gold pearlecents.


I did some machine stitching around my picture, and also used some pretty flowers, rub-ons, wishing bubbles and did a lot of fussy cutting from the "sunflower" collection by ScrapAndMe.
 At the end I added some frozen jack frost & shimmer spray. 


I also added some rub-on words & three beautiful butterflies made by my very talented friend Renea Harrison. Thank you so much for your visit and I hope to see you next time.

If you would like to see more of my work please visit:

 HERE

Much love and happy crafting...