Showing posts with label Border fancy set 2. Show all posts

Tuesday, October 18, 2022

Cheeky I Love You by Amy Voorthuis

 Hello sweet 2Crafty friends, 

For today I am going back in time a little because when the new "Beauties" collection arrived at my doorstep I really needed to use a baby picture of Abbey with this amazing phrase by 2Crafty Chipboard. "I love you more than the sun the moon and all the stars" the phrase was treated with two layers of white gesso and then some white embossing powder the same as I did with the word cheeky. I also separated the phrase in four pieces to make it more the focal point on my layout next to my picture. 

Cheeky I Love You:

 2Crafty Chipboard used: 
Foliage Set 10
I Love You More Than Title 
Fancy Set 1 Borders `
Mini Word Set 4
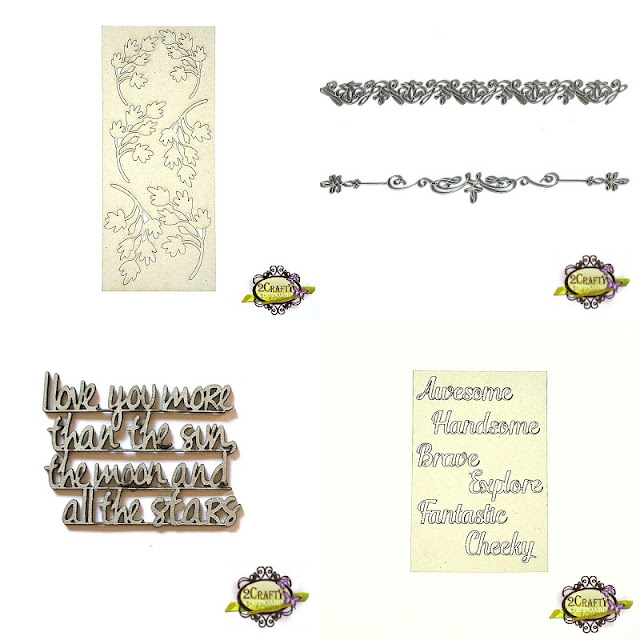

The leaves are treated with one layer of white gesso and then with some spray which I added three times and I used a whipe to take away the excess and dried with a heat tool. I did the same with the border piece. 


The flowers are handmade with some new dies I just purchased. I also did a bunch of fussy cutting for this layout. On the background I did a lot of machine stitching and I used a stencil & added some nuvo drops on the stencil. 

Thank you so much for your visit today and if you would like to see more of my work please visit here:
Amy's Pretty Papers


Much love and happy crafting...

Monday, April 4, 2022

Love, Adore, Dream Frame by Tania Ridgwell

Hi there!

Tania joining you today with the first of my DT shares for April.
  I have altered a wooden frame.


2 Crafty Chipboard Used:

*Circle Word Tag Set 1
 *Border Fancy Set 2
*Addy's Butterflies 
*Mini Decorative Frame Set 6
*Mini Title Stick Set 3 


Once I had coated the frame with a couple of coats of gesso and decorated the inner panels with patterned paper I set about embellishing it with lots of 2 Craft Chipboard goodness.


I used Prima Blue Lagoon Metallic Wax to colour the Mini Decorative Frame Set B.  The Fancy Set 2 Borders and Addy's Butterflies have been coloured with black mist.
Once I had added photos I embellished the frame with flowers and chipboard pieces.


I used several of the Circle Word Tag Set 1 chipboard and also a piece from the Mini Title Stick Set 3 which I kept raw to finish off the frame.


That's all from me today, I hope I have inspired you all a little with my Altered Frame.  
Until next time,
Thanks so much for stopping by.

Tania xx

Wednesday, February 24, 2021

A splash of colour layout - by Chrissy Tingey

Hi everyone,

 Chrissy here with another layout for you, featuring some gorgeous 2Crafty Chipboard, with added stamped & fussy cut images. 


For this layout I wanted to paint some of the beautiful chipboard and keep some raw, I love that you can mix the two together for a different look


2Crafty Chipboard used :

Brooks Swirl x 2

11inch Circle Leaf Frame

Fancy border Set 2 


Once I had made up my base, which consists of white card and two layers of the same paper, one on top of the other the top being slightly smaller, I then stitched all around the edge, most of my layouts start like this. I then picked out some floral stamps to use and stamped one on plain white card and the other on coloured paper that coordinates with my base, I wanted this layout to be a bit funky and bright. These were then all fussy cut. 


I also stamped and fussy cut some leaves onto plain white cut. 


Now for the gorgeous Chipboard - I just love the large 11 inch frames you can get, 2 Crafty have quite a few!!! - I love this circle Leaf Frame, I decided to paint this white and this was going to be the main feature of my layout.


I cut the leaf section off the frame and repositioned it to the top right hand 
corner of my layout.


I then arranged my fussy cut flowers and leaves around the frame in three clusters. 


I also added Brooks Swirls raw chipboard around my flora clusters, I love how these then stand out from the painted frame


  I cut a small section from the Fancy Border set and added it to the top left hand corner of my layout, this just adds a pretty little detail. I have lots of little pieces of chipboard that would have been covered by embellishments, I keep them to use like this. 


I hope I have inspired you today to use these fabulous chipboard products, I will be back next month with two more Crafty Chipboard projects. 

Check out the 2Crafty Facebook page for lots of inspiration & the Instagram page

Happy Crafting everyone!!! 
Hugs
Chrissy Tingey 
xXx 


Thursday, December 31, 2020

Life is the Journey Canvas + Video by Emma Zappone

 Hello :)
Emma joining you today for the last day of 2020!!!
So to go out with a bang I created a Steampunk Canvas to share and hopefully inspire with you all.
At the end of this post is a video for you to enjoy in your free time.

And here are the pieces used:

Clock face discs
Fancy clock Hand set 2
Fancy Set 2 borders
Steampunk Strips


The chipboard doesn't need much to make it look great so I kept the finish on all the chipboard pieces simple. Starting by painting them in Black Gesso.


Then started to apply layers of wax to create colour over the black.


Most of the chipboard includes 2 to 3 Colours on them to create the gradient in colour.


Pops of colour from the flowers and paper elements also help the chipboard stand out from the canvas.


Sometimes keeping things simple makes for a great impact.

I hope you enjoy the video process of this canvas coming together.


Thank you for visiting today and hope you have a great start to 2021. 

See you all soon.
Emma.


Sunday, October 4, 2020

Autumn boxes by Elena Martynova

Hello crafty friends!
 Elena here today with a set of Seasonal Mixed Media Box.

All the luxury of autumn in new photo boxes. 
Noble purple, rebellious Burgundy, and sumptuous gold were reunited together.

The main decoration is my favorite chipboards from 2Crafty Chipboard.

Some of them are covered with brown and gold embossing powder by  Lindy's. 
The other part is painted and covered with transparent powder
 to enhance the color and fix the paint.

I used paper by Blue Fern Studio and Fabrika Decoru.


These boxes are designed for storing photos from autumn photo sessions. 
They can also be used as gift wrapping. 
I think it would be very nice to receive such a compliment.


I used all the chip dials and I still have a lot of hands from the clock.
 Why not use them this way! The role of the dial was played by a wreath of leaves
 from the Frame Viney Circles set, I pasted it on a card with a calendar 
and it turned out to be such a little crazy clock :)))


I put pictures of my dad in this box when he was very young. 
They were made 70 years ago.


Have a look at the wonderful chipboard I've used here:


Thanks for stopping by!
xoxo


Friday, July 31, 2020

Take Me With You - By Emma Zappone
plus VIDEO TUTORIAL


Hello, Emma here, thank you for joining me today for an end of month share.
Today's  share is a layout that for me feels pretty, and that I really enjoyed creating.


Here are the awesome 2Crafty chipboard pieces I used:

Fancy Set 2 Borders
Clock Face Discs
Fancy Clock Hand Set 2
Amelia Frames
Foliage set 7


If you follow me you know that I like to keep my finishes of the chipboard fairly simple,
and so, this page is no different.


With this layout I decided to paint all my chipboard with Black Gesso first.


Then I chose a selection of Prima waxes for colour and to compliment the papers.


I think my favorite piece of chipboard has to be the Clock faces.
 I used two on this layout, but cut the bigger one to make it look like three.


The hits of metallic wax really sets the chipboard apart from the other elements on the page.


I have created a video for this layout that you can all enjoy here


Thank you for joining me and I look forward to sharing with you all again soon.

Em xx