Today I’m sharing my first inspiration for September, a layout that is especially close to my heart as it features my youngest granddaughter. These two sweet photos pair so beautifully with the “Little Dreamers Sugar” collection by 49 and Market.
To compliment them, I chose three chipboard pieces: the 11" Circular Leafy Frame to frame the photos with its lovely curves, the Large Berry Stem to tuck among the embellishments, and the Cuties Title, which fits this sweet theme perfectly.
"Cuties"
I also filmed a process video to share how this layout came together.
Before embellishing my chipboard pieces, I applied a generous coat of white gesso and used my heat tool to speed up the drying process.
On the left side of the photos, I tucked the Large Berry Stem among the floral and foliage die-cuts. I embossed it with “Terra Cotta Plum” embossing powder by Lindy’s Gang. Its warm shade picks up the tones in the photos and the little characters from the collection.
I love how the delicate branches peek out between the embellishments, complementing the photos without covering them. The little elephant adds another sweet touch to this cluster.
The Cuties title was just perfect for these photos! I placed it on the right, between the two pictures and just below the little animals.
I also used “Terra Cotta Plum” embossing powder to color the title. I applied two coats for a more pronounced embossed effect. This finish highlights the lovely lettering and ties in with the Large Berry Stem.
I think these chipboard pieces and this collection complement each other perfectly. I loved combining them to preserve these precious memories of my granddaughter.
Here is my first inspiration for this month of April, a layout in the colors of spring.
I love this season so much.
With a random photo of my granddaughter.
"DREAM in colour"
The 2Crafty Chipboard used:
- DREAM in Colour
- 11" Circular Leafy Frame
- Flowering Clusters
I chose the "Circular Leafy Frame" chipboard with leaves and arabesque it is so beautiful.
It can be positioned differently to fit your layout.
After passing a layer of white gesso I applied an acrylic paint "Stormy Ocean" I was inspired by the color of the knot in my granddaughter’s hair.
I also added shine with some touches of hot embossed powders in "Topaz Glitter" color.
As the chipboard I chose generous embellishments in size, in the bouquet I added the chipboard "Flowering Clusters" it is airy and harmonizes perfectly.
On the title I mixed colors and materials to give it a polychrome effect.
Some embellishments and flowers on the leaves of the chipboard.
Very little not to bury the beauty of this chipboard.
I hope you like this layout very simple to make.
Thank you for stopping by, and I hope to see you again very soon...
Chrissy here with another layout for you, featuring some gorgeous 2Crafty Chipboard, with added stamped & fussy cut images.
For this layout I wanted to paint some of the beautiful chipboard and keep some raw, I love that you can mix the two together for a different look.
2Crafty Chipboard used :
Brooks Swirl x 2
11inch Circle Leaf Frame
Fancy border Set 2
Once I had made up my base, which consists of white card and two layers of the same paper, one on top of the other the top being slightly smaller, I then stitched all around the edge, most of my layouts start like this. I then picked out some floral stamps to use and stamped one on plain white card and the other on coloured paper that coordinates with my base, I wanted this layout to be a bit funky and bright. These were then all fussy cut.
I also stamped and fussy cut some leaves onto plain white cut.
Now for the gorgeous Chipboard - I just love the large 11 inch frames you can get, 2 Crafty have quite a few!!! - I love this circle Leaf Frame, I decided to paint this white and this was going to be the main feature of my layout.
I cut the leaf section off the frame and repositioned it to the top right hand
corner of my layout.
I then arranged my fussy cut flowers and leaves around the frame in three clusters.
I also added Brooks Swirls raw chipboard around my flora clusters, I love how these then stand out from the painted frame
I cut a small section from the Fancy Border set and added it to the top left hand corner of my layout, this just adds a pretty little detail. I have lots of little pieces of chipboard that would have been covered by embellishments, I keep them to use like this.
I hope I have inspired you today to use these fabulous chipboard products, I will be back next month with two more Crafty Chipboard projects.
Hi everyone.
Sadly today is my last post for 2Crafty, I have loved creating with this gorgeous chipboard
and want to thank Vanessa and Di for having me on this amazing team.
This layout is based around the Circular Leafy Frame chipboard piece, it's just so beautiful.
I've had it sitting in my stash for a while now and was unsure how to use it, but
I finally figured it out.
The 2Crafty Chipboard Used:
Circular Leafy Frame
Shine Bright Title
Mini Squiggly Bits
Palm Leaves
I started off this layout by coating the Circular Leafy Frame, Shine Bright Title and Mini Squiggly Bits of chipboard in white gesso. I used the Prima watercolours in Woodlands to add colour to the frame. I added blue tones in a random and uneven manner, I really like this variation in colour which gives the frame more interest. With the Shine Bright Title and Mini Squiggly Bits of chipboard I added some gold texture paste while the gesso was still wet, this gives just a light hint of gold. To the Palm leaves I added a deep green watercolour to the raw chipboard.
Today I have a few projects to share with you.
A mixed media canvas and a layout.
Before we start
Become a blog follower & leave a blog comment to be eligible to go in our monthly draw for a great chippie prize pack.
"Dream"
I had been wanting to make a mixed media canvas something like this for so long.
When I got these chippies in my DT pack, I knew I could go ahead.
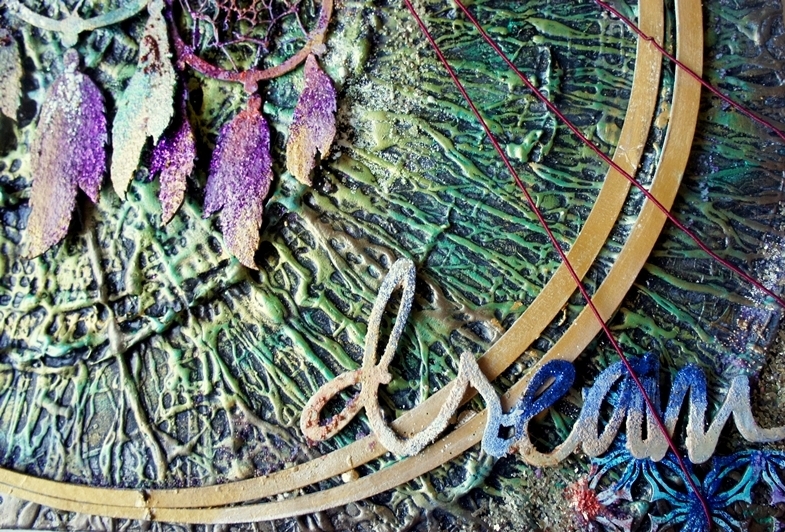
These dream catcher chippies are so gorgeous and intricate. It was fun to create
this canvas with them.
Some close-ups-
Look at that intricate pattern! Isn't it gorgeous?
I applied some white acrylic paint to my chipboard pieces and once it was dry I mixed
some glitter with soft matt gel and randomly applied it to the chipboards. Next was
adding some DecoArt Metallic Lustre in Gold and champagne ice. They look
absolutely amazing after this treatment!
On this particular piece I added some embossing enamel and
micro-beads for added texture.
Love that 'Dream loopy font' chippie. I have loads of navy blue glitter on it
coupled with highlighting with DecoArt champagne ice metallic lustre paint.
The moon like chipboard that you see here is actually a left over from
Circular leafy frame chipboard. I love how beautifully it mimics moon. I
painted it with Gold DecoArt metallic lustre paint.
2Crafty Chipboards used-
Dream catchers
Circular leafy frame
Dream loopy font
Circle lace panel
"Amaze Yourself"
For my next project I wanted to make something depicting nature in the raw form.
So I decided to create something that was highly textured using just the shades
of greens and greys.
The wonderful chippies from 2Crafty made this possible. I just love those gorgeous
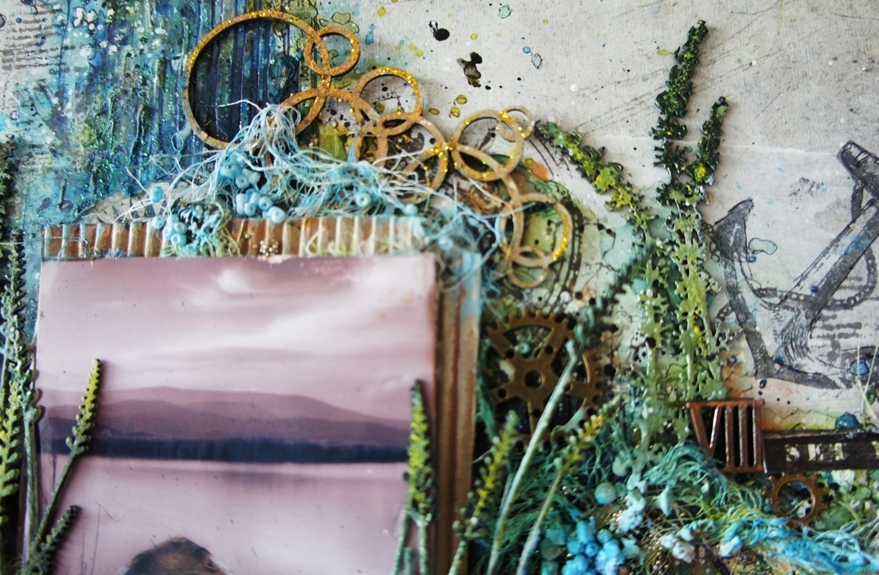
Anchors and Shrub chippies. Aren't they the most gorgeous and intricate pieces
to add to your beach/sea theme pages?
Have a look at the page-
Some close-ups-
I wanted to keep raw look of the chippies but at the same time add some colour and shine.
So I coloured my chipboard pieces with some brown watercolour pastels and once it was
dry I added some liquid gold sparkle sparingly to them. Have a look.
I also did some doodling on my anchor chippie to make the lines stand out after
colouring. The shrubs and leaves were first embossed with dark green and teal embossing
powders and later I added a hint of yellow at places. It gave them the perfect natural
look I was aiming for.
2Crafty Chipboards used-
Lavendar shrubs
Thistle shrubs
Bubble clumps
Amaze yourself
That is all from me today. I hope you were inspired with these projects.