Showing posts with label retro panel. Show all posts

Friday, May 10, 2019

"Be yourself"
by Sabrina Turpin

 Hello 2Crafty friends,

Warm weather is finally here in Canada and we can finally enjoy outside activities again! Last summer, my son Liam discovered himself a taste for skateboarding. He has been longing for the moment where he'd be able to jump back on his board for a few months and this moment has finally arrived.

I took this picture and had an inspiration to create a layout that would capture the almost-but-not-yet-pre-teen attitude of my 10 years old boy.

"Be yourself"


I did a lot of work on the "Frame Star with Stars": I started by inking it with blue ink. Then on the center star, I applied diluted navy paint. On the side stars, I applied a white and blue embossing enamel.


On the "Retro panel", behind the picture, I used silver embossing powder and applied black embossing ink on top of it. Then I traced the border with black ink.
For the "Light bulb word set", I applied red embossing ink and put a silver glaze on top of it.


On the "Star Bubble set", I applied red embossing ink then dabbed white embossing ink on top. Finally, I've applied a silver glaze.


For the title, "Be yourself", I used a silver wax and traced the border with black ink.

On this layout, I used the following 2Crafty chipboards:
 Frame Star with Stars [FR0030]
Light Bulb word set 1 [M00803]
 Retro Panel [660042]
Star Bubble Set [M00666]
Be yourself  [W00055]


That is all for me today! I hope you enjoyed my creation and that it gave you some inspiration! I'll be back in a few weeks with more ideas to share with you. Until then, have fun creating!


Wednesday, December 26, 2018

Experience - with Emma.

Welcome to the 2Crafty blog friends.
Emma here today with you all.

I'm sharing a page that has a slight spacey/melancholy yet new adventure vibe. 


And these are the awesome chippy pieces I have used...…


6" Circle Revolution Frames
Mini Travel Word Set 2
Retro Panel
Geometric Arrows


The retro panel is inked in an archival black ink and left as is.

The geo arrows and circle frame I painted over with white gesso first so the colour would be more vibrant once painted.


I decided to keep the frame in the white but the arrows I painted with a watercolour ink. It covered the chipboard beautifully and the colour really popped also.


For the word I chose the 'experience' word out of the set which I also primed with white gesso and then painted with a complimentary blue shimmer ink.
The words in this set are very versatile as they are flexable and so I could curve the word around onto the circle frame.

I thought this a cool use of a title instead of always just using them straight.


I hope this has inspired you to get creative, maybe you have some time off over this holiday season?

Have a great rest of the year and I will catch you all very soon in the year 2019!!!

Em xx


Friday, September 7, 2018

"Escape Under the Stars"
By Emma Zappone

Welcome everyone to my first share this month.
Today's share is totally inspired by the image, my love of all things Star Trek and sci-fi.


Here are the chipboard pieces I chose to bring this layout to life.


Because Star Trek is iconic I decided to go with a bit of a retro feel as this
 particular artwork is of the original Spock.
Hence this is why I chose the retro squares for the background. I painted the
chippy in an Art Alchemy acrylic first and then once dry stamped over it with a
white ink.  The stamped image is the same one as  what I stamped directly on my layout.


The Circles I sprayed with a Dylusions ink spray and I chose a purple, a colour I very rarely
use as I just don't like it, but felt this page would do purple justice, you know, being spacey and all.


The arrows I painted in a Sparks over them being inked in black first.
I also painted the decorative disc under my arrows in the matching shade of purple.


My title word from the Mini word set is also in the purple but
with an Opal metallic over the top to add extra sheen.


Over all I feel I have captured the essence of space and beaming up into it.

I hope you can see where I was going with it anyways.

I'll catch you all again a bit later on in the month.
Till then I hope you are inspiring and being inspired.
Em xx


Saturday, August 19, 2017

Karine's Shares for August

Dear 2Crafty friends,

Karine here with you today to share two new layouts filled with 2Crafty chipboard goodness!
 Let's jump right to the first one.

"Enjoy the Journey"

My main inspiration came from the Decorative Rod Set 2 piece I chose. I painted it
black and partially covered it with bronze and dark teal embossing powder. I glued
 it in the middle of my layout, vertically.


The shine I got on that piece is gorgeous!


I decided to use a few of the 6" Clock Face Frames here and there on my layout.
 I embossed them in bronze embossing powder.


For my title piece, I chose the Enjoy the Journey title.


I embossed it with the same bronze and dark teal powders I use all through my layout.

Here are a few other close-up pictures.


2Crafty Chipboard products used:

Enjoy the Journey 

Decorative Rod Set 2

6" Clock Face Frames


"Perfection"

I used roughly the same sketch for this second layout, but I went a bit crazy with the colors.


I began with the Retro Panel. I cut it in 3 pieces and embossed them with a black
 glittery embossing powder. I then rubbed some Art Alchemy waxes on the edges.


Over my picture, I placed the beautiful Ornate Dragonfly. I embossed it with
 a dark blue powder, and then, rubbed some waxes to add to the old finish.


 I treated my title, the word Perfection, the same way.


I embossed the Weeping Vine in gold embossing powder. I then cut it apart
 and placed pieces here and there on my layout.


2Crafty Chipboard products used:

Retro Panel


Ornate Dragonfly


Perfection

Weeping Vine


I hope you like my layouts. Have a nice day.
Karine
xx


Wednesday, May 17, 2017

May Inspiration by Rachael Funnell

Hello There 2 Crafty fans!
Rachael here, today I have two layouts to share.....

'Mother's Day 2016'

 2 Crafty have this really lovely Mother's Day word-title & as we just celebrated
Mother's Day a few days go here in Australia..... I hope all you mothers had a
 WONDERFUL day!  xx
 I decided to create a Mother's Days inspired layout - Mother's Day 2016...

2 Crafty Chipboard used: 
Ava's Frame
Beaded heart borders
Heart Silhouette's
2016
Mothers Day word


Inspired by the colours from my photo!
 I started with a coat of gesso, to both the 2016Mothers Day word....
Then Mothers Day is inked with Pale Pink & 2016 inked with a Burgundy...  


The Heart Silhouette's inked with Burgundy & some with black.....


With the Ava's Frame & a piece from Beaded heart borders,
 both have been coated a gesso....


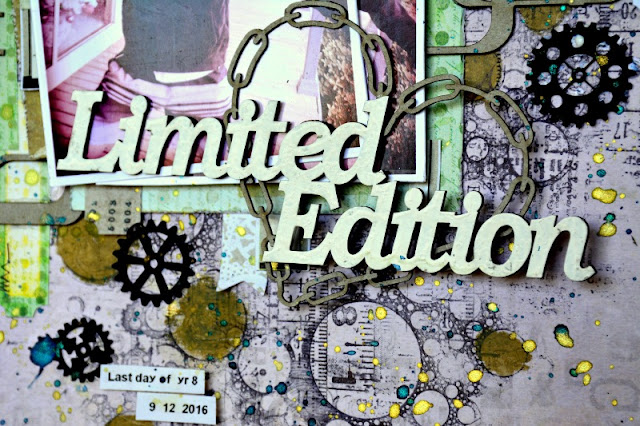
For my second layout a grungy boys page..... of my son!

'Limited Edition'

2 Crafty Chipboard used:
6x6 Retro Panel
Medium steampunk gears 
Chained heart frame
Limited Edition word
Small steampunk gears 


I am really loving the look of adding a couple pieces of raw chipboard, as well as
 treated chipboard throughout my page..  & this page is a perfect example of this!!
I have used the smaller Chained heart frame which I have left raw! 
 Limited Edition word has a couple of coats of gesso....


The Medium & Small Steampunk gears have been inked black....


And with the 6x6 Retro Panel I cut into 4 smaller pieces, left two
 pieces raw & the other two pieces have been heat embossed with a blue... 


I REALLY love the end result.... 
Thanks for stopping by AND 
 HAPPY crafting.... 😀