Showing posts with label Sharon's Butterflies. Show all posts

Tuesday, April 16, 2024

'Her Smile' layout
By Rachael Funnell


Hello everyone & A warm welcome to the 2 Crafty blog today...
Rach with you sharing another bit of 2 Crafty inspro
This feminine layout featuring my gorgeous girl & some fabulous 2 Crafty Chipboard pieces...


2 Crafty Chipboard used:
Fine word set - Months
Pretty birdcage
2019
Her Smile (title)
Sharon Butterfiles


 Let's start this Pretty Birdcage (named pefectly I might add)
I have sitting moungst the blues & purples fussy cut out flowers images.
I have simply inked this birdcage with some black..


Next up for the title 'Her Smile' which is such a pefect title for this gorgeous photo of my girl.
I have given 'Her Smile' two coats of gesso and I think  it looks so good sitting over the birdcage.


You may have notice that the Pretty Birdcage does have this super sweet tiny bird in the centre of the cage.
But for this page I wanted to added some butterflies & I have used two of the Sharon Butterfiles
inking both with a lovely pastel purple and placing the smaller butterfly over the bird....


And lastly I have added the date, using the January from Fine word set - Months inking this with black.
and then for the year 2019 inking this navy blue color...

That's it from me today,
Thanks for stopping by and 
hopefully I have inpsired you in someway..


Monday, May 22, 2023

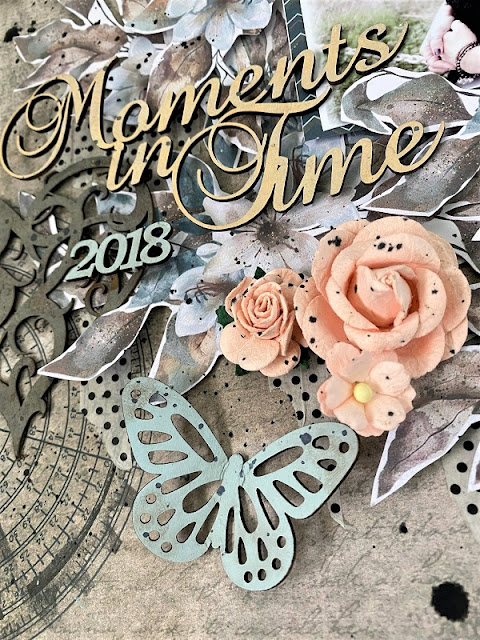
'Moments in Time'
layout by Rachael Funnell


Hello everyone! 
Today I have another layout to share with you all...

This layout features a photo of  myself & my daughter 
a moment captured back in 2018 and 
some gorgeous 2 Crafty Chipboard pieces...


2 Crafty Chipboard used:
Moments in time
Sharon's butterflies
2018
Tattered heart


For my Title Moments in Time which is just perfect for this page
I have inked this with a lovely soft peach color..


The Sharon's butterflies I have used, I have inked 
with a soft blue. I also used the same blue for the 2018..


Lastly! The Tattered heart I have sitting on the left side
of my page, I have inked this with Distress Oxide - Vintage photo
I love how using this color the heart seems to blend in a little with the background!!

Thanks for stopping by
I hope I have inspired you in some way

Tuesday, October 4, 2022

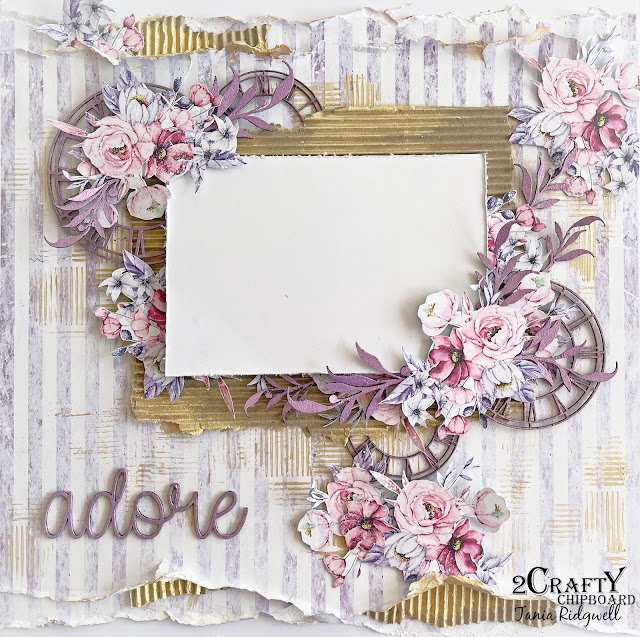
Adore Lovely You Step x Step Tutorial by Tania Ridgwell

Hi there!

Tania joining you today with a layout I created for my first share for October.

  I have a short step x step tutorial on how I created my layout too.


2 Crafty Chipboard Used:

 *Clock Face Discs
 *Adore Script
*Sharon's Butterflies
*Foliage Set 6


To create the background page I added layers of paper and tucked in corrugated cardstock
adding some texture with a stencil and gold opal polish.


I gave all the chipboard pieces a light coat of gesso and then coloured all the pieces with
purple opal polish.


I tucked in the Clock Faces Chipboard under the corrugated cardstock and photo mat.
Added the Adore Chipboard title to the bottom left of the page.  


I fussy cut lots of floral elements and tucked them in and around the Chipboard to add more
layers. Added my photo.  I then tucked in the Chipboard Foliage amongst the fussy cut elements,
added the Sharon's Butterflies Chipboard to the fussy cut elements.  To finish my page I
lightly sponged some gesso over the Chippies.


Thats' all from me today, I hope I have inspired you all with my Layout.
Until next time thanks so much for stopping by.

Tania xx


Monday, August 1, 2022

"Cherished Family Memories"
Layout By Marie Sabatier


Hello everyone,

I present to you my first inspiration of this month of August. 
The warmth of the summer inspired me to create a dynamic and colorful layout. 

With a family photo taken this year for my son and daughter-in-law’s birthday.


"Cherished Family Memories" 


The 2Crafty Chipboard Used:


- Word "Cherished Family Memories"
- 6 Inch Mandala N°5
- Sharon's-Butterflies


As always a layer of white gesso on each chipboard.

The background of my paper being essentially pink it was necessary to find a color 
in harmony to embellish the chipboards.
I hesitated a lot, but I dared the yellow color.

I cut the "Mandala" chipboard before putting it under my photo like a beautiful sun.


 I embellished each panel with Lindy’s Gang "Sunset Yellow Orange" embossing powder, 
I had to apply several layers to get a strong yellow. 

On the butterflies I added a few touches of black ink as well as a darker yellow.


I have arranged my layout according to the title, it is flashy and deserves to be in plain sight.

The rose being still very predominant I added some yellow embellishments.


Now I’m done, I hope you won’t feel any pain in your eyes 
and that my choice of chipboard will inspire you!


Thank you very much and see you soon.


Sunday, January 3, 2021

“So Beautiful”
By Chris Tingey


“So Beautiful”


Hi everyone, I hope you have all had a wonderful Christmas, 
I am so excited to show you my very first project for 2Crafty. 
I have created this layout and used one of my favourite photo's of my daughter. 

2Crafty Chipboard Used...
Flourish Adornment Set 6
Sharon Butterflies
Leafy Shrub Set 2
Thistle Shrub
Stitched Lace Border
Ariel Spray


To start with I gave all the gorgeous Chipboards a couple of coats of white paint, it doesn't 
need to be perfect, I quite like it to look a bit textured, so dabbing it on adds to that. 


I stitched along the edge of the Stitched Lace Border Chippie with some lavender coloured thread....


I love the fact that the chippie's are quite flexible, so I layered up the butterflies 
and shaped their wings to give some height....


I also shaped some of the beautiful flourish stems and tucked these 
in and around my fussy cut flowers....


I added the beautiful Ariel Spray Chippie to the left of my photo to frame it -
 with some more of the layered butterflies....


I love the Thistle Shrub.....I divided it up and tucked little bits of it to the right and left of
my photo and also added one of the chippie's from the Leafy Shrub set....


I hope you like my layout and I hope I have inspired you to layer up, 
shape and maybe even stitch on your chipboards. 


Thursday, August 20, 2020

"Just you " quick and easy video tutorial
by Jenny J.

                                                              Good morning everyone!
Here is a quick video process of my today's layout.


Click below for the video


You will be able to see those gorgeous chipboard pieces


*Sharon's butterflies
*Circle lace panel
*Heidi's vines
*Just you

A few close-ups pictures now

You can see above that I've applied some texture paste on my background.
I've done some random stamping too.

My title "Just you" is heat embossed with a pretty powder 
with chunky pieces of glitter in it:
that's what gives that texture :)

Below, a piece of "Heidi's vines" (just the top of them),
also heat embossed.


"Sharon's butterflies" chippie is easily treated with a Lindy's spray.


Love, love, love that "Circle lace panel": didn't you?

You can see this gorgeous piece all around my picture.
It it simply painted with gesso and colored with a spray 
but using a brush to give a watercolor look.


My focal point wouldn't be finish without some art stones and white drops.
I hope it will give you some inspiration :)


Please subscribe to my Youtube channel also 
for more videos tutorial to come.

Stay safe!


Saturday, March 21, 2020

Dreamer
By Marie Claude Rodier

Hello girls,

With all that is going on into the world, I almost forgot that today is officially spring! Finally!

Time for me to show you my latest project using 2Crafty chipboards...
I was inspired by nature adventure my little one is enjoying so much.

"Dreamer"


"Dreamer" title was painted with gold matte acrylic paint and partially covered with white gesso.


"Corner Leafy Swirls" were covered with white gesso and embossed with light mint powder.
One swirl was placed under the title.
The other was cut into several pieces and placed around the other clusterings.


"Sharon's Butterflies" were painted using gold acrylic paint and dry-brushed with white gesso.


"6" Butterfly clock frame" was painted in white with gesso and embossed with white pearl powder.


Product used...
Dreamer
6" Butterfly clock frame
Corner Leafy Swirls
Sharon's Butterflies


Until next time, be happy and be creative!
Marie Claude
xx