Showing posts with label Sakura Flowers. Show all posts

Wednesday, July 27, 2016

July Projects by Lisa Griffith

Hello 2 Crafty friends! So happy to be staying on the team through the end of the year :)
I have a few layouts to share with you this month.
But before I continue...
Please remember while you are here be sure you have 
become a blog follower and leave a comment to
 be eligible to go in out monthly draw for a great chippie prize pack.


'Anäis'

I saw this quote from the author Anäis Nin as part of these Graphic 45 papers, 
and so I wanted to make a page about the sea and all its wonders. 
2 Crafty Chipboard has a new piece called 'Fishing Net Bits' that fit my theme perfectly.
 
2 Crafty Chipboard pieces used:
'Fishing Net Bits'
'Cartia's Swirl'
'Seashells'


To add texture to the starfish I coated it with a heavy uneven layer of thick white gesso,
when you heat it on high with your heat gun the gesso will bubble up, after that's dry,
I colored it with an orange Lindy's Starburst spray.


I used the same spray on the beautiful swirl to add some movement to my underwater scene.


'Cherish'

I used that same technique on my chippies for this layout too, except I added color by
 painting them with some copper colored acrylic paint and then also using the heat gun,
as this makes the paint bubble up, and I love how it transforms the chipboards.

2 Crafty Chipboard pieces used:
'Addy's Butterflies'
'Fine Word Set 1'
'Sakura Flowers'


Here you can see the "Cherish -title" from the new Fine Word Set #1
which is just painted with the white gesso.

I have also tucked in some Sakura flowers too.


Lastly I wanted to share a layout I created for the 'More than Words' June challenge.
'Imagine'

Here I kept my chippies simple with a coat of white acrylic paint to fit my shabby chic look.
 
2 Crafty Chipboard pieces used:
'Lacey Signpost'
'Corner Thick Vine'


See you soon,


Photobucket

Friday, October 3, 2014

Variety Day with Jennifer Snyder

Hello - Jennifer Snyder here with you. I called my post "Variety Day" - a little of this and a little of that today.   As Guest Designer, I have just one day a month to showcase all the wonderful 2Crafty chipboard pieces I enjoyed through the month  so I am making the most of my blog space. The post will seem a little disjointed or lacking in continuity - BUT that's what happens when one is having fun and gets carried away in creating.

I will present my cards that I made first, then finish with my Halloween canvas.  I no longer name my pieces.  Gosh I'd spend so much energy thinking of names and am not good at that so they are just Card 1, Card 2... Ahhhhh easy. 

Card 1  - Featuring  2Crafty "Mini Word Set 1"

My cards are of a simple design.  I used to not enjoy card making because I thought I would need to be complex and elaborate, but you know what?  Simple is OK! The 2Crafty chipboard piece can be the focal point of the card.  No need to get overly fancy.  

In my case, trying to be overly fancy was getting in the way of me just having fun.  I used the "Mini Word Set #1" on this card. 
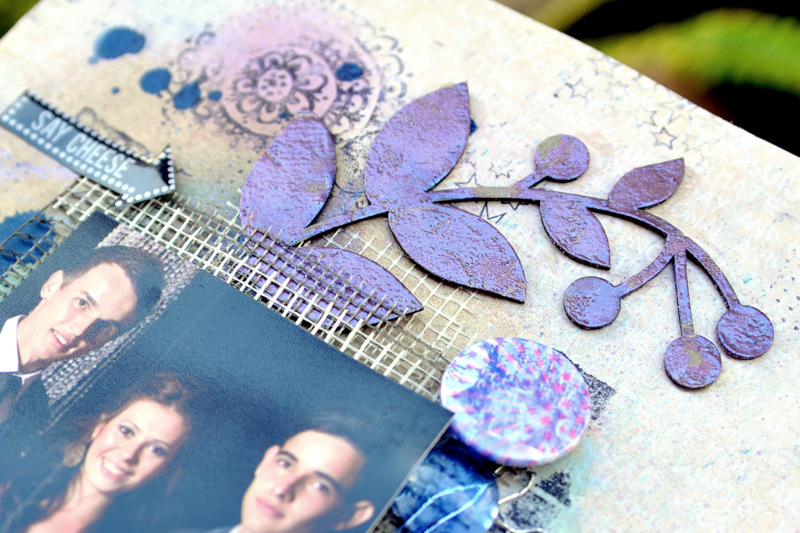


Card 2
This card features 2Crafty's   "Maple Leaf" atc025 and  "Sakura Flowers" m00243.    I painted the flowers with textured paint, sprinkled them with gold micro beads and dried them with a heat gun so the paint bubbled just a bit.   

                              To finish the florals, I added the "Maple Leaf" atc leaves.  
                          They were painted then stamped  with  a small text stamp.  


    "Maple Leaf" atc025 and  "Sakura Flowers" m00243


Card 3
I chose the 2Crafty  "Tattered Hearts" m00280 for this card because it went well with the flourishes and  delicate scroll work on the paper.  It's a perfect match.  I embossed this with ivory embossing powder ( ivory  powder flecked with gold)  and added micro beads.

 "Tattered Hearts" m00280


 Card 4
 The star of this card is the fun "Word Circles Set 1" m00527 chipboard piece from 2Crafty.  These are perfect card sized sentiments.   This is inked brown and covered in gold glitter. 
"Word Circles Set 1" m00527


Card 5
"Sharon's Butterflies" m00496 grace the front of this delicate card.


Haunted Canvas

And now to change directions from pretty and delicate to haunted.   This is a canvas I created using a 8x10 black canvas board and a doll stamp.  My patchwork pumpkin patch ( try saying that 3 times fast) is adorned with the "Iron Fence" and "Grass Clumps".  

I actually left the "iron fence" bare with no finish on it.  I thought that painting or treating the fence with a darker finish would make it disappear in the black busy canvas.  We can't have our beautiful chipboard getting lost on the piece.  That's just not right.   


The  2Crafty chipboard pieces were combined with products from the Flying Unicorns .  
A quick review of the 2Crafty products used:

Card 1 "Mini Word Set 1" m00542
Card 2  "Maple Leaf" atc025 and "Sakura Flowers" m00243
Card 3 "Tattered Hearts" m00280
Card 4 "Word Circles Set 1" m00527
Card 5 "Sharon's Butterflies" m00496 
Canvas "Iron Fence" and "Grass Clumps"

 Thanks for your visit today.   Please stop by the 2Crafty products  website and see what's available and 2Crafty Blog.

And remember, to find a 2Crafty stockist near you, drop an email to...
salesat2crafty@optusnet.com.au


Photobucket

Thursday, February 27, 2014

February Layouts from Helen

Hello everyone!
HELEN here again with a few layouts to share with you today.
Firstly, a canvas I created for the Lindy's Stamp Gang CHA Booth
in January 2014.  This was the first ever piece I've made using 2 Crafty chipboard.


I was immediately attracted to the large (11 inch) 
ornate circle frame {the Florabella Frame}.


I embossed the chipboard with Lindy's Stamp Gang
Geranium Coral Blush after first painting it with Glass
 Bead Gel from Golden.  Lastly I rubbed over with gesso.


I also used the Cherry Blossom, which I cut up & placed
 at both the top & bottom of the Florabella frame.


I embossed the Cherry Blossom branches with Hydrangea
 Blue Mauve embossing powder then rubbed over random
 areas with gesso, using my finger.


I misted some cheesecloth & added it underneath the chipboard
 for some extra texture.  The chipboard works as the perfect
 anchor to hold it in place.


I adhered the chipboard to my canvas using my hot glue gun
 as hot glue is the strongest adhesive known to man
 {well known to me anyway!!}


Next up is my dedicated 2Crafty work for the month. 
 For my first layout I was inspired by the Prima BAP 
{sketch} for February as I could see there was 
opportunity for A LOT of chipboard embellishment :) .


I don't generally enjoy following sketches as my layout design 
is often pretty predictable.  {I enjoy centering my photo/s
 & favour a diagonal design} but I did love this sketch
 as it is so interesting & so embellished!


It gave me the opportunity to use just about
 all my favourite things all on the same page!


I used the "Love You" title but I cut off the "you" & saved it for a future project.
I embossed the title with Venus Violet Blue from Lindy's Stamp Gang.


I also used the "Chicken Wire" sheet behind the photograph,
which I cut up into 3 different pieces, each tucked just a tiny
bit beneath the photo - to give the ILLUSION that it extends 
all the way underneath the photo.  GREAT WAY TO SAVE!


I used one branch from the "Leafy Shrub Set 2", which I 
coloured using Adirondack Brights Alcohol Ink in Pool & Raspberry.


I misted some cheesecloth pale lilac then dabbed it with matching alcohol ink 
& adhered it with some dabs of hot glue before attaching the chipboard on top.


  For fine chipboard pieces my go-to glue is Tombo Mono Adhesive
 as it has such a fine tip which works perfectly for precision application.


Lastly I used 3 out of 6 "Indian Feathers" which I treated 
with droplets of alcohol ink, which blended into each
 other beautifully {pink & blue = purple!}


For my 2nd layout I simply had fun playing with my mists & chipboard, together with
 quite an unusual design inspired by ex-2 Crafty teamie, Keren Tamir.

Of course, as I was only using one photo my layout ended up having
 little resemblance to Keren's but hers inspired the placement of
 my elements as well as my misting & stamping.

 
I embossed all my chipboard pieces on this layout in the same 
way - using Hollyhock Scarlett Plum & Venus Violet Blue,
 adhered using an embossing dabber, randomly to give a
 mottled effect, together with some small areas
 of raw chipboard.
 

I had fun mixing textural elements on this page.  
Chipboard is such a tactile element that it works perfectly with my layered style. 
 Layer 1)  Mists  Layer 2)  Stamps  Layer 3)  Mesh tape  Layer 4)  Metal mesh 
 Layer 5)  Photo  Layer 6)  Silver Thread  Layer 7)  Chipboard  Layer 8)  Flairs.


I used some wonderful new stamps and flairs that I recently 
purchased from 3rd Eye, a Polish Manufacturer.


From 2Crafty Chipboard I used Heidi's Vines, Shrub Set 1 
{bottom right} & a couple of Sakura flowers.


I added a flair to the centre of the top flower & a glass bead
 to the centre of the lower flower,using them as pinning 
points to run some fine silver wired thread in between.

 
As usual I had a thoroughly wonderful time playing with my
2 Crafty Chipboard products this month.  I do hope you 
have enjoyed looking at the results!


Until next month...Happy Crafting!! Helen 

Photobucket