Showing posts with label Thin Square Stacked Frames. Show all posts

Monday, August 11, 2025

Rainbow Garden Cards by Tania Ridgwell

Hello there! 

Tania joining you today to share the first of my DT projects for August.
  I have created a set cards.


2 Crafty Chipboard Used:

*Thin Square Stacked Frames
*Thin Hexagon Stacked Frames
*Photo Adornment - Element Set 3
*Flourish 2


I created each of my card bases using the beautiful Paper Rose "Rainbow Garden Quick Card Cardmaking Kit". 

I coloured all my chippie pieces using a mix of Art Alchemy Indian Pink, Blue Lagoon and Jamie Rodgers Cherry Blossom Metallic Wax's. 
To construct each of the cards I added either a Thin Hexagon or Square Stacked Frame or a half Element from the Photo Adornment set 3 chippie to each.  I also added a Flourish chippie to each.  I
then embellished them with paper doilies, die cut elements from the kit and paper blooms. 

See each card below.


Thats' all from me today, I hope I have inspired you all a little with my Rainbow Garden Cards.
  Until next time thanks so much for stopping by.
Tania xx

Wednesday, January 15, 2025

"A Precious Moment"
Layout
with Amy Voorthuis

Goodmorning lovely 2Crafty friends, 
Thank you so much for taking the time to visit the 2Crafty blog, I hope I can inspire you with my layout to take out your lovely 2Crafty Chipboard and have some fun. For today I have a cute baby layout - one I made for my ex-colleague, she had a baby boy in June and she always loves my work so she asked me to make her a layout and so I did. 


A Precious Moment

Gorgeous 2Crafty Chipboard used: 
Thin Square Stacked Frames
Mini Buttons
Loopy Heart Swirl
A Moment With You
Beaded Hanging Heart Set
Fine Word Set 2
Funky Heart Swirls
Corner Annalise
Baby's Clothesline
2024's


Oh my gosh how I love the aqua/alcohol markers it's so easy to add them to your chipboards that it takes a hour less creating. You can add it to just raw chipboards or chipboards treated with gesso. It just makes it a lot easier. 


So all the chipboard pieces are treated with the markers to match the colors of my papers. I have used some soft tones like yellows, greens, browns & white. As most of you maybe know I love to cut up phrases and add words to it I also did that here. 

 Hope you all enjoyed my post thank you so much for stopping by, I will be back with another project soon hope to see you back then.... 

Meanwhile if you would like to see more of my work you could visit here: 

Amy's Pretty Papers


Tuesday, October 22, 2024

"Journey"
Layout by Marie Sabatier

 Hello everyone,

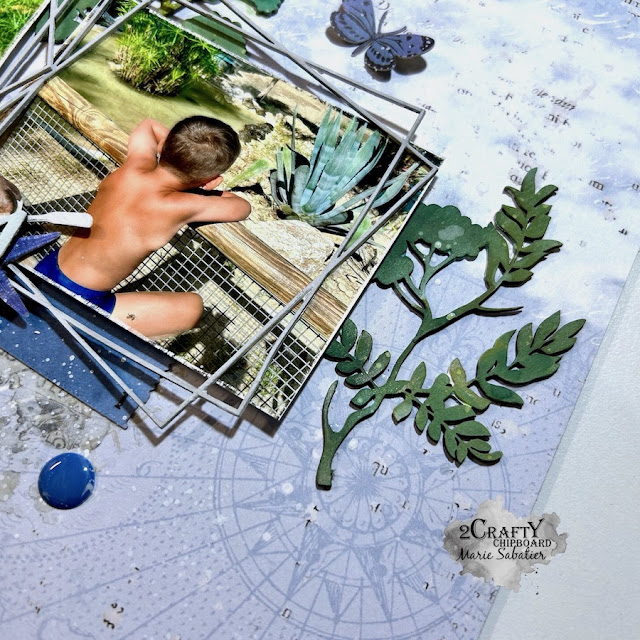
I present to you my second inspiration for this month of October: a layout with photos 
of my grandson taken this summer, contemplating a pond with turtles. He was fascinated!

"Journey"


The chipboard used:

- Thin Hexagon Stacked Frames
- Thin Square Stacked Frames
- Foliage Set 2
- Journey


I start by applying a coat of white gesso to each particle board.
To frame the photos I use a “Thin Hexagon Stacked Frames” and a “Thin Square Stacked Frames”
They are simple while bringing fantasy through their design to this layout which I wanted to be very refined.


I applied Lindy's Gang inks in shades of green to the foliage, using a brush equipped with a reservoir.


I position them around my photos to have a visual impression of extension in relation to the decor 
of the photos. I add splashes of white gesso to obtain a less sharp effect.


"Journey"
I chose this imposing title which fits perfectly and which illustrates this moment when my grandson 
is lost in his thoughts. It is decorated with a single coat of “matte white” acrylic paint.  


    I am hoping that this layout will be a source of inspiration for you.

Thank you very much for your visit!


Saturday, June 1, 2024

"Disneyland"
Layout by Marie Sabatier

 Hello everyone,

For my first inspiration this June, I made a layout with several photos.
We had the chance to spend a weekend alone with our grandchildren at Disneyland Paris. 
It’s an unforgettable memory. 


"Disneyland"


The chipboards used:

- Disneyland Chipboard Title
- Thin Square Stacked Frames
- Corner Swirly Heart Set
- Mickey Heads


My granddaughter loves "Stitch". 
We waited more than 4 hours for some pictures, and especially to receive big hugs.

I based myself on the dimensions of the frames "Thin Square Stached" to print my photos. 
They are delicate and do not hide the photos.
I wanted to use the beautiful title "Disneyland", so I chose a horizontal layout. 
It’s imposing, but it’s perfect.


I used Distress Oxide inks to embellish the chipboards.
For the frames "candied apple" for the title "black soot". 
A Mickey Heads chipboard was added to my cluster of paper embellishments. 
The look is captured by dyeing it black.


At the end of the line, I added this swirl heart. I really like its design!
The color is that of a "stormy sky". 


I am optimistic that I have awakened your interest in creating 
a layout with the irresistibly cute chipboards from 2Crafty!


See you soon!


Monday, April 8, 2024

'Dogs have a special way of adding Love to everyday'
layout by Rachael Funnell


Hello Everyone!
Rach with you today sharing another bit of 2 Crafty Chipboard inspro
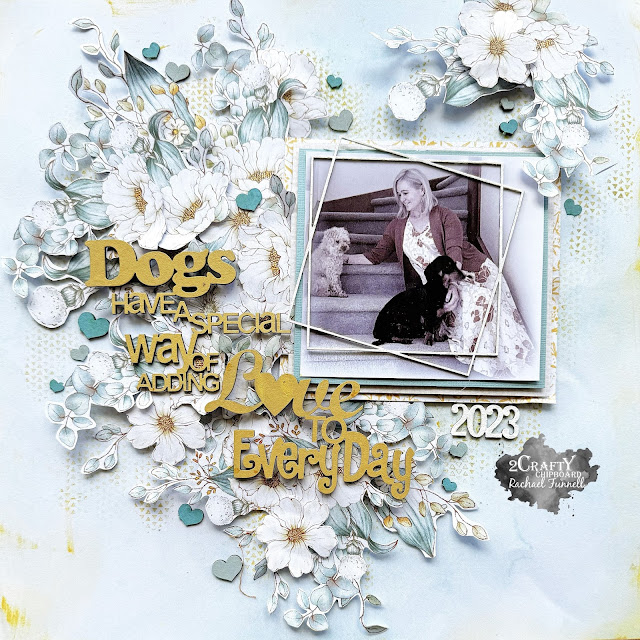
This layout featuring  myself & my two furbabies...


2 Crafty Chipboard used:
2023
Dogs (title)
ATC - Tiny Hearts & Stars
Thin Square Stacked Frames


Let's start with this fabulous title & just perfect title for this photo that was taken last year...
'Dogs have a special way of adding love to everyday'
where I have inked with a lovely pale yellow with Tim Holtz- Distress Oxide - Scattered Straw..

Now this title was a all in one title but I didn't want it to sit all to the left side so I
very carefully cut this title into two & sat the 'love to everyday' a little closer to the photo.. 
I am SUPER happy with how it turned out..


Next up is the year 2023 & the largest Thin Square Frame from the Thin Square Stacked Frames pk
Both of these have been given two coats of gesso

Lastly I added quite a few of the adorable Tiny hearts from the ATC - Tiny Hearts & Stars pk
Inking some of the tiny hearts with Tim Holtz - Broken china & Speckled egg
and scattered them thougout the fussy cutting...

I hope I have inpsired you in someway
Thanks for stopping by
Until next time...


Saturday, July 1, 2023

"Token to my Heart"
Layout by Marie Sabatier


Hello everyone,
I hope you are all doing well. 

This is my first inspiration for this July. 
A colorful layout with a photo of my grandchildren 
and this nice chipboard set I’ve never used before. 


"Token to my Heart" 


The 2Crafty chipboard used:


- Token to my Heart Set
- Thin Square Stacked Frames 


I directly embellished the chipboards with Distress oxide ink I received a nice color assortment and I hasten to test them. 
 
I detached the hearts from the center to color them black and arrange them differently.


I really like these new frames, they fit perfectly on a layout.


I raised the title before gluing it, and for a bit of fantasy I colored the hearts differently.


It is a simple layout but made with a lot of heart and love. 


Thank you very much. See you soon!


Tuesday, April 18, 2023

Purple Haze Cards by Tania Ridgwell

Hello there! 

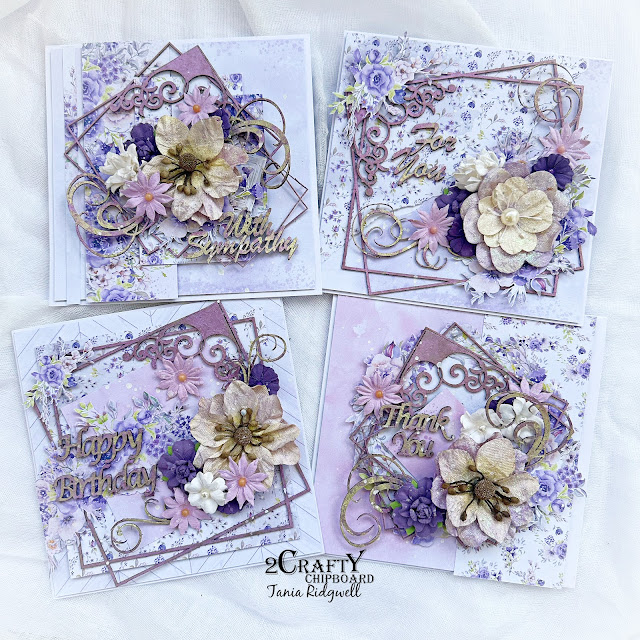
Tania joining you today to share the second of my DT projects for April.  I have created a set of cards. 

"Purple Haze Cards"


2 Crafty Chipboard Used:

*Corner Mini Set 1
*Ginny's Flourish Set
*Thin Square Stacked Frames
*6 x 6 Mixed Sentiment Card Words


I created each of my card bases using the gorgeous Paper Rose Purple Haze Paper Collection.
I just love the colour palette in these patterned papers. I used Pink Thistle Opal Polish to colour the Corner Mini Set and Thin Square Stacked Frames. I also painted the Ginny Flourishes and Sentiment Card Words with the the Opal Polish, once dry I sponged some Art Alchemy Opal Magic Green-Gold Paint over them. 
To construct each of the cards I added the Thin Square Stacked Frames, with a Mini Corner chippie to each.  I embellished them with fussy cut flower elements and then tucked in some of the chippie flourishes pieces to each card and to finish I added a Chippie Sentiment Title to each.

See each card below.


Thats' all from me today, I hope I have inspired you all a little with my Purple Haze Cards.  
Until next time thanks so much for stopping by.

Tania xx