Showing posts with label Flourish Adornment Set 6. Show all posts

Sunday, July 2, 2023

'We All Become Stories'
with Lisa Amiet


Hello all!
it's Lisa here today to share a couple of moody
 cards that I have created. 


2Crafty Products used:


For my first card, I used one of the 
'Clock Face Discs',
that I embossed in white and tucked into my layers.


I used one of the flourishes from
'Flourish Set 4',
also embossed in white.


I also used one of the
'Delicate Lace Border'.
 I have cut a piece from it, 
embossed in white,
and tucked it into the top of my card.


For my second card, I used one of the
'Flourish Adornment Set 6',
embossed in white. 


I also used one of the
'Georgian Frames',
embossed in white, 
to frame my dragonfly element.


To finish I use one of the keys from the
'Key Set Mini',
also embossed in white,
and layered with a sentiment.


I hope that you like what I have created.
I love the deep moody feel to these cards. 

Until next time!

Lisa


Monday, July 18, 2022

A Glimpse of You Layout by Tania Ridgwell

Hello there!

Tania with you today to share the second of my DT projects for July. 
I have created a layout.

"A Glimpse of You"


2 Crafty Chipboard Products Used:

*A Glimpse of You
*Flourish Adornment Set 6
*Brick Panel
*Kathleen's Tiny Frame


I coloured the Brick Panel, Kathleen's Tiny Frame and Flourish Adornment Set 6 Chipboard with Art Alchemy White Pearl Paint and the A Glimpse of You Title with Smooch Pearlized Accent Ink.


I positioned my photo where I wanted it on the page.  I then cut up the Brick Panel Chipboard and tucked pieces in and around the torn patterned paper and photo.  I added flower clusters to the top left and bottom right of the photo.


I tucked a Flourish Adornment Chipboard piece into each of the flower clusters and a Tiny Kathleen's Frame into the bottom flower cluster.  I finished off the page by adding the A Glimpse of You title to the bottom left of the photo.

Thats' all from me today, I hope I have inspired you all a little with my Layout.  Until next time thanks so much for stopping by.

Tania xx


Sunday, July 17, 2022

'Precious'
with Lisa Amiet

 Hello all!
It's Lisa here today to share some 2Crafty
 goodness with you. I have created this layout.


2Crafty Products used:


For this layout I have used a mix of pieces, starting with one of the
'Element Set 1', that I have embossed in white,
and added in among my floral elements. 


I have also used some of the 'Film Strips Tiny',
that I have finished in an aqua colour to suit my papers.


Alongside my photo, of my son & I at the beach,
I have used one of the 'Flourish Adornment Set 6',
that I have embossed in an aqua and white mix. 


Finally, I have used one of the 'Fine Word Set 2' as my title,
that I have embossed in white and layered under my photo. 

I hope that you like what I have created,
I will be back soon with more to share with you!

Until then

Lisa


Monday, June 7, 2021

Essential Worker
by Sabrina Turpin

Hello 2Crafty fans!

Summer is approaching quickly here in Quebec and restriction are being relaxed as vaccination
is going well and COVID cases have dropped a lot.
This is an amazing way to start the sunny season after what has been a difficult year of lockdown!
 My colleagues and I have been exposed to a lot of active cases as part of our job, have been tested a lot, but we're now hopeful that the worst of it has passed.

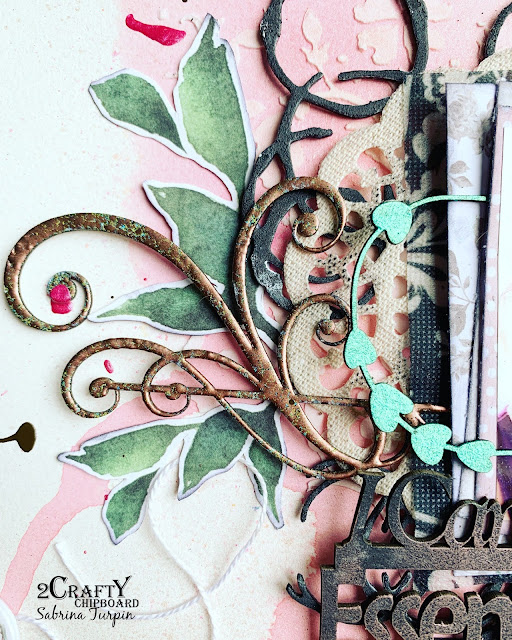
"Essential Worker"


For the "Framed Heart String", I used two coats of green metallic embossing ink.


On the "Flourish Adornment Set 6", I applied one coat of copper embossing enamel.


For the title, "I'm an Essential Worker", I used one coat of black gesso then rubbed some
rose gold wax with my fingers.

For this layout, I used the following 2Crafty chipboards:

Frame Heart String [FR0090]
Flourish Adornment Set 6 [PA0049]
I'm an Essential Worker title [COV010]


That's all for me today!
I how you enjoyed my layout and that it gave you some inspiration for your own creations.
I'll be back in a few weeks with more ideas to share with you.
See you soon!


Tuesday, February 9, 2021

Wing Canvas
By Marie Claude Rodier

Hi everyone,

For my first project this month I have created a Mini Canvas.

We are about to redecorate my oldest son's room and he asked me to create something
that would best fit it's new decor with remaining metal pieces of an old mixed media
project that he particularly liked - I was happy to oblige!                    

Wing Canvas


I started by painting every metal pieces and chipboards with black gesso. Meanwhile,
I prepped my canvas with modelling paste, black gesso and several layers blue tone waxes.
When all the pieces were dry, I glued them with hot glue and heavy body gel medium.

I roughly applied Firebird wax on all pieces, leaving some part black
. White gold and white matte waxes were used to highlight them.

Flourish Adornment Set 6


Angel Wings, Medium and Giant gears


Frame Celia’s Flourish


 2Crafty products used...

Frame Celia’s Flourish
Flourish Adornment Set 6
Steampunk Gear Medium
Giant Gears
Angel Wings


Until next time, be happy and be creative!

Marie Claude
xx


Sunday, January 3, 2021

“So Beautiful”
By Chris Tingey


“So Beautiful”


Hi everyone, I hope you have all had a wonderful Christmas, 
I am so excited to show you my very first project for 2Crafty. 
I have created this layout and used one of my favourite photo's of my daughter. 

2Crafty Chipboard Used...
Flourish Adornment Set 6
Sharon Butterflies
Leafy Shrub Set 2
Thistle Shrub
Stitched Lace Border
Ariel Spray


To start with I gave all the gorgeous Chipboards a couple of coats of white paint, it doesn't 
need to be perfect, I quite like it to look a bit textured, so dabbing it on adds to that. 


I stitched along the edge of the Stitched Lace Border Chippie with some lavender coloured thread....


I love the fact that the chippie's are quite flexible, so I layered up the butterflies 
and shaped their wings to give some height....


I also shaped some of the beautiful flourish stems and tucked these 
in and around my fussy cut flowers....


I added the beautiful Ariel Spray Chippie to the left of my photo to frame it -
 with some more of the layered butterflies....


I love the Thistle Shrub.....I divided it up and tucked little bits of it to the right and left of
my photo and also added one of the chippie's from the Leafy Shrub set....


I hope you like my layout and I hope I have inspired you to layer up, 
shape and maybe even stitch on your chipboards.