Showing posts with label Beaded Heart Borders. Show all posts

Saturday, June 17, 2017

June Shares Including a VIDEO TUTORIAL
by Rachael Funnell

'Adore'

Hello! 2 Crafty FANS...
Rachael with you today sharing two layouts I created this month....
My first page 'Adore' is of my girl....

2Crafty Chipboard Used...
ATC Tiny Butterflies
Mini Branches
Beaded hearts border
Adore word from Mini word set 2
Large Film strip 
Element set 1
Arrowed heart


 Leaving the large film strip, Arrowed heart & a few of the ATC tiny Butterflies raw,
 I think  worked really well with my base page....  I did however ink the edges of the
 Tiny Butterflies with black ink, just to give them a little bit more definition...


Cutting one of the Elements in half, inking black & placing a piece at either end of Large film strip.


Also! inking black some of the Mini Branches...


Had a little strip of the Beaded heart, left over sitting in my stash & thought it would
 go perfectly on this page...
First I added a coat of gesso, then a light layer of teal....


Same gesso teal treatment to the Adore word from Mini Word Set 2....


For my second layout...... of  Me & my family!

'Love is in the Air'

Again! lots of Beautiful 2 Crafty GOODNESS used on this page:
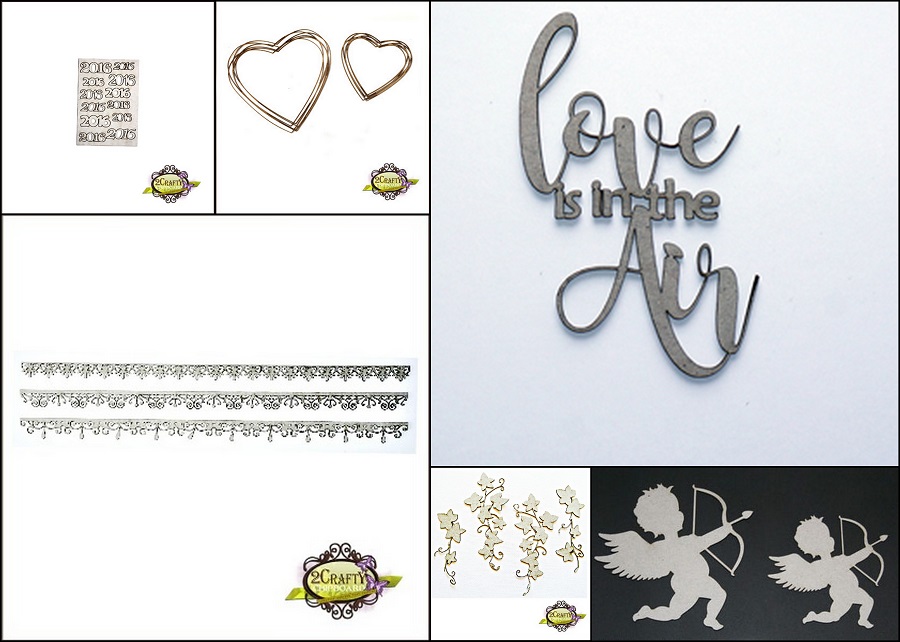
2Crafty Chipboard Used...
2016
Handdrawn heart frame
Love is in the Air (title)
Lacy border
Ivy Clusters
Cupid


I have created a VIDEO TUTORIAL on this page, please press the play button,
to see how I went about creating this page.....  I hope you ENJOY....   😁

TO VIEW VIDEO CLICK HERE


THANK you for stopping by & HAPPY Crafting....


Saturday, July 23, 2016

July Projects with Rachael Funnell

"Key to my Heart"

Hi There 2 Crafty fans! Rachael with you, 
Today I have some projects to share....

But before I continue.....
Please remember while your here be sure you have
become a blog follower & leave a blog comment to
be eligible to go in our monthly draw for a great chippie prize pack.


2 Crafty Chipboard used..
  Key to my Heart title 
Frame heart String
Bird set
 Funky Arrow
 Bead hanging hearts
  Foliage set 1


I started off with giving a coat of gesso to most of these chipboard pieces...
  Then decided that the bird, the bead hanging hearts & the title Key to my Heart 
  looked good left as is...


After the gesso dried on the Foilage, from Foilage set 1 then gave it a good coat of
 texture paste & finish it with by adding some teal & green colors!


Around my photo, I've used the larger Frame heart string... Once the coat of 
gesso dried  I then added some pink to the frame!

I inked this Funky Arrow with Silver ink & it ended up getting a few white splatters, 
Which I  ❤️  the end result!!


************


My second layout ...
"Cherish"

2 Crafty Chipboard used:
which include a couple of the new released pieces
 
Fine word set 1– Cherish 
Humming bird 
Arrowed Heart 
Circle dot frame
Beaded heart border
2016
 
I Sooo ❤️ the Fine words... I started off with adding a coat of gesso to the 
 Fine word - Cherish
then a coat of gel medium & the finish with some pink mist spray...
 
 
Gave a coat of gesso to this Circle dot frame & finished it with a few pastel color crystals!
I think it looks SO PRETTY....
 

Another new FAVORITE of mine from the new released range is the GORGEOUS
 Humming bird  SO pretty & delicate!!  
I started with a VERY light coat of gesso & finished it off with a rainbow of watercolors....
 VERY HAPPY with how it turned out...  :) 


Once the coat of gesso dried on this Beaded heart border, cut it in half
 & placed it either side of my page....


 2016 has been inked with some silver ink, Arrowed Heart with some light purple ink!


Just before I go today!
I thought I would also share this ATC that I created as part of my DT work for
 More Than Words - Mini Challenge.. 
I have used a Bubble Word - Fun & gave it a coat of gesso then while still wet added 
some pink glitter & finished with adding to the back, a layer of black cardstock so that the
 word FUN would stand out more... 

'Fun Times'


For more info on this or the main monthly challenges where 
Vanessa (the owner of 2 Crafty Chipboard) VERY KINDLY is a regular sponsor! 
THANKS Vanessa! :)
 You can stop by the More Than Words blog -----> HERE 

 Thanks for stopping by & I'll be back again next month. Until then...

 Happy Creating peeps!


Photobucket

Tuesday, December 15, 2015

December Inspiration By Di Garling
Two Layouts To Share
Plus a VIDEO TUTORIAL

"Precious"
 
  Hi there paper friends, thanks for stopping by.
Today I have two layouts plus a VIDEO TUTORIAL to share with you
& naturally I have used lots of yummy 2Crafty chippies & some 
wonderful Maja Designs papers

Click here to view video...


First up I have use the 2Crafty chippie title, "Precious" which was
just the perfect title for this layout of my new grandson Henry.

The little "Baby Clothes Line" was simply coloured with a
brown ink pad & I just cut it to fit. It doesn't get much easier than that.
It doesn't have to be complicated to look good.


2Crafty Chipboard Used...
Precious-loopy font
ATC Tiny Hearts & Stars
Baby Clothes Line
2015 's Multi Pack


Next up I have used a "2015" date & a sprinkling of stars from the 
"ATC Tiny Hearts & Stars" pack.
All of these blue chippies were simple coloured with blue Mica Powder.
It is absolutely brilliant for colouring chipboard. Because it is so highly
pigmented, you don't even need to prime the chippies first with gesso !!


Lots of stamping & mixed media on my background.


 "A Glimpse of You"
 
For my second layout I have used some of the "Beaded Heart Borders".
I have been dying to use these & thought they would work brilliantly on this layout.
 
 
2Crafty Chipboard Used...
A Glimpse of You - title
Beaded Heart Borders
Bubble Clumps
Lattice Heart Set
 
 
On both the "Beaded Heart Borders" & the title "A Glimpse of You"
I have first primed them with a coat of gesso, followed by a random
coat of turquoise mica powder, to achieve this effect.
 Next I applied a little bit of Kindyglitz here & there for a little 
touch of sparkle, although it is hard to see the sparkle in these pics.

 
As always, lots of mixed media, stamping & some gold micro beads on my background.

 
Here you can see I have added some of the chippie "Bubble Clumps" 
in between my layers for some added effect. After a coat of gesso I gave 
them a lick of colour using lime green Silks paints.

 
I gave the same treatment to one of the "Lattice Hearts" which I
have used to layer my title onto.

 
Well thats all from me today.
 I hope you have a lovely & safe Christmas & I will 
see you back here again in January.
ALSO
 
Please remember to become a blog follower & leave a blog comment to
be elegible to go in our monthly draw for a great chippie prize pack.
 
Photobucket