Showing posts with label ribbon ties. Show all posts

Monday, February 15, 2016

Inspiration With Athanasia

You+Me=Big Love

Hello 2Crafty friends!
In a couple of days we will be celebrating Valentine's Day, so I wanted to make
 something with a LOVE mood :)

Before we start...
Please remember while you are here  to become a blog follower & leave a blog comment to
be eligible to go in our monthly draw for a great chippie prize pack.

This layout represents a big love, indestructible in time.
First thing I do to start building a layout is to place the photo and the basic elements,
 and these are the chipboard pieces.
Here is how my page looked before adding more embellishments and painting...


 I used three Polaroid Assortment Frames which I absolutely adore! They look so
 beautiful in the clusters and they come in different sizes, how cool is that?. 
All chipboard pieces were the inspiration for this layout, even the small Asst Arrow.
  I love how it stands there and points to the main composition.


To paint all the chipboard pieces I used silks and H2Os Twinkling watercolors.
It is really a quick process to paint all these before gluing them down -
 the chipboard sucks the color and they dry in no time!


For the cluster in the picture bellow I used four different chipboard pieces,
Two Polaroid Assortment Frames, the word Precious and a small Hedgehog
  (how cute is that??? ) 
I love how they look one above the other!


2Crafty Chipboards Used:

Polaroid Assortment Frames, Flower Medallions

 Ribbon Ties,Hedgehogs, Precious - Loopy Font

 Asst Arrows


 Precious - Loopy Font (unit of 3)   Flower Medallions (unit of 3)    Hedgehogs (unit of 3)

 Ribbon Ties (unit of 3)   Polaroid Assortment Frames (unit of 3) Asst Arrows  (units of 3)


'Trust'

This journal page turned to be one of my favorites in my journal 
because of this amazing Aidan's Arrow.
As I was looking in my stash I saw it and that was it!
It was like a vision with this arrow standing on some big circles, 
don't ask why and how ...


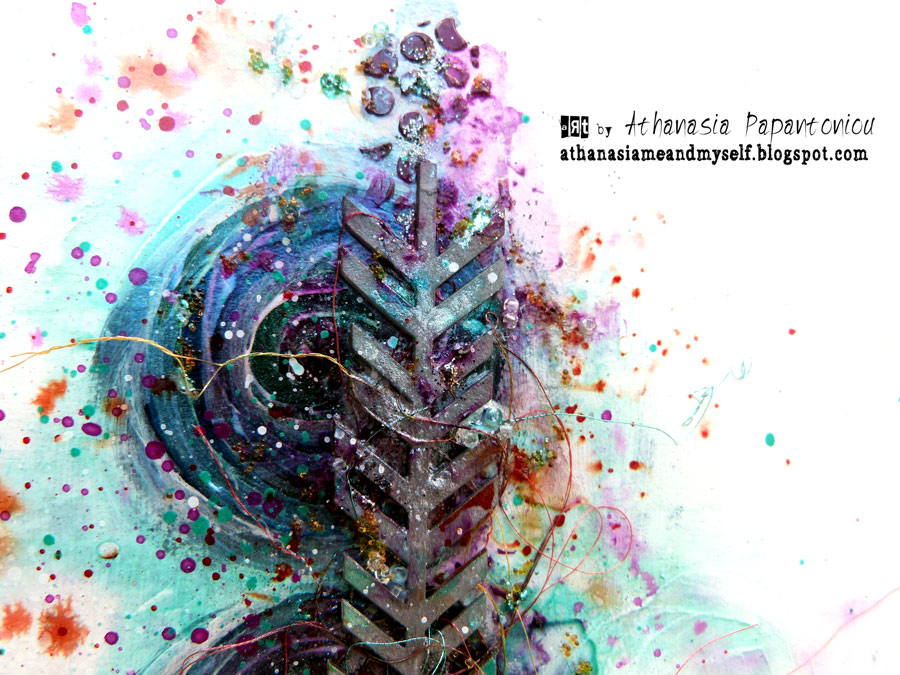
I created this page immediately after the layout -yeap, that was a really creative day for me :)
I used the same color shades I used on the layout above, as well one more
 Polaroid Assortment Frame. These frames are so cute that I just can't
 have enough! In order to alter the chipboard pieces I used  warm grey Silk and 
primary elements to create more texture on them.
 I 

 The ATC Tiny Heart is like the icing on the cake: cute and delicious! 
I love how it looks on my beloved arrow :)
I painted it with H2Os watercolors purple and spiced pumpkin.


2Crafty Chipboards Used:

Polaroid Assortment Frames, Aidan's Arrows,
ATC Tiny Hearts & Stars

Aidan's Arrows (units of 3)   ATC Tiny Hearts & Stars  (units of 3)

 Polaroid Assortment Frames (unit of 3)


Thank you for visiting
Have a lovely crafty day!
xxx
Athanasia
 
.
Photobucket

Sunday, August 11, 2013

"Happy in the Water"
By Resident Guest Designer
Chantalle McDaniel

Hello again 2Crafty fans!

Hope you have enjoyed a wonderful (crafty) weekend. 
I'm back today to share this layout, using some of my favourite 2Crafty chippies.


I've stuck to a pink and white embellishment colour scheme, as the base paper is very busy. 
By unifying the colours, I think they compliment, rather than fight with, 
the rest of the information on the page.

The little flower and star are the positive shapes out of some Ribbon Ties
I've painted them with some light pink acrylic paint, applied adhesive and dipped them in glitter.


For the fab 'Happy' loopy font title, I've used Gesso as an all-over base coat, then applied 
Tattered Angels chalkboard mist in 'Strawberry Shortcake' with a dry brush. 
I've inked the edges slightly and finally given it a bit of a sand and a top coat of Glimmer Glam 
(which unfortunately hasn't really shown up in the pic.)


This little guy started life as a Spiral Flower. I thought the shape went well with the Silhouette die cut.
I've snipped out the inside, then painted it with Gesso, Mr Huey's and inked the edges.

The ribbon arrangement kinda happened by accident! It was stuck in the instaframe, when I thought
 "that looks cool" so I threaded a heart punched Ribbon Tie through the loose end 
and machine stitched it in place.


To create this great debossed effect:

• Apply embossing ink all over your chipboard
• Cover with a generous coat of embossing powder in a colour of your choice.
• Heat the powder from the bottom, to prevent it from blowing away. 
(Again, this one takes a while to heat up, but the effect you can create with it is worth it!)
• Once the powder is melted, heat it a bit longer from the top to make sure it's all hot and slightly pliable. 
• Working quickly, stamp the top, and you will get a fabulous print. 
And don't worry, your stamp will not be harmed in the process!


If you would like to see more of what I get up to,
 pop in to my blog, CLICK HERE

Till next time!
Chantalle


Photobucket