Showing posts with label 2Crafty. Show all posts

Thursday, June 13, 2024

'Never Stop Believing' - by Emma Zappone

Hi there 2Crafty friends.
Em with you today with a small Mixed Media panel.


Here are the awesome chipboard elements used.....

Pretty Flowers
Mollies Butterfly Set
Foliage Set 7


I painted all the chipboard pieces with some Color Glow powders, that left a beautiful shimmer to them.


Look at all that awesome shimmer!


I love the way these powders sit on the chipboard. These I chose not to prime first, so that the water that mixes with the powder, soaks into the chippy a little and mutes the colour but leaves all the shimmer.


I love the calmness this panel creates.


I hope you have been inspired a little today.

I hope to catch you all again soon.

Till then, Em xx


Thursday, May 30, 2024

ABC - by Emma Zappone

Hello.
Emma with you today with an A4 layout.
This project has some of my favourite chipboard elements.
I hope this layout inspires you today.


Here are the chipboard pieces chosen for this creation....

Clock Faces
Alphabet
Geo Panel
Arrows
Funky Film strip


I wanted the chipboard to fit amongst the layers blending into the background but still having
 a presence of their own.


The film strip really compliments the paintwork on the background paper and the tags and tickets in the layers.


I used a chopped piece of the geo panel to break up the paper layers from the photo.


The clock face was used as a feature of the orange tone. Blending it with the butterfly wings and causing it to compliment and tie all the elements together.


The 2 small arrows used, are finished with a metallic colour glow, and a contrast from the neutrals and browns of the whole project. 

I hope this layout inspired you in some way today.

Until next time, Stay Crafty.
Em xx


Monday, January 30, 2023

Dreams of Beauty - by Emma Zappone

 Hello everyone.
Emma with you today sharing my first 2Crafty project of 2023.
I hope this page inspires you to get a little creative. I loved playing with this colour scheme, and the chipboard pieces were definitely the perfect compliment.


Check out the pieces I used here.....

Foliage Set 4
Intricate Seahorses
Seaweed Set


I love how the chipboard is thin enough to slide between my layers and how well they work with all mediums.


The Foliage pieces on this page are only 2 pieces out of 6 in a pack. I love that this means I have so much more to play with on other projects. I painted these in a Light Blue acrylic and once dried sprayed a Pearl shimmer to them.


I applied the same finish on the Seaweed pieces too. With the pearl spray it made them a gorgeous silver tone.


I used the smaller Seahorse out of the 2 pack and painted it with a cream acrylic to start with and then found it got lost. So I rubbed a little orange distress crayon over the top and then activated it with a wet paint brush. So much better, that gorgeous Seahorse really pops now.


I hope I have inspired you to try something a little different, either it's the colour, chippy, size of the project or maybe it's all of the above. Whatever it is, have fun.

Thanks for joining me today, I will catch you all again soon.
Em xx


Friday, January 27, 2023

"Forever Treasure this Day" heart canvas by Amy Voorthuis

Hello fellow creative souls, 

I am so excited that you are here with us today as it's my turn to bring you some inspiration. For this occasion I created a heart canvas for my co-worker. Her daughter went to CuraƧao with her aunt & grandmother last August and her dream came true which was swimming with the dolphins. She & I just really love the pictures they took so she asked me if I could make something for her so I did. 

Forever Treasure This Day: 


2Crafty Chipboard used:
Esther Vine
Fishingnet Bits
Mini Word Set 1 
Mini Word Set 2
Palm Leaves Set
Mini Word Set 3 
Seaweed Set
Seagrass Set
Seashell Set 


The background that I created here took a couple of days since I love it when it dries & crackles naturally. I also used a couple of stencils on my background and some sprays and waxes.


All the chipoard pieces are treated with either acrylic paint, spray paint, rust paste and waxes. I really love the effect that paste makes on the chippies in the end I added some wishing bubbles & art stones. 

 Thank you so much for your visit today and if you would like to see more of my work please visit here:

Amy's Pretty Papers

Much love and happy crafting...


Monday, October 31, 2022

'Bessie' - by Emma Zappone

Hello 2Crafty friends!
Today I would like you to meet 'Bessie', a stunning 1920's French Cabaret performer.
Life hasn't been easy for Bessie, the stage has come at a cost.
But with all she may have lost, her passion and love of performing out ways the sadness she has felt.
Please put your hands together for 'Bessie'.....


Let's also focus on a few other star performers featured on this page....

ATC - Mini Scissors
Rose Set 1
Lattice Leaf Set
Messy Squares


For this page I wanted to go dark, a little smoky and create a vibe that reflected the image. 
So I painted all the chipboard with black Gesso. 


The Messy Square also had a light paint of Prussian Blue to set it off from the black. The lighting in the photo doesn't quite pick it up. Once dry I added a clear emboss powder to add a little more drama to the chippy. And the little pair of scissors were painted black with a blue wax to finish them off.


The lattice leaves are also in black with a Clear emboss.
I just love how these black elements set apart the layers.


The stunning Rose chippy was treated the same way as the Square, with that slight hint of blue shining through the embossing. 


Bessie and I would like to thank you for stopping by and for all your continued support.
We hope we have inspired you a little.

Stay crafty, Em xx


Wednesday, December 8, 2021

Life In pictures by Emma Zappone

Hello Lovelies!
Em with you on the blog today sharing a vintage/nature vibed piece.
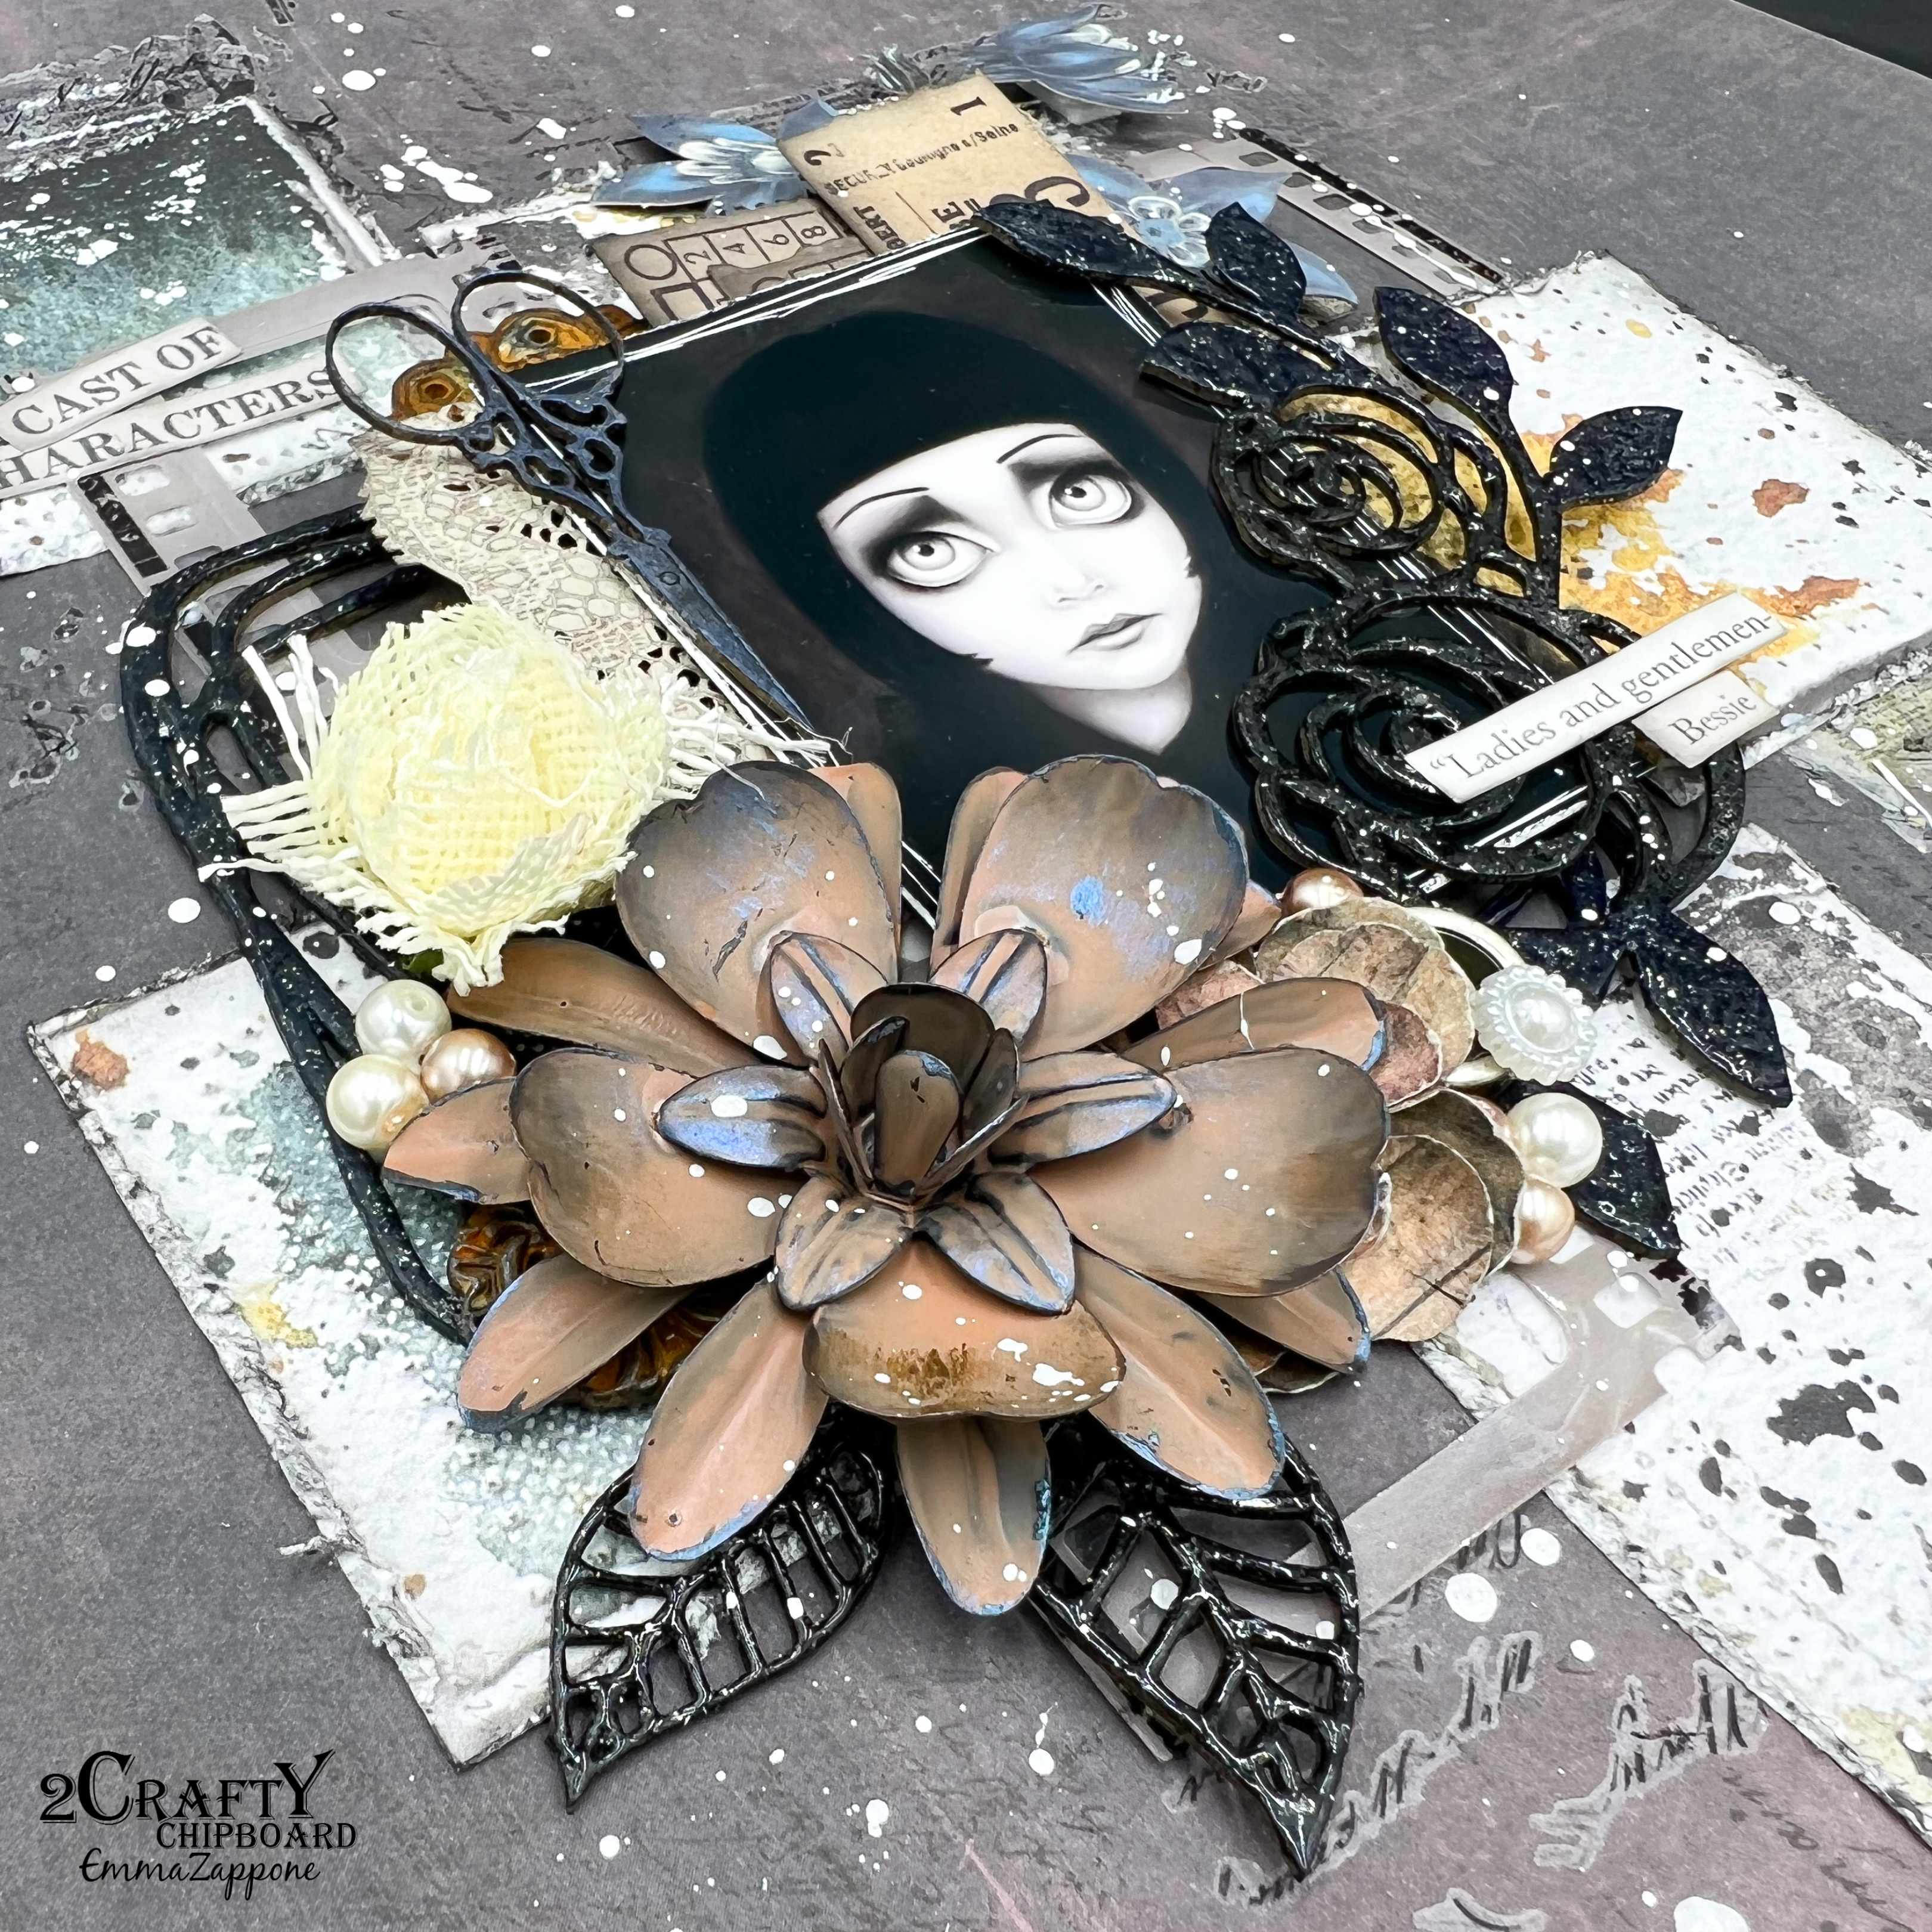
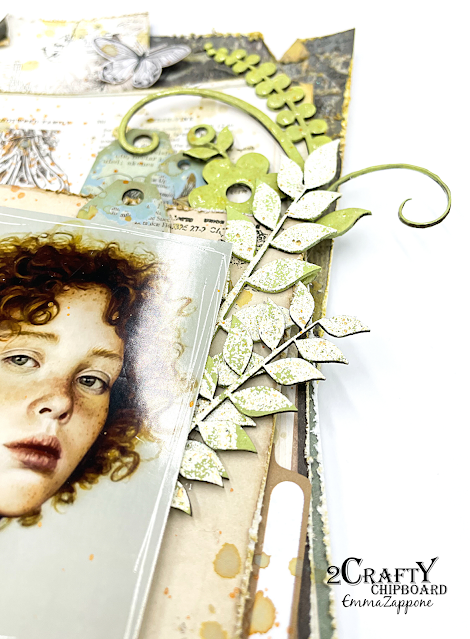
This project is created using some bookplates that are heavily layered and are created on
its own with no background paper etc. 

I guess it's a little like making a large tag, or mini layout. And of course the chipboard pieces compliment these pages perfectly.


These are the glorious chipboard items.....

Leafy Shrub Set
Tiny Leaf Stems
Mini Tags


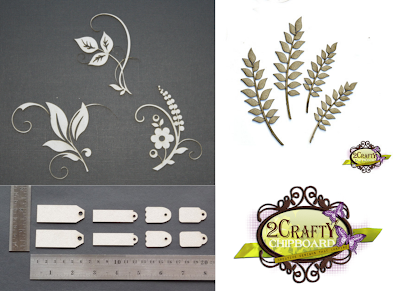
I decided to play around with the chipboard more than I usually do. In saying that the
finishes chosen were still simple to execute.


For the Tiny Leaf Stems I chose to paint them in a beautiful green acrylic and then dusted
them lightly with an embossing powder. 


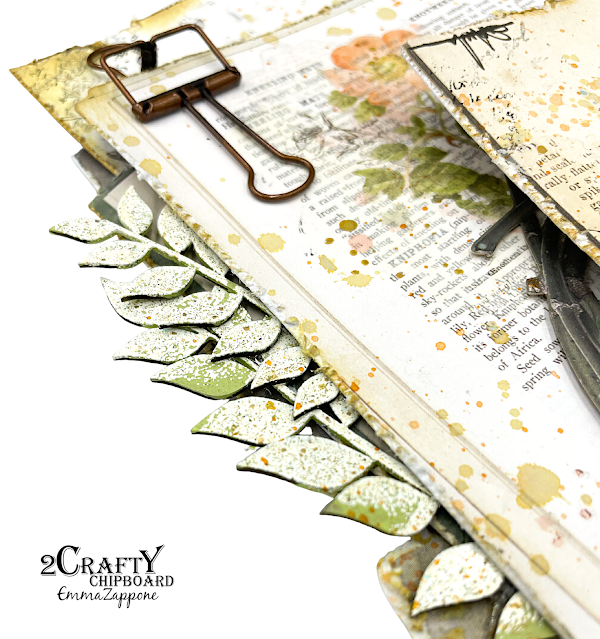
I wasn't after complete coverage on the leaves so leaving them random suited me and
gave way to more detail & interest.


The piece that I chose from the Leafy shrub set was painted with the same green acrylic
as the leaves and this time a clear emboss glaze was used over to create a shine and allow
the green to shine through.
Then the little mini tags were painted in a blue acrylic. Once these were dried I added rub-ons
to create a worn vintage finish but totally compliment the background papers used.


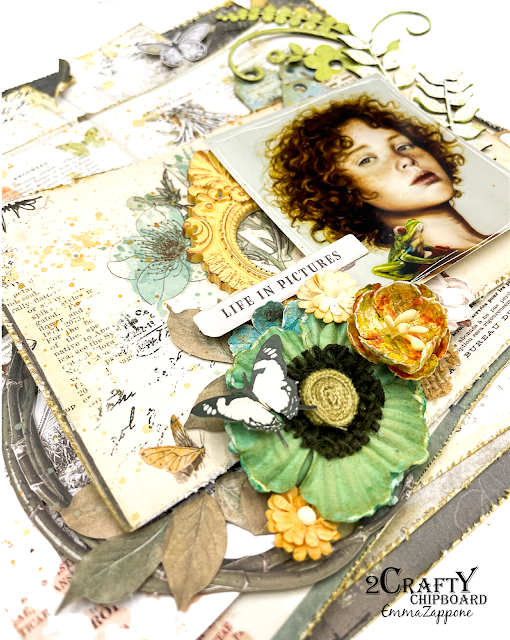
I love the over all look to this piece and the chipboard and resin really make this creation
a stand out for me. I love these colour tones too.

I hope it has inspired you a little.
Happy crafting friends and I will see you later in the month.

Em xx


Sunday, July 12, 2020

My Happy Place ~ Layout by Priya Mishra

Hello 2Crafty Fans,
Welcome to the blog and today I have a beautiful Layout to share with you using some amazing chipboards from 2Crafty.

I love nature and I love spending time with nature so I used this sentiment stick " My Happy Place" and this is the title of my page too.


2Crafty Products used


For the chipboard pieces, I coloured them with Blue and Green glitter metallic paints. They look so shiny and awesome. They are complementing my background after being coloured.


For the Sentiment stick, I cut it a little from both sides as I wanted a smaller Caption, U can use it as a whole or go for small size sentiment sticks. I coloured the stick with glitter paint and then sanded the surface to get a rough look around the sentiment.


For these flourish chipboards, I coloured them with green glitter paint, but as I used the same brush it's giving a dual tone effect. 


I hope you like my page. 
Do let me know in the comments . 
Thank you for visiting and do check out 
more of my work on my INSTAGRAM