Showing posts with label Love my mum title. Show all posts

Monday, September 2, 2024

"Love my Mum"
Layout and tutorial by Marie Sabatier

Hello everyone,

I present to you me first layout of this month of September.
A botanical atmosphere with this adorable photo of my grandson with his mum. 
To embellish this beautiful moment, I chose this superb chipboard "Rosa Frame".

"Love my Mum"


I made a video tutorials that you can watch HERE


The chipboard used:

- Love my Mum
- Rosa Frame
- Foliage Set 10

This chipboard "Rosa Frame" is really elegant, perfect for framing your beautiful photos!
These dimensions are 10 cm X 14.5 cm.
The perfect size to highlight your photo.

My background is very colorful, I chose a neutral color to embellish the chipboards.
A 'Vintage Silk' wax that I then adjusted. 


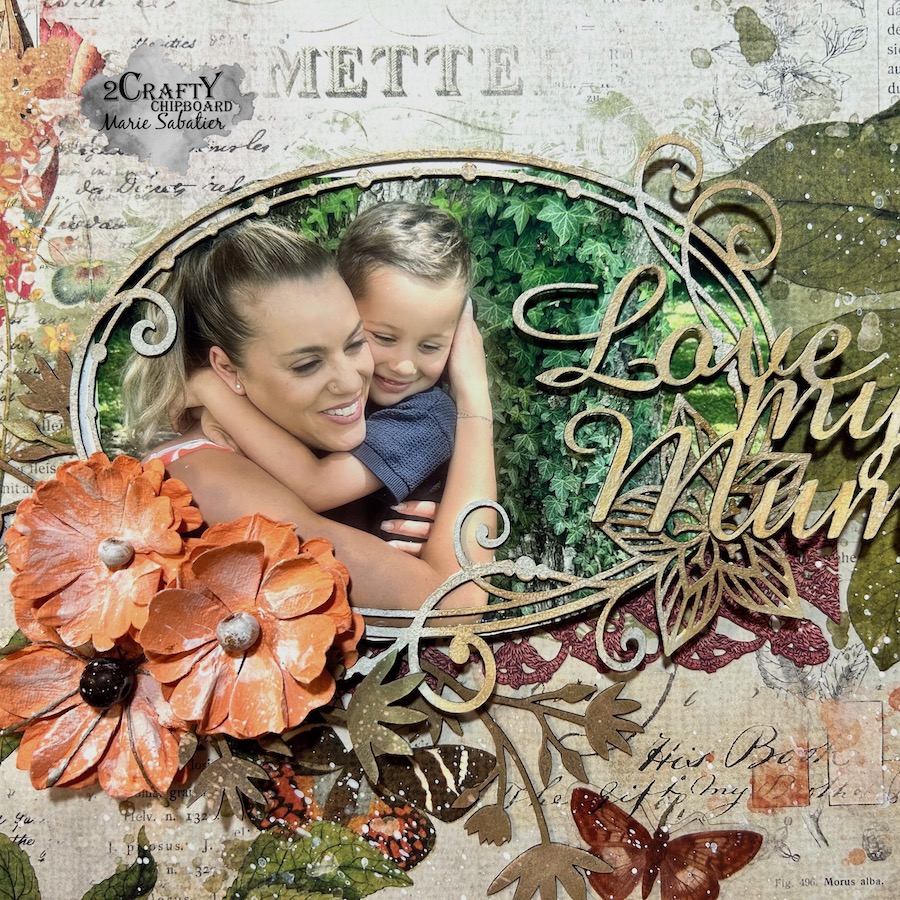
    This title "Love my Mum" inspired me to choose my photo.
    It is superimposed in an impeccable way and adds a lot of charm to the decor.
I raised the beginning of 'Love' and 'Mum' to balance it well.
I preferred the arrangement with the flower at the bottom for my title layout, but it suits your convenience.


To give more volume to my bouquet, I add this foliage that blend perfectly into the decor of my layout.


Watching the video is a good way to get more details.


It’s always a pleasure to meet you here!


Tuesday, July 16, 2019

"Love My Mum" PLUS "Me & My Dad"
Canvas by Marie Sabatier


For my second inspiration this month I associated creation and 
the pleasure of offering these two canvas' to my little girl "Mia" 
who has just celebrated these 4 years.

The theme of love from a little girl
 for her mom and dad and the sea.

"Love My Mum"
  

"Me and My Dad"

2Crafty Chipboard used :
- Love my Mum
- Me & My Dad
- Intricate seahorse
- Corner Twisted Vines


For a little girl's room I chose very light colors and
 for chipboard I chose mainly white.

For the "Corner Twisted Vines" chipboards 
I applied a paper texture paste and a touch of wax
 to the spatula to match my paper.


On the "Seahorse intricate" chipboards I applied an embossing powder
"Purly White" also with some golden wax.


 For the titles too I just applied a layer of "Purly White" 
embossing powder and then I sprinkled glitter to bring shine.

These big titles are incredible, I love them !


And here, I especially like to make pages but from time to time it's nice to diversify.

I hope you will not be disappointed!

See you sun.


Thursday, May 25, 2017

May Inspiration by Noura Pompilla


Hello 2crafty friends!!

Noura here today to show you my first projects as part of 2Crafty Design Team.
 I'm excited and this month I've prepared a layout and a canvas,
so let me present my first project.

"Love my Mum"

Some close ups...


"Funky heart Swirls "and "Circle heart frames" chipboards. They are absoloutely
gorgeous I love the way they combine perfectly for the topic of my page.I covered them
 both with a layer of gesso so that it would stand out over the background color.


For the decoration I added "Addy's Butterflies" which I covered
with black gesso and I stuck a half of a pearl on it.


And finally I added the words that fit perfectly for the layout "Love my Mum" title
which I also painted with black gesso & I used a silver glitter on half of it.

My layout is inspired by More than Words challenge.
 2Crafty chipboard used 

"Love my Mum"tittle
Circle Heart Frames
Addy's Butterflies
Funky Heart Swirls


"Create Art"-Canvas

Some Close ups...


For my second project I created a reverse canvas in a steampunk style.For the base of 
the background I used the "Checkerd board clumps" and "Squeare collage panel",
they mix awesomely for what I wanted to achieve.


Then I started to create my little Frankestein and I decorated him with one of the
 "Clock face Frames" and "Angel wings". This is so pretty both of them were
 covered with black gesso and I gave a little touch of silver wax.


In the corners are a mix of "Steampunk gears small" ,
 "Steampunk gears medium" and "Assorted arrows".


To conclude, I used "Everyday font L/C" to form the word ART and I added 
texture with mini art stones and silver wax.

I´m  participating in the Mixed Media World May Challenges.
This is their beautiful moodboard.


2Crafty Chipboards used...

Steampunk gears Small
Steampunk gears medium
Checkerboard clumps
Angel wings
Assorted arrows
Squeare collage panel 
Everyday Font L/C
Clock face Frames 


Thank you so much for stopping by.
Until next time.


Sunday, August 30, 2015

August Layouts by Rachael Funnell

"Love my Mum"
 
Hi there, Rachael with you to share two layouts I created for August.
First up is this layout of  my mother & I... Would you believe I have used
 six different pieces of chipboard on this 1st page..... A couple pieces are 
from the Mother's Day mini release...


Gave this "Love my Mum" title a coat of gesso, then added some pink glitter. 
I added a bit of pink glitter to the other chipboard pieces on this layout to tie it 
all together..... I think the end result looks FANTASTIC!
 

Did the same with this foliage piece from the Foilage set 2.


 Cut up some of the Heart Clumps then inked it black..


One of my faves is the Chained hearts.... 
Gave this  a coat of modeling paste to give it some added texture,
 then a coat of peach paint..


 I cut up this strip from the Mixed border pack & inked it with some pink ink.


In this day & age selfies are big.... Even more so with the kids....
2 Crafty Chipboard has this FANTASTIC "Selfies word pack"! 
& I just had to create this next page!  :)
 
"The Selfie"
 
 I just love finding these sort of photos on my phone! 
 
2 Crafty Chipboard pieces I have used:

 To start off I gave all pieces I have used on this layout a coat of gesso.
I then gave a coat of gel medium to The Selfie words, &
finished it off by adding some teal ink.


After the gesso dried, on the Interlocking grid Panel, dabbed some
 Antiqued bronze Distress paint & cut it into smaller pieces & placed
 them randomly onto my page,...
 

I have added some aged black embossing enamel to the Chevron bits & the
leaf part of the Leafy shrub from set 1, finished them off by lightly dabbing
 a little gesso just to tone down the black a little more....

 
Thank you for stopping by & I hope I inspired you in some way...  :) 
 
 
Photobucket