Showing posts with label Helen Tilbury. Show all posts

Sunday, June 7, 2015

A Double-Pager, a Layout & an Art Journal Page
By Helen

Hi everyone!  Today is my last post here at 2Crafty Chipboard & I've had a 
wonderful time working with Vanessa & Di & of course the FANTASTIC
 CHIPBOARD!!  I have quite an eclectic mix for you today - this post is
 full of things I don't NORMALLY do, starting with a MASCULINE PAGE!


First up is my layout for Off the Rails Scrapbooking, where 2Crafty were the
 Guest Design Team last month.  You can see this in lots more detail up on 
my personal blog HERE.  Of course, the lovely "Dream" title comes from 2Crafty.
I painted the word with pale blue paint then dry-brushed over it with white paint.


 I used the small chipboard chicken wire 6"panelcut up into 3 pieces with 
quite a bit left over, swiped over a Distress Ink pad in 'Vintage Photo' colour.  
I also used a scattering of stars from the ATC Mini Hearts & Stars pack.
I pressed them into my black ink pad so that they were not fully saturated
with ink, so that some of the raw chipboard is still showing through.


Lastly I used part of the 12"Circle Revolution Frames, but not the 
chipboard piece, rather the 'negative' piece between the chipboard
pieces.  I painted it in the same way as my title but added some
stamping to it as well, using a script stamp & black archival ink.


I found the colour scheme quite a challenge as these colours are not
ones I normally use.  My advice in this case is to use a lot of white,
kraft or a pale neutral tone & use the colours in smaller quantities. 


Some close ups of the chipboard details...


As I always say, the great thing about chipboard is you can customize it
 to match your project, so there is always a way that you can use it.  
You don't have to wait for that perfect colour match!


I know there are many different adhesives around the world, but I always
 stick to using the white Tombo Mono Adhesive with the green lid, for all 
my chippie sticking, & it always works like a dream!


So quite a bit of chippie on that one!
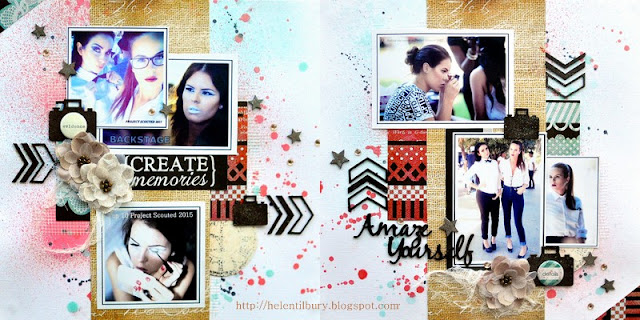
Next I created a DOUBLE PAGE!!  Shock, horror!  I know!! 
 But I do do it once every couple of years or so LOL & now that I am teaching classes
it is THE most popular way to scrapbook here in South Africa so I wanted to have a
nice, well-balanced page to offer my students, that is easily replicable & teaches some
basic misting techniques as well as how to layer elements to avoid overfilling the page.


"Amaze Yourself"

Being a class page the chipboard I've chosen here is more generic, in other words
 they can be suited to various different photo themes.  I have used the stars
again, as well as the cameras, chevrons & the "Amaze Yourself" title.


I used Distress stains to colour most of the chipboard, followed by some 
clear, glittery nail varnish, except on the stars, which got the nail varnish
treatment only as I wanted a pale contrast.  On the 2 larger cameras I
added a flair to the centre of each which adds a nice touch I think!


These are called 'Mini Cameras' & are really cute!!  They'll go with just 
about any page you create.  I still have a couple left too!


The Chevrons came from this Mini-Sampler pack & I didn't even use them
 all!  These are great value for money & again, completely versatile!!


I stuck with white cardstock for these pages to demonstrate some simple misting
 techniques & have everything clearly visible.  The 'pattern paper' is actually
Prima packaging so didn't cost me a cent!  Even the Aztec packaging comes
from the Prima Finnabair Canvas Strips.  I tried to keep costs down by keeping
embellishments to a minimum but the page was just too flat before I added
the lovely flowers!!  I tucked in a bit of gauze as that is so easy to get anywhere :)


I also added a few bling dots, some Prima clocks from their packaging, & some
 dry-wall tape,as again that seems to be easily available & very inexpensive.  


And lastly, I had a PLAY in my art journal!  Pure creative time, just for me!!
No specs involved, so it was wonderful therapy!!  I concentrated on playing
around with a few different misting techniques, which is also the purpose
of an art journal, for experimenting...  


As you can see I used the Stars again!!  I also used the hearts this time too!
PLUS the negative backing sheet as well!!!  You can sure get value for 
money this way LOL!!!!  AND 3 projects later they're still not all used up!!


ATC Mini Hearts & Stars Pack


I focused mainly on background techniques with this page, trying out some different
things to what I normally do.  Something interesting that may be a good tip for 
anyone else who likes to play with mixed media.  I used a spray glue between 
layers, which acts like applying clear gesso, only much quicker & easier.
It seals off the previous layer so that, when you apply the next one,
you don't end up with muddy mush, as it is no longer reactive.


For the  chippie pieces I painted the stars & the backing sheet with black,
added some dry brushing of grey & white for a mottled effect, then
applied the clear, sparkly nail-polish again.


For the hearts I mixed up a tiny amount of pink, purple & white paint on my craft mat
& used my craft tweezers to push the shapes down into the colours, that were close 
together & swirled around, but not mixed altogether, as obviously that would create
an entirely different colour!  I sealed these off with the sparkly nail-polish once
dry as I did with everything here.  I LOVE this page!!  Pure fun!!!!


Remember chippie is great for art journaling too - because it is nice & flat!
Not bulky!!  And THAT people is the end of the end...My very last post
for 2Crafty Chipboard!!!  I hope you will still follow me HERE.
I've had a GREAT time & will miss you all xoxo


DON'T FORGET!  You can always contact 2Crafty to find out your 
nearest stockist!!  So no reason to ever be without the lovely stuff!!!
 
Photobucket

Monday, May 4, 2015

A Mix of Projects from Helen for May

"Art Journal"

Hello everyone!  How are you all?  Today I am sharing an art journal page, 
a layout & a canvas!  Yup I am mixing it up quite a bit these days!!


For this very simple art journal page I simply cut & tore up my off-cut pieces
 into small rectangular shapes & collaged them all together using gel medium, 
 then sprayed & splattered some mists before adding my 2Crafty Chipboard
 butterflies & my hand drawn arrows & title.  

Sharon's Butterflies (unit of 3)

The Sharon's butterflies are my favourite out of all the butterflies!
  I love the complexity of the cuts & as they are so beautiful they look 
stunning  with simple treatments.  Here I simply inked them black.


I varnished them with some glittery nail varnish that looks shimmery & lovely in person but alas does not  show in the photos!  So the moral of this project? Don't over think it!  Sometimes simple is enough :)


"Hello / Love"
 
Next up I made a layout of my daughter with a random shot I caught of her smiling at her mobile phone! 
 Technology is such a big part of life these days...have you remembered to capture it
 "on film?"


Because my photo was so "white" I chose to use a dark brown background paper to
 go with my daughter's hair.  I think it makes everything "pop" so nicely off the
 background so is perfect for some stencil/modelling paste work.
 
 
Once I had dried off my hearts design & splashed on some lovely gold ink I set to work on decorating my page with wonderful pieces from 2 Crafty. When I hauled out my brown cardstock pile I found these 2 off-cut strips of browny green on top of them & decided it was serendipitous!


So I added the border strips of brown & green spotted paper which really started the
 WOW factor! Then I added my favourite 12 inch border strips - the Stitched Lace Border


  I cut off 2 Stitched Lace semi-circles from each border strip to allow for a bit of breathing 
space, then I used my Aladine Izinks from France to ink them up in green & gold.

  
Next I added my photo, tilted at an angle & offset on top of some coordinating spotted paper 
{these papers are VERY old - 2009!  Just shows that classic designs never date!!}  Then I 
began my embellishing around the photo. Seeing as the theme of my page was 
TECHNOLOGY I used the  COG BORDER.  I cut it into 3 pieces & tucked the 
pieces into 3 sides of my photo after inking in 3 different rusty colours.

Cog Border (unit of 3)
 
It is very easy to paint your chipboard this way if you start with the palest colour as
 then it is not even necessary to wash off your paint brush in between & you waste
 less medium this way. 

 
Next I decorated around my photo & the cogs with various pretty flowers, leaves, tendrils, cotton reels & micro-beads before lastly adding a couple of Circle Words with the words HELLO & LOVE.

Word Circles Set 1 (units of 3)
 
The LOVE circle forms part of my title ''LOVE Technology". I painted these with  gold inks then sponged on a bit of white acrylic paint before adhering them then gluing on  some micro- beads between the lines.  
LOVED creating this page.
 
2CRafty Products Used
 2 STITCHED LACE BORDERS
 {with some off-cut pieces left}
1 COG BORDER
2 WORD CIRCLES


"Love -CANVAS"

My last share is a "canvas" that is actually just a thick piece of mounting card. 
 Canvases are  quite expensive here in South Africa so I save anything I can 
that will work as a suitable alternative {lids are great too!}.  
This was really thick so worked PERFECTLY!


The measurement of this piece is 9 x 12 inches.  I started by painting the entire board with white  acrylic paint then I stuck some old stickers onto the base while it was still wet, to add some texture.  I repeated the same method with some more white acrylic paint acting as my 
adhesive, & added the negative area of the sticker sheet too.

 
I snapped a few photos along the way to show you my starting process.  This is a great way of using up old alphas & things that you no longer like the colours or themes of as they end up getting mostly covered up & just add some  textural interest. 
 
 
Next I added some 2Crafty Chipboard pieces for textural interest. 
I started with the sets of 3 circles from the mini-sampler set.

Mini Sampler Set 1 (unit of 3)
 
 Next I added some SKELETON LEAVES - LOVE these!!  Have been dying to use them! 


 I painted over the first layer with white acrylic then sprayed with mists then painted the second layer with green Izinks.  I ended up using 9 leaves {1 1/2 packs}.  
Next I added my other embellishments.

 
Once I had added my flairs, flowers & fabric leaves I felt that something was still lacking so I painted up & added 3 out of 4 of the set of  MINI-FLOURISH BITS - these are SO handy - the perfect size!


I used my glue-gun to layer up all my elements {& my Tombo glue to adhere by chipboard pieces} then added some mica-flakes & a couple of sequin  butterflies as my finishing touch.  Thanks for visiting today!


2Crafty Products Used
1/2 pack mini-sampler set
1.5 packs of Skeleton Leaves
3/4 pack of mini-flourish bits


And here are the  process photos to help you get started on a canvas of your own :)


For more tutorials visit my blog HERE.

Remember, to find a 2Crafty stockist near you, drop an email to...
salesat2crafty@optusnet.com.au

Photobucket