Showing posts with label Halloween. Show all posts

Friday, November 1, 2024

"Spooky October Memories"
Round Mixed Media Canvas
with Amy

 Hi lovely creative peeps, 
Hope you are having a wonderful & creative day, today I'd like to show you a round spooky halloween canvas. Last friday we had a halloween party {more for kids tho} so we got dressed up Abbey had fun at the party that's why we do it right? Enjoy my post....

Spooky October Memories: 

Gorgeous 2Crafty Chipboard used: 
Skeleton Leaves
Mini Title Stick Set 4
Lattice Leaves
 Corner Crackle
ATC Word Banner Set 2
Oversized Flower Stem Set 1
Fine Word Set ~Months~
Leafy Sihouettes
Corner Steampunk 6
Mini Word Set 3


Most of the chippies are treated with a layer of white gesso & embossing powder to make the embossing powder less shiny I added some matte wax on some of them. The oversized flower stem I cut up and used them separate on this project but also on a ealier project. 


For the corner crackle I used a layer of black gesso too, before I added two layers of dark embossing powder. As most of you now know I love to make some words I use in a two toned color! I did that with the word "october' on this project. 

Thank you so much for stopping by I will be back soon with another project hope to see you back then....I hope I have inspired to create something spooky and have fun while doing so. 

Meanwhile if you would like to see more of my work you could visit here: 

Amy's Pretty Papers

Wednesday, October 30, 2024

"Steampunk Halloween"
Mixed Media Pumpkin
with Amy

 Hi lovely creative peeps, 
I hope this post finds you well and that you are enjoying your day! Well I always enjoy my day while creating for 2Crafty Chipboard since I think it's unimaginable not to use their chippies on my work. For today I have a mixed media halloween pumpkin. Enjoy my post....

October Fun


Amazing 2Crafty Chipboard used: 
Giant Gears
Fine- Word Set ~ Months ~
Funtimes Mini Title
Mini Branches
Mini Word Set 1
 Corner Steampunk 6


The mini branches are treated with only two layers of green embossing powders for the other pieces I used some white gesso on them first and then added two layers embossing powder. For the word "fun" I added three layers on the lower part of the word.


This was such a fun project to create all the flowers are hand made {my new addiction} with fabric the pumpkin I had in my stash for a long time and I finally got to use it. I am also hooked on the fine words especially the months.  

Thank you so much for stopping by I will be back next month with another project hope to see you back then....I hope I have inspired to create something pretty and have fun while doing so. 

Meanwhile if you would like to see more of my work you could visit here: 

Amy's Pretty Papers

Monday, October 21, 2024

Boo - Laura Gilhuly

 Hi Everyone!

Halloween is an awesome time! 
 Our sons always dressed up for Halloween then let me take lots of photos, and getting the fabulous Halloween themed chipboard from 2Crafty makes creating Halloween themed layouts a breeze!


2 Crafty products used;


Halloween Set 4

Halloween Scary Fence

Batty Boo


I painted the bats from the Halloween set and the Boo title but added silk microfine glitter to the title


For the fence I covered in white gesso, then an orange gelato crayon, black paint and grey ink.  For the skull I used the grey ink and orange gelato


Thanks for stopping by


Friday, October 19, 2018

Halloween by Elena Martynova

Happy Halloween to everybody!!!
 Since we are in October & 2 Crafty Chipboard have some REALLY COOL Halloween
 themed chipboard pieces!
I thought it would be a perfect time to create this canvas!
My family doesn't celebrate Halloween, but I still like to do something for the this holiday.

I've used bits of
Chicken Barbed Wire Small 
 to decorate the edges of the canvas.
 It is painted with black acrylic paint and covered with Prima Metallique Wax White Gold


 Figurines of the witch, the cat and the pot I took from a Halloween Set 3 

Started with adding a bit of texture paste to Graveyard Tree with bats.
 Then covered black paint and Prima  Sparks - Unicorn's Hair. 


 I coated the gravestones with craquelure varnish to create the effect of old cracked tombstones.


 Look at this gorgeouse Halloween Night Title!
 I really like how the letters "L" put on funny shoes!

2 Crafty Chipboard used:


I'll be back again next month..
Till then HAPPY SCRAPPIN!!

Sunday, November 8, 2015

October Shares with Beck Beattie

"Best Birthday"

Hi, it's Beck Beattie here with my October inspiration shares
I decided this month I would focus on some different products you could use to easily colour
 up your chipboard pieces.  Both of these products (one used on each layout) are often my go 
to when I want to add a little colour mostly because I have the most amount of different colours.  


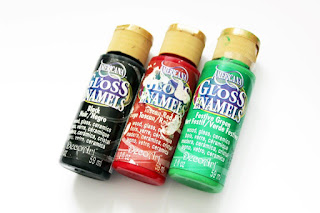
For this first layout I decided on using Gloss Enamel paint.  I love how easily it coats the
 chipboard, adds a little gloss and also dries rather quickly for paint.  I used these three
colours on the different chipboard pieces.
Sometimes when I want to achieve a brighter colour on the chipboard I will apply a coat
 of gesso first to give it a white base.  I decided upon doing this with the title and also the red arrows.


I also used Faber-Castell Design Memory Craft Gelatos and Tinby Designs Metallic Melts 
in my background to contrast the strong colour of the chipboard pieces.

   2Crafty Chipboards Used:
Mini Fast Forward Arrows  
Square Collage Pane
Birthday Sentiments


"Live Laugh Love"
For my second layout, I focused on the use of Copic Markers to colour up my pieces. 
I didn't use any priming such as gesso as a base on any of them and I was quite pleased 
with how the colours came up.  Sometimes in the past I have used Gesso for a brighter
 look with some of the lighter colour markers.


These are the Copic Colours I used:

The "Live Laugh Love" word comes up so nice with the orange marker against the other colours.  


  It was SO easy to colour up the Interlocking Grid panel with the marker. 
 I used the wedge tip end when colouring up each of the pieces. 


I used the black for the circle as I wanted to create some added depth but not take
 away from the title.  Just love how it came!


Layering up the pieces really takes focus to the photo.  

I co-ordinated the coloured chipboard with watercolours and stencilling in my background
 as well as some background stamping.

2Crafty Chipboards Used:
 6 inch Circle Revolution frames
Interlocking Grid Frame
Live Laugh Love words


I hope you enjoyed my share this month on the 2Crafty blog!

Happy Crafting
xxx Beck BT
 
Photobucket