Showing posts with label cog nested frame. Show all posts

Tuesday, July 8, 2025

Boys Will Be Boys - Laura Gilhuly

 Hi everyone!
I am back to share another fun masculine layout I created of our youngest!


2Crafty products used:


Steampunk Gears Small
Steampunk Gears Medium
Chevron Bits
Industrial Light Bulbs
12x12 nested Cog Frames
Boys Will Be Boys Title


I wanted to keep with the masculine grungy feel


I covered all the pieces with the exception of the lightbulbs with texture paste and allowed it to air dry


I used Dusty Durango stampin' up ink pad and orange brusho powder on the rust colored pieces including the lightbulbs


I used a combination of uncharted mariner and faded jeans distress oxide inks with turquoise brusho powder


When all the pieces were dry I dry brushed white paint overtop to accent the textures.

Thanks for stopping by


Friday, April 12, 2024

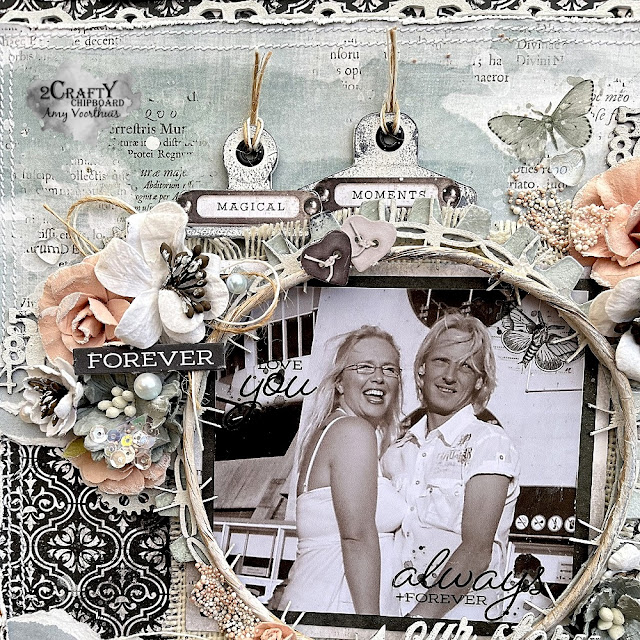
"Our Story" with Amy Voorthuis

Hi lovely creative peeps, 
Hope you are enjoying your day! I am always in my happy place while creating for 2Crafty Chipboard and all their lovely chipboard designs I just can't imagine to not use their chipboards on my work as they are so detailed and wonderfully designed.
 For this layout I have used some papers by 49 and Market as I was dying to dig in and again they don't disappoint. They are such a great fit together that I started a new page already. 

For this layout I have used a picture of my husband & I at a party called "Sensation White" way back {feels like a lifetime ago} enjoy my post.... 

Our Story: 


2Crafty Chipboard used: 

You know what's amazing, you can order directly from the
2Crafty website here so you can also play with their amazing chipboard pieces.


This time I haven't treated the chipboard pieces a lot since I didn't want them to be shiny or have a lot of color. The nested cog frame that I used around my photo is the only piece that I wanted to stand out from my work so that one I gessod two times with white gesso & used embossing powder on{blue with a pink shimmer on it} 


I have used the large one of the square barbed wire frames and just gessod it with two layers of white gesso and the cut it in pieces to later add them on my nested cog frame after that I used some charcoal black wax what I also did with the rest of my chipboard pieces. 


Only on the gears I used a thin layer of gesso and left some parts of them a little more raw. For the bulldog clips I just added a word from the 49 and Market collection that I raised up with some foam tape. To soften my page I added some white spray & matte white wax. 

  Thank you so much for stopping by I will be back later this month with another project hope to see you back then....

Meanwhile if you would like to see more you could visit here: 

Amy's Pretty Papers


Sunday, August 5, 2018

August - Vintage Mixed Media Layout and Video with Kripa

Hello friends,

'You are not old, your Vintage'

This month, my scrapbook layout is inspired by the moodboard at 
I wanted to add a lot symbolism in my layout and 2crafty chipboard had so many pieces that were a perfect fit. With plenty of options, finally here is what was chosen - one Moroccan Swirl, handful of Steampunk gears Small & medium, a frame each from the 6" Circle revolution frames & Cog Nested Frames and the negative of the Leafy Twig Branches.


I find it hard to get rid of the negative of the chipboard once the pieces have been used and try to incorporate them in the layers behind the photograph. But, in this layout, I used the negative of the Leafy Twig Branches as a stencil to paint leaves while making the background. Most of it got covered up, but there are still some visible in the left side of the layout.


All the chipboard pieces were coated with white gesso and then painted on with teal or rust brown colour spray. The flowers on the Moroccan Swirls were left with just white gesso. One swirl has been cut in half and each half tucked on top right and bottom left part of the photograph.


I hope you enjoy the video tutorial.

Thanks for stopping by today.
Happy creating,
Kripa

2crafty chipboard used:

Moroccan Swirls
Cog Nested Frames
Leafy Twig Branches
Steampunk gears Small
Steampunk gears Medium
6" Circle revolution frames


Friday, July 20, 2018

July Inspiration : Art Journal PLUS Video tutorial
By Kripa Koushik

'What if I fail? But, Oh Darling, What if you Fly?'

Hello friends,

My second project for this month is an art journal page...


To begin, one piece each from the sets  
12" Clock face frames 
6" Clock face frames 
 Cog Nested frames 
was glued down and covered with black gesso. All the violet colored chipboard 
pieces were first coated with black gesso. All the rest were covered with white gesso.


I layered the chipboard pieces over and under tags cut out of pattern paper. To add dimension,
 I've popped the flower doilies on top of the chipboard circles that are the negative
 from the clock face sets.


I hope you enjoy the video tutorial...

TO VIEW VIDEO CLICK HERE....


Thank you for visiting us today.

2crafty chipboard used:
- 12" Clock face frames
- 6" Clock face frames
- Cog Nested frames
- Leafy Twig Branches
- Decorative Rod Set 2
- Flower Doilies


Saturday, May 5, 2018

'Perfection' Scrapbook Layout
By Kripa Koushik

Hello friends,

Its starting to look & feel like autumn here, yet I'm unable to move away from lush green
 & pretty pink flowers. So, my project today is a layout that looks a lot like spring.

"Perfection"


As the background was dark and provided enough contrast, I decided to paint the chipboard
 pieces to blend in with the colours on the pattern paper. Layers of pattern paper & chipboard
 have been built on top of a piece from the Cog Nested Frame. A smaller piece from the
same set has been used in the top right cluster. Tucked in between layers of pattern paper
and lace are pieces from...
 Leafy Shrub Set 1, Mini flourish bits, Gigi's flowers & groovy flowers.

All the chipboard pieces were coated with two layers of heavy gesso. Dab the gesso using
a make up sponge to get a rough application. Once completely dry, paint the  
Cog Nested Frame, Leafy Shrub Set 1, Mini Flourish Bits with shades of pink &
 green Twinkling H2Os.  
Gigi's flower got a coat of dark burgundy acrylic paint and Groovy flowers peach acrylic paint.
 

 Finally, the title piece - Perfection.I didn't add any colour to the title piece, its just
coated with several coats of white gesso.


2crafty chipboard used:
* Gigis flowers
* Perfection Title
* Groovy Flowers
* Leafy Shrub Set 1
* Cog Nested Frame
* Mini Flourish Bits

Thank you for stopping by today.
Until next time, happy creating!
Kripa