Showing posts with label Day at The Beach. Show all posts

Thursday, June 20, 2024

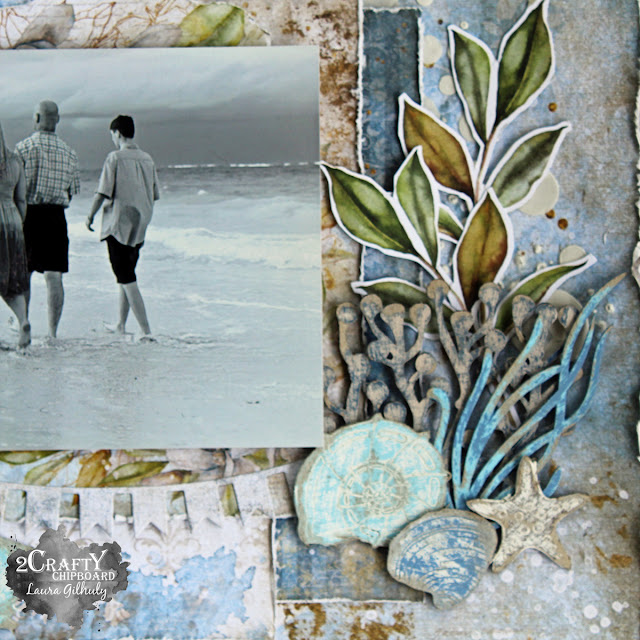
Day At The Beach - Laura Gilhuly - Tutorial

 Hi everyone!
I'm back today to share my newest layout for 2Crafty and a small tutorial on how I
 created this layout and altered the fabulous chipboard!


2Crafty Products used


Seashells Set 2

Day At The Beach

Seaweed Set 1


Part of my creative process is to gather all the products I may need even if I don't use them all


I used 

2Craftys seashells

2Crafty day at the beach title

2Crafty Seaweed set

1-12" sheet of paper

3 - 6" squares

4 - tags

1 - 5" circle and 3" circle - cut the 3" circle in half

1 - die cut banner

3 - 12" paper strips cut from the end of papers or 1/4" cut in half

a few fussy cut flowers/branches/leaves

stencil

modeling paste

clear gesso

edge distresser or scissors

heat gun

sand paper  (I used 100 grit)


Step 1 - paint all your 2Crafty chipboard with coordinating colors to your paper. Allow to dry or heat set. I used white, blue, and brown.  I had to mix paints together to get my desired colors.


Step 2 - Paint all the 2Crafty chipboard a second color - not the same as your bottom coat


Step 3 - using your sandpaper, sand some of the top coat of paint off so the bottom layer and some of the chipboard shows through.  It will look something like this;


Step 4 - Cover your background paper with clear gesso

Step 5 -apply your stencil using modeling paste in various spots on your paper and heat set


Step 6 - Use your edge distresser on all papers

Step 7 - Layer your tags, then your 3 sheets of 6" paper and circle and your photo


Step 8 - Cut your paper strips to desired lengths and apply to top and bottom of your project along with cut circle, images and a seashell


Step 9 - add your banner and create your cluster using your 2 crafty chipboard on the right side of your photo


Step 10 - Add a couple of die cuts/fussy cut images then your title and your seashells


Hope I have inspired you to create!


Tuesday, September 10, 2019

Day at the beach
by Sabrina Turpin

Hello 2Crafty friends!

Summer time has officially come to a close here with my kids going back to school after two months of fun and amazing memories! They're happy to see all their friends again but they say they already miss the beach and can't wait to go back next year. We've been going for 4 straight years now and they enjoy it even more every year.

The layout I'm sharing today show them with the same pose taken on each of these four years. We made it so they wore the same swimsuit the first two years, but they've been growing too fast for us to repeat that after. 

"Day at the beach"


On the "Palm Leaves Set", I applied a green embossing ink and then applied green-gold wax on top.


For the "Flower set 1", I inked with teal ink and then used a blue embossing ink on top.


On the "Fish Net Bits", I used teal wax applied with a small brush.


For the title, "Day at the Beach", I used a blue-white-gold embossing enamel.

I used the following 2Crafty chipboards in this layout:
Palm Leaves set [M00739]
Fishing net bits [M00657]
Day at the beach [W00423]
Flower set 1 [M00817]


That is all for me today! I hope you enjoyed this and that it will give you some inspiration for your creations! And if your kids are going back to school, I wish you and them to have a good time! I'll be back soon with more ideas to share.


Monday, August 5, 2019

Day at the Beach - With Karan Gerber


Hi Friends and welcome to the 2 Crafty Chipboard Blog today, I am sharing a altered
 canvas with you showcasing some fabulous chippies.
 I really love the titles and enjoy working with them. 


I gessoed the title and heat set, then applied a few coats of various mists to achieve the final color


The journey ATC banner I just kept plain.
 The grid panel I cut into pieces and used on either side of my project and cut off
 pieces to detail throughout. 


Materials Used:


Thanks for stopping by, see you next time.


Friday, June 21, 2019

Pretty in Pink - Day at the Beach
By Marie Claude Rodier
PLUS A PROCESS VIDEO TUTORIAL

Hi,

I'm happy to be on the blog today to show my latest creation using lots of 2Crafty chipboards.


You will find a process video at the end of this post.
I hope you will enjoy it.
"Day at the beach"


Summer has finally arrived in my part of the world and it's officially beach season!!!
Instead of the traditional blue/teal color palette used for this kind of layout,
I chose a monochromatic pink one.

I love how it turned out and I hope you do like it too.


Day at the beach title was first coated with white gesso and
then embossed with rose gold embossing powder.
To get constrasting white edges, I let my embossing gun heat up a little longer on the edges.


Pointed Doily Frame was also basecoated with gesso and
then embossed with pale pink embossing powder and tucked behind the photo.


Palm Leaves set and Foliage Set 1 were first basecoated.
Palm Leave set was embossed with pale mint green.
Foliage Set was embossed with with pearl powder then partially covered
with a light coat of white gesso and a few touches of pink Gelatos.

TO VIEW VIDEO CLICK HERE..


2Crafty Products Used…
Day at the beach
Foliage Set 1
Palm Leaves Set
Pointed Doily Frames


Until next time, be happy and be creative!
Marie Claude
xx

Monday, April 9, 2018

April Projects & Video Tutorial with Kripa


Hello friends,
Today, I have two scrapbook layouts and a video tutorial to share with you all.

‘Journey’

A few days ago, I found a box full of travel photographs and decided to make layouts of at
least a few of them. Instantly, I decided to use the World Globe chipboard piece as the main embellishment. Once, the papers and basic composition were finalized, I chose
 Groovy flowers and the word journey from Mini Travel Word Set 1 to add along.


 I almost always paint my chipboard pieces and started off by applying a layer of white gesso
on all pieces. The groovy flowers and world globe got a layer of peach paint. After the first
layer dried, I applied white paint on the World globe to tone down the colour and then
stamped using green ink. You can see the exact process in the video tutorial below.


I wanted the title to stand out glossy as opposed to the matt layers of paper,
so it was embossed with white embossing powder.


Here is the video of how the page came together.
I hope you enjoy watching.

TO VIEW VIDEO CLICK HERE


2crafty Chipboard Used:
* World Globe 
* Groovy Flowers
* Mini Travel Word Set 1

'Day at the Beach'

This a layout is all about a day at the beach. The photograph has been altered to
sepia tones to keep with the shades of teal, blue and brown in the layout. 

As is my usual style, I applied a layer of white gesso on all the chipboard pieces
 – Fishing Net Bits, title – A day at the beach and a few ATC Tiny stars. The first two
 pieces were painted on with a few blue shades of twinkling H2Os. I was after
a distressed look, so only applied paint in a few places.


The stars on the other hands were painted on with Vivid Ultra Metallics True Silver. The
 stars are tucked under layers of fussy cut elements - can you spot one behind the pirate ship?


2crafty Chipboard Used:
* Fishing Net Bits 
* Title Day at the Beach
* ATC Tiny hearts & Stars

Thank you for visiting us today.
Happy creating,
Kripa


Thursday, January 11, 2018

January Inspiration by Tammy Klingner

Good morning 2 Crafty lovelies!
I'm excited to be back again in 2018, sharing my 2Crafty Chipboard creations with you.
Let's get started......first up I have a creation called..

 "A Day at the Beach"


This is what a New Year's Eve looks like in Australia..... a warm night spent
at the beach with family playing cricket.  Perfect!
I used the following 2Crafty Chipboard:
"Day at the Beach title"
"6 inch Revolution Frames"
"Circular Panel"
"Hessian Patch Panels"


I cut one of the "Hessian Patch Panels" in half and then applied white gesso.
I popped this behind my photo.


I also applied white gesso to a small circle frame from the "6 inch Revolution Frames".
I added this on top of my photo, to frame the focus of it.


I then added the "Day at the Beach title".
I love the mix of fonts in this....the print mixed with the script.
I applied a few layers of  Distress Inks in various colours  to the title until I achieved the
 colour I was after - I don't have purple so I kept applying teals and pinks until the right
 purple appeared. I love the splodginess (is that a word?) of this. I think this adds to
the beachy water theme.


I added some circular stamping to my background, and cut a few circles from the 
"Circular Panel" to  add to the background, giving some texture and interest.
I like how the circles go with the water/beachy theme too.


 To colour them, I added gesso and then couldn't find my brown ink,
so I created my own using coffee!!
When I create, I don't like to spend a lot of time searching for something, so I get
creative and work with what I have.....so on this occasion, coffee it is!!!


 I love all the layers on my layout......I adore the texture and interest that Chipboard gives.


 A page celebrating summer in January in Australia!


My second creation is titled...

"You Shine"


 A layout celebrating my kids academic achievements last year.....super proud of them.
 I used the following 2Crafty Chipboard:
"You Shine Title"
"ATC Tiny Hearts and Stars"
"Number Panels"
"Pine Needle Wreath"
"Crazy Stitched Panel"


I began by trimming down the "Crazy Stitched Panel" and painting them black.
These formed part of my background.


I painted the "Number Panels" black and then swiped them with some Finnabair Opal Magic Acrylic Paint in Aqua/Rose.  Over black this gives a lovely teal metallic finish.
 I applied it randomly as I wanted it to have a grungy finish to go with my background.


 I painted a "Pine Needle Wreath" in white gesso.  These are a new 2Crafty product,
and they are gorgeous.....not just for Christmas time!  I poked this behind my photo.


I added the "You Shine" title on top of my photo, and coloured it using Distress Inks. 
I love the matt finish and the grungy look it gives the chipboard.


Finally I added some stars from the "ATC Tiny Hearts & Stars".
I again used Distress Inks and a few swipes of the Opal Magic paint,
and placed them randomly on the layout.
Well that's it for me for January.....I will be back next month to
share some more of my 2Crafty Chipboard creations.
I hope this has inspired you to get creative.