Showing posts with label Elegant Flourish. Show all posts

Monday, June 13, 2016

June Projects
By Priscilla Lim

Hello 2Crafty fans,
Ready for more inspirations today? :)
 
  But before we start....
Please remember while you are here  to become a blog follower & leave a blog comment to
be eligible to go in our monthly draw for a great chippie prize pack.
 
In this post, I will be sharing 2 layouts of different themes.
Here's the first layout based on a photo we took recently on our outing to Universal Studio Singapore.
 

On this layout, I wanted to have some clean space and also focus on layering the 
chipboards and flowers which I have fussy cut from a Bo Bunny pattern paper.
Here are some close up photos for more details. 
Note that I have lightly applied a layer of gold metallic paint to all the chipboards.
 

I have popped up the photo with some 3D glue dots and layered the title 
"Happiness is This" on top of the photo to make it really pop :)
In this photo, you get a glimpse of how I have layered the fussy cut flowers as well.


Here is another example of how I raised up the title chipboard with 3D glue dots which 
adds to the attraction and definitely looks much better than lying flat on the paper. 
It gives the whole layout a  dimensional feel too.

 
In this last photo, I would like to zoom down to the worn look of the border chipboard. 
This is easily achieved as I have only lightly applied the gold paint and still allow some
 parts of the original chipboard to come through.
To finish off the layout, I have added on some speckles of gold and white paint around 
the page. Hope you like what  have share today and these are the 2Crafty chipboards used:
 
 
2Crafty Chipboard Used
Festive Music Notes 
 Happiness is This Mini Title 
 
Festive Music Notes (unit of 3)   Happiness is this Mini Title (unit of 3)  
Just the 3 of Us and Chevron Bits
Just the 3 of Us (unit of 3)  Chevron Bits (units of 3)
 
 
For the second layout, I'm turning the spotlight to my boy.
 
Lots of Tim Holtz distress inks and stencils were used on this page.
 
 
Scroll on to check out the close up photos and write up on how I have altered the chipboards.
 
 
On this title chipboard, I have actually gave it a layer of white gesso, followed by dabbing
 Tim Holtz distress ink in broken china and ripe persimmon. Topping it up with a last
 layer of black gesso.
On the Harlequin clumps, to get the rusty look, I have dab with distress ink peeled paint,
 and aged mahagony and added on some white speckles.
 
 
On these chipboards, I have dabbed them all with distress ink directly to the raw chipboard.
  • On the flourishes, they were very lightly dab with distress ink in black soot so that part of the original chipboard still shows.
  • On the interlocking grid panel and arrows, they were dabbed generously with distress ink in ripe persimmon. I allow the ink to soak into the chipboard. Another reason why I have directly inked on the raw chipboard is to allow the ink to appear in a darker shade.
  • The circle frame was actually from a left over chipboard that was holding the original piece. I dabbed it with distress ink in broken china, add some white speckles and to complete the look, I gently rub on some black gesso with my finger :)
  • As for the star chipboards, I have inked them with distress ink in weathered wood, add on some white speckles, and dab on the left over black gesso from my finger.
  2Crafty Chipboards used:
Asst Arrows
Love You To The Moon Set
Interlocking Grid Panel
 
Asst Arrows  (units of 3)  Love You to the Moon Set (unit of 3)  Interlocking Grid Panel (units of 3)
Elegant Flourishes, Handsome Little Man, Harlequin Clumps
Elegant Flourishes (unit of 3)  Handsome Little Man (unit of 3)  Harlequin Clumps  (units of 3)
Thank you for popping by!
Photobucket

Friday, June 6, 2014

Two Layouts & an Off-The-Page Project
From Helen Tilbury

Hello 2Crafty friends & followers!
I hope you are all well & ready to be inspired!!
 It is HELEN back with you today to share a few projects, 
starting with a layout inspired by the monthly mood-board
 challenge over at Prima.
 

As you can see I managed to use FIVE pieces of gorgeous
2Crafty Chipboard on this page & absolutely love the tactile
addition of it!  Let's take a closer look shall we...


I used a couple of TINY LEAFY STEMS that are not that tiny,
as you can see!  And they come in a multi-pack so are great value!!
I painted them roughly with some texture paste, using a spatula,
then rubbed some gelato onto some parts & blended with a baby-wipe.


I love the messy look it creates & still seeing parts
 of the raw chipboard peeping through!


I used another TINY LEAF STEM coming out from underneath my
stack of papers beneath my photo, using exactly the same technique.
Also notice above that I used the PRECIOUS title & simply pressed
it loosely into my black archival ink pad then rubbed some texture
paste onto it in random places for texture & to brighten it up!


For my "Love"title {Photo Adornment - Love Flourish} I first dabbed it
 with texture paste then went over it with a black photo-marker pen 
{writes over just about anything!} using some messy/doodly lines
 & some cross-hatch shading, to define it, then rubbed in some gold
 gelato to soften it up a bit & add some shine.


I also added some gold gelato to my "Precious" sub-title
 & adore the lovely glimmer it gives.  Not too garish at all
 & GOLD is just so IN right now.  


To the right of my photo I tucked in an "Edgar Swirl" photo adornment.
I treated it in the same way as my "Precious Love"title & love the 
subtle touch it adds.  It comes in a double-pack so I have one
left for another project - yay!


A closie of my texture paste/gelato technique...


Both techniques used on this layout shown above.


Have you ever thought about "scratchy-doodling"on your chipboard?!
I want to do it more now - it was fun & looks COOL I think!!

--------------------------
 
 
My next project is an OTP {Off-The-Page} project made as a gift for a friend.
I was going to make her a canvas but mysteriously "mislaid"ALL my canvases
LOL in my studio so used a Ferrero Rocher box instead :)  {I have since
found the canvases by the way...!!} but the acrylic box worked really well!!


I made use of quite a few pieces of 2Crafty Chipboard on this piece too.
Along the left I have the Elegant flourish - cut into 3 separate pieces,
above & below the photo & also coming down from the edge of the frame.


Then along the right hand side I have used the Madeline Flourish Frame.
For all the chipboard here I have used the same technique, I have first
sponged it with good quality gesso for a smoothish finish, then stamped
freehand {no acrylic block} using my favourite Finnabair stamp from Prima.


 My inspiration for this project came from the Prima BAP {sketch} for this month. 
 It was full of hexagons which is what inspired me to use the hexagon stamp.
Stamping on chippie is a really fun technique & always looks so intricate & 
effective yet is super easy :)


Above you can see the elegant flourish on the left & the Madeline Flourish Frame 
on the right {well a tiny portion of it!}


I love how the end of the Elegant flourish looks like the butterfly's trail :)

The fencing I've used is also from 2Crafty - Ornate Fence & comes as
a 12"border but of course can be cut up & customised to suit your page.


For continuity I repeated the hexagonal stamping on the background as well 
as on the chipboard so that, in parts, it blends in, which I think looks awesome!


In keeping with the movement of the flourish I added some whispy
cheesecloth underneath my main quote photo too.  This was really
SUCH a fun project to create & I cannot WAIT to hand it over!!

------------------------------


Lastly I am sharing a project that is from a recent Guest Designer
gig at Colour, Stories, Inspiration {CSI} a few months ago.


For all the details you can check it out on my blog HERE if you are interested.


The 2Crafty Chipboard I used here is the Twiggy Branches
I love how versatile it is as it is quite big so can be cut into
 many smaller pieces.  The rounded leaves reminded me of the plants 
we get here by the sea so I thought they tied in well with my beach photo.


For this very pale page I just sponged the chippie lightly with some white
 acylic paint & stapled the pieces on in parts to go with the masculine look 
as well as to bring in more silver to tie in with my title.


I used to be scared of chipboard years ago because it wasn't "ready"!
In other words I had to DO something with it before I could use it...
NOW I LOVE it for that very reason!  A touch of paint, glitter, gelatos,
stamping, texturing, embossing...there really is no embellishment as versatile.


I hope you have enjoyed my shares today & I will be back with more
2Crafty inspiration in July.  Keep crafting with 2Crafty :)
 

HELEN
 
Photobucket

Saturday, January 25, 2014

A Couple of Christmas Layouts
Plus My Scrap Around The World Page
By Helen Tilbury

Hi there 2 Crafty fans!
HELEN here sharing my very first 2 Crafty post with you today :)
 

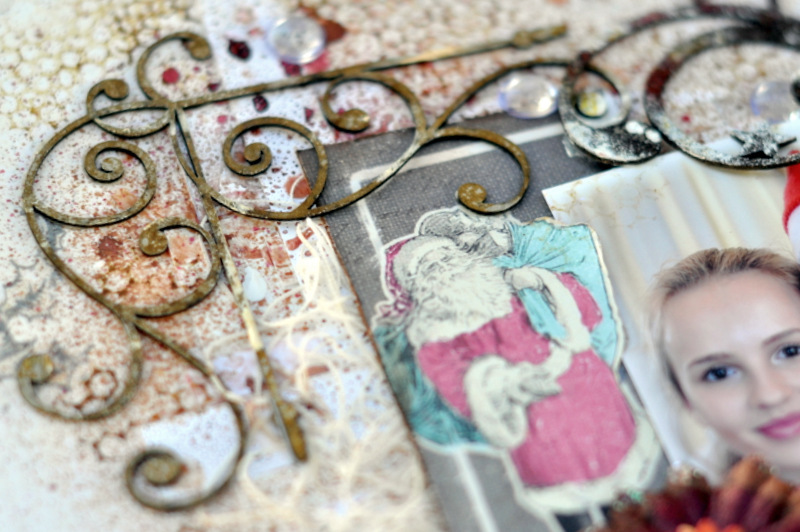
For this page I used 3 pieces of 2 Crafty chipboard.
The largest piece, with the hearts, is the 'Corner Heart Spray.'
The two bottom pieces come from a set of 3 pieces called the
'Leafy Shrub Set 1' - a gorgeous set indeed!!


I have already edited & printed out my Christmas photographs
& am determined to get them all scrapped asap!  


I enhanced the chipboard using a red gelato from Faber Castell,  
applied randomly then spread with a baby wipe.  I then sponged
highlights of gesso on using a small sponge & lastly I added some
sparkle to random areas using some glittery gold varnish.


I love the 3D 'shaded' look the chipboard takes on when given this treatment.
I also added in some other gold accents by means of glittered-up alphas, twine
& 'to die for' gold doilies sent to me from the USA - serious LOVE!!


You will usually see that I treat my chipboard in an uneven manner
rather than painting, embossing, etc all over in a uniform style.
To me this makes the effect look more artistic.


I LOVE the 'Corner Heart Spray' piece!  It is really
substantial & makes for SUCH a dramatic focal point...


I also love how in this instance it reminds me of Christmas ornaments/
decorations draping down from a branch.  Perfect for this layout!!

----------------------------------------------

I completed this next layout, also along the Christmas theme,
using three  very different pieces of chipboard as I challenged
myself to see how effectively I could get them to work together!


The large piece of chipboard positioned under the photo, coming 
out from the top right, is the 'Corner Christmas Star Spray', which
 I cut into two pieces, placing the smaller piece underneath the photo.


Working around the layout in an anti-clockwise fashion,
from the top right, here in the top left corner I have used
another piece of 2 Crafty chipboard - 'Corner Marisa'.


I gave the Marisa Corner a completely different treatment to the large
 ' Corner Christmas Star Spray'.  On the large Star piece I embossed 
using  Lindy's Stamp Gang Embossing Powders in Midnight Copper
 & Candy Cane Red Gold, both applied randomly then sponged with 
gesso, with some areas deliberately left raw too.


To add more texture & interest to my chipboard I added some white 
threads underneath them, which I first swirled around to encourage 
them to lie in a random pattern.  I also added some staples here & 
there as I love the industrial look this adds.


I used a beautiful swirl on the right of my photograph - 
it is called the 'Elegant Flourish' & is sold in a pack of 2.


I treated the 'Marisa Corner' piece & the 'Elegant Swirl'
both in exactly the same way.  I stamped  randomly over
each using Vintage Photo Distress Ink by Ranger,
 then sponged some small areas in white gesso.


I hope you enjoyed my two Christmas themed pages this month & that they 
have inspired you to use 2 Crafty Chipboard on your layouts - it doesn't
even need to be specifically Christmas themed as I've shown you :)

--------------------------------------------------------

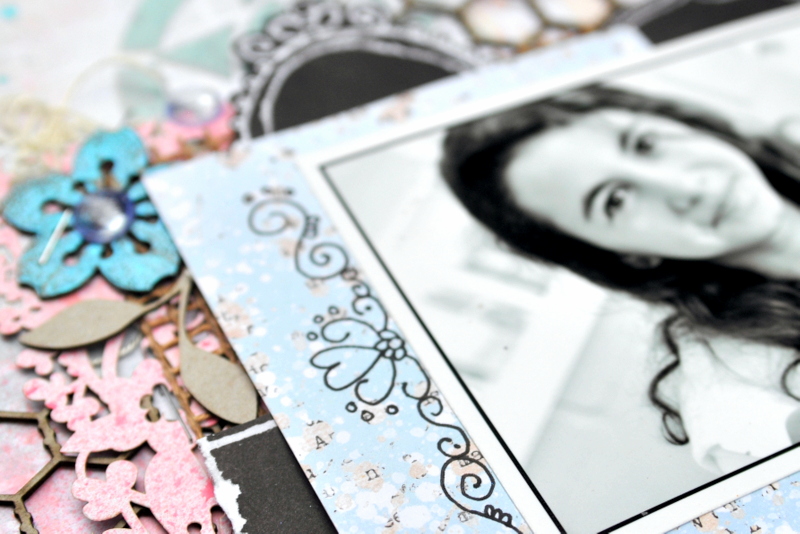
Now onto something completely different!


Here is the very beautiful Mood Board from Scrap Around The World,
together with my Design Team interpretation of it, using plenty of pieces
of 2 Crafty Chipboard tucked in here, there & everywhere!
{You can join in the fun too!  Entries close 31st December midnight EST}


I layered up lots of different textures & cut up the 2 Crafty 'chicken-wire'
sheet into 4 different pieces to use on each side of my photo cluster.


Above, you can see I used a leafy branch 'Summer Leaf Stems' that I also
 cut up into three  different pieces to tuck into different areas of my paper cluster, forming
 a visual triangle.  I used about half the pack {it is sold in a set of 3 leafy branches}.


At the top right here you can see I used a chipboard flower, which I embossed
 with Lindy's Stamp Gang Embossing Powder in Hydrangea Blue Mauve 
- a truly beautiful colour!  I have one in the opposite corner too...


These flowers are called 'Sakura Flowers' when you buy them from
2 Crafty.  I chunky embossed them by using an embossing dabber 
instead of an embossing pad, as it gives an uneven texture, which
is just what I love!  With some areas left raw too...


I added a glass pebble on top of each 'Sakura Flower' & some pink 
candy cane twine underneath them.  Chipboard is SUCH FUN 
as there are just so many ways you can add detail to it!


I added some doodling around the leafy stems above, just for a bit of fun :-D


Chipboard is often 'the cherry on top' of projects - in other words -
just what the doctor ordered to finish off a piece to perfection!


I hope I have inspired you to order your next (or first!) consignment
of 2 Crafty Chipboard & get experimenting!  As you can see, the 
possibilities really are endless.  Whether you let the raw beauty of
the pieces shine through, by not enhancing the chipboard pieces at 
all - like I have done in the layout above, or whether you dress-it-up
with all sorts of glitzy paints, powders and/or varnishes - chipboard
is a MUST HAVE & 2 Crafty Chipboard has an awesome selection!!


Photobucket